
 Facebook
 X
X
 Pinterest
 Copy Link
What Millennials are Looking for in an Apartment or Condo


LinkedIn recently told us that 4,279 new apartments were added to Seattle’s local inventory last year, and based on the number of cranes you constantly see around the city, we believe them. With so many choices, Millennials are getting really specific about what they want in a living space and the lifestyle it provides them. Here are some of the amenities we’re told that Millennials have come to want, and in some cases, expect:
1. Parking & Electric Car Charging Stations
2. High Speed Internet and WIFI (around the entire building). Preferably free WIFI on the first floor
3. State of the Art Fitness Center – Fitness centers not only act as a place for exercise, but now a place to casually socialize and build friendships. For instance, when a developer integrates fitness classes into the gym, they are creating a space where tenants can connect with their building community.
4. Dog Grooming/Washing Facility & Outdoor Pet Run: As many millennials are postponing starting a family to focus more on their career, their pets are like their children. With that said, an apartment building that doesn’t allow their fury friends will ultimately be losing out on a big portion of the millennial pie.
5. High- Tech Control Automation: Using smart technology to control your thermostat, lights, switches, sensors, and locks while you are away.
6. Business Center/ Work From Home Space: With remote work becoming an increasing popular trend, the potential ways of catering to work-at-home tenants are limitless.
7. Laundry Facility/Service and Dry-Cleaning Drop Off/Pick Up- Laundry is a hassle, and most renters want the burden of doing laundry to be, well, less burdensome. Programs like “Laundry View” are used in some apartment buildings to view how many washers and dryers are in use. It will also send you text alerts when your laundry is done.
Read the full article on LinkedIn.
For more information on Windermere Evergreen please contact us here.
Refinancing: What you need to know

 Thanks to all-time-low interest rates, the number of homeowners refinancing their mortgages is at an all-time high. Of course, no one should refinance just because everyone else is doing it. But, for many homeowners, the benefits are simply too hard to ignore any longer.
Save money each month. According to Freddie Mac (The country’s largest purchaser of home mortgages), the average homeowner who refinances is able to cut their monthly payment by $108 (almost $1,300 per year) for a $200,000 loan.
Save even more in the long run. If you currently have a 30-year mortgage, refinancing with a 15-year version can save you thousands of dollars in interests over the life of the loan, plus allow you to build equity in your home faster than ever.
Switch to a fixed-rate mortgage. Refinancing with a fixed-rate mortgage gives you the security of knowing that your monthly payment will remain steady, regardless of whether lending rates rise or fall in the years ahead.
Access emergency funds. Something the mortgage industry calls “cash-out refinancing” allows you to take out a new mortgage for more than your current principal balance and use the additional money for other expenses (remodeling, college, a major medical procedure, etc.). Of course, this option should only be considered if you have a real need for the money and a solid plan for paying it back.
Consolidate debt. While consolidating credit card debt under a home loan may not be wise (unless you have a plan for controlling any additional spending), refinancing to consolidate two mortgages at these record-low rates can provide significant savings in both cases.
Things to consider beforehand:
Before moving ahead with a refinance of your own, a number of factors need to be considered (and numbers crunched) before you can determine how much you’ll actually benefit and if you can qualify for the best rates:
Closing costs. The fees associated with refinancing your mortgage are called “closing costs” and generally add up to somewhere between three and six percent of your loan amount (between $7,500 and $15,000 for a $250,000 mortgage refinancing). While there are ways to lower some of those costs, you’ll still want to weigh those expenses against how much you stand to gain.
For example, let’s say you figure you’ll be able to save $100 per month by refinancing, and you’ve calculated the closing costs at about $10,000. That means you’ll need to continue living in the house for at least eight more years before the savings surpass the closing costs. In the mortgage industry, this is referred to as the break-even point; and the longer you continue living in the house beyond the break-even point, the more money you’ll save.
Your credit score. It depends on the circumstances, but most borrowers will need a credit score of 700 or higher to get access to the best rates and closing costs. To determine your score, get a copy of your credit report from Experian, Equifax and TransUnion. (Why all three? Because, if there’s any difference, most banks will use the lowest score.)
Your current level of home equity. To qualify for refinancing, your current level of “equity” (the difference between the market value of your home and the balance of your current mortgage) typically must be 20 percent or more. That means, if the market value of your home is $250,000, the remaining balance on your loan would have to be $200,000 or less.
Pre-payment penalty. Check to see if your current mortgage includes a pre-payment penalty for refinancing. That would likely make refinancing too expensive even at these record-low rates.
The importance of timing
Mortgage rates have sustained record lows over the last few years, and they will likely stay relatively low for the next few years. However, even a small increase can make a drastic change in the amount of money you will pay over the duration of your loan. Getting the lowest rate you can, will benefit your finances over the long-term.
Getting the process started is easy. Begin by checking your equity and credit score, then crunch the numbers using one of the many online mortgage calculators.
If the initial results look promising, ask your Windermere Real Estate agent for a recommendation on a reputable lender (or mortgage broker) who can provide you with an actual quote.
An Agent in Seller’s Clothing


Have you ever wondered if your real estate agent understands what you are going through? They come into your house speaking confidently about your neighborhood and market trends. They have vendors ready to help you prepare your home for sale. But do they really think it’s that easy? Do they understand the conversations that follow once they’ve left your dining room table? Have they lain awake at night in worry?
You might be surprised.
I’ve been a real estate agent for eight years and recently attempted to sell my condo. My income hadn’t been what I’d planned; I was upside down and worried about the risks of holding onto it. I wanted less stress, so after months of consideration, I decided to sell.
Here’s how it went down:
-I chose my agent and sat down for a meeting. “Are you willing to meet the market?” she asked? That wasn’t easy to answer!The choices I’d made at purchase (lay out, upgrades, etc.) weren’t as valuable in her eyes as I had anticipated. I tried to fight the urge to feel that my home was worth more than she did.
-We moved out of the condo and hired a great stager to “edit” what we’d left behind. What?! You don’t like the black and white poster of John Lennon from my mother’s Let It Be album?!
-We had handiwork done and a professional photographer shot some great images. My agent listed the property, but after only one day on the market without an offer, I was already anxious.
-Then the Homeowners Association sued the developer (long story, but in short: not good for sales) and convinced me that I was definitely not prepared to meet the market. So, we removed the home from the market, and moved back in.
-Then, the phone rang. Agents wanted to show it, earnestly offering “My clients aren’t concerned with litigation.” Surprise: I didn’t believe it. Right or wrong, I suspected that these well-meaning people would not make it all the way to closing. I wasn’t ready to board that roller coaster.
And, it felt like the market was finally turning.
A property that had once seemed like a heavy weight began again to look like home; like a place that – from a post-tax perspective – is only marginally more costly than renting. So, here I am, happy with my decision to stay in my home and reminded what it’s like to walk in my sellers’ shoes – a win-win situation all the way around.
Michael Doyle is an agent with Windermere Real Estate’s Lakeview office in Seattle, WA.
For more information on Windermere Evergreen please contact us here.
6 Clever Ways to Disguise Trash Bins
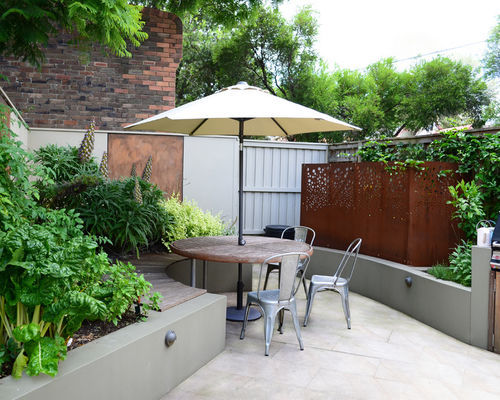
 You probably don’t give much thought to your garbage cans, other than remembering to put them out on the right day. But we all have to store our trash and recycling bins somewhere, and doing so can be a challenge on a smaller property, especially if you don’t want them to be an eyesore. If you’re struggling to find a stylish way to store your bins, check out these smart and inspiring ideas. Now, is it black or green bin day this week?
Garbage Bins 1: Outhouse Design, original photo on Houzz
Choose a screen. The curved screen in the corner of this courtyard is an attractive feature in its own right, thanks to the decorative cutwork pattern, and offers an elegant way to hide ugly plastic bins from view.
By using a screen like this, you can section off as much of the garden as you need — to store bikes or garden equipment as well as bins. To blend in the structure even further, you could grow climbers up and over the screen or along the wall behind.
Related: Outdoor Chairs to Entertain in the Garden
Create a brick shelter. Built in red brick to match the house, and tiled with slate, this practical storage area blends with the property’s exterior and actually enhances the space with its character and interest. The look is mirrored in the raised bed at the front of the drive for a coordinated finish.
A custom compartment on the left neatly houses the bin, while two smaller storage compartments on the right make room for stacking recycling boxes.
Make it part of the garden. The aim of this front garden design was to create a wildlife haven, and rather than see the bins as an unsightly obstacle to be hidden away, the owners decided to make them integral to the design.
They created a sturdy wooden structure with a living roof that works as an extension of the garden and is planted with wildlife-friendly flowers and foliage.
Related: Create a Wildlife Haven With a New Bird Bath
Design it into an outbuilding. In a larger space, an open-sided outbuilding like this one is ideal for storing and hiding bins. It’s painted a heritage shade and is partly screened in front with evergreen topiary to create a visually appealing feature — a great way to smarten up a drab drive.
This idea would complement a traditional or cottage exterior, but if your style is more contemporary than country, you could choose a sleeker style, or paint it a darker shade to tie in with the exterior of your home.
Tuck it into a border. Can you spot the trash bins on this drive? They’re neatly tucked away in the wooden box to the left of this image, and the impact of the structure has been much reduced by positioning it in a decorative floral border and planting low standard trees right alongside it.
The structure also has a green roof planted with succulents to further disguise the box and make it as visually appealing as possible.
Build a clever storage wall. If space is limited, why not make your recycling containers work extra hard by turning their storage area into a boundary wall, as these smart homeowners have. This neat wooden shelter screens the bins from the road while creating a clean, contemporary-style wall.
Related: More Designer Tips to Boost Curb Appeal
By Victoria Harrison, Houzz
For more information on Windermere Evergreen please contact us here.
6 Ways to Personalize a White Kitchen


White-on-white kitchens have been a classic look for many years. Why does this trend endure? For starters, white connotes cleanliness, makes small spaces appear larger, and brightens rooms that are naturally dark.
Although many all-white kitchens are just lovely, some can appear a bit stark or cold. To help clients warm up their white, I recommend a variety of strategies, such as mixing metals and adding contrasting paint, fabric or wood. Read on for inspiration for personalizing your white kitchen so that it stands out from the crowd.
White Kitchen 1: Allard Ward Architects, original photo on Houzz
1. Warm metal accents. Copper, bronze, brass and polished nickel are just a few of the metals that can warm up an all-white kitchen. The gold sconces above the window and the white pendant lights, with their subtle hint of gold, add warmth and a touch of luxury to this all-white kitchen.
2. Color and metal. Moving beyond metallics alone, a single contrasting color when combined with metals can create drama in a white kitchen. In this photo, a modern white kitchen intermingles black pendants and countertops with gold seating. This combination contributes to the room’s sleek contemporary look.
3. Wallpaper. I love wallpaper, especially in kitchens. Wallpaper can introduce color, movement and dimension to a white kitchen. When applied to a lone wall, wallpaper can create a dynamic focal point, as shown in this photo. The bright white cabinets and crisp white walls are softened by the shades of blue in the fish swimming on the side wall. This kitchen’s under-the-sea motif is enhanced by the blue tile on the back wall and the sea urchin-shaped pendant lights.
4. Colorful island. Wood-stained islands often appear in white kitchens because of the richness and contrast they bring. This kitchen shows a creative alternative, pairing a chartreuse island with a chartreuse Roman shade. Together they lend a whimsical, personalized feel. To give your white kitchen a personal touch, consider painting your island your favorite color.
5. Tile rug. Layering in a rug is a great way to introduce color and texture to an all-white kitchen, but some clients worry that a rug could be an added source of dirt as well as a possible tripping hazard.
This clever kitchen resolves both issues with a tile rug instead of a fabric one.
6. Backsplash. A tile backsplash also can bring color and texture to your white kitchen. But who says a backsplash must be tile? This kitchen has a counter-level window in lieu of a tile splash. The window faces a luscious succulent garden, thus creating a green vista for an otherwise monochromatic kitchen.
By Barbra Bright, Houzz
For more information on Windermere Evergreen, please contact us here.
Tiny Homes Promote Quality over Quantity
 Are you fascinated about downsizing? Do you love small places? Does a simple and serene ambiance sound like music to your ears? Then hop on the bandwagon and get yourself a ‘tiny house’ because we all know the best things come in small packages.
What’s a tiny house? Tiny houses have recently hit the real estate market by storm. The to-go models typically range from 100-175 square feet, while the larger, more permanent cottage styles are usually around 250 to 500 square feet. With a multitude of floor plan choices that include full kitchens and bathrooms, heating, AC, and a reasonable range of prices, a tiny house couldn’t be more practical.
What tiny house are you? The best part about tiny homes is that you get to pick whichever one compliments your lifestyle and needs the most. Are you more of a beach house or cabin in the woods type of person? What about a pool house for your backyard or an art or yoga studio? Or maybe you’re guilty of always wishing there was somewhere else for your mother-in-law to stay while she’s in town. On the other hand, if you’re looking for something less permanent, then a to-go model might be more your speed. You can grab your house whenever you are feeling an itch of wanderlust and head out on the open road. You can park it near the coast or somewhere concealed for a relaxing and quiet weekend. If being on the water is more your thing, there are even tiny floating homes.
Who owns one? The small, but rapidly growing number of tiny house homeowners can be found all over the country. People are shedding their square footage and downsizing from coast to coast. In 2013, the tiny home movement saw 2,600 residents, while 2014 currently has about 4,000 residents and growing. People are joining the tiny house movement for various reasons. Some want to downsize due to environmental or financial concerns, others are looking for more time and freedom in their lives. Having tiny homes encourages people to live beyond their own walls and spend more time in the outdoors and their community. Tiny homes have redefined the American dream by promoting quality over quantity.
If you think you might want a tiny house as your primary home, the only sacrifice is space; the gains however, are countless. Tiny homes come in all shapes and sizes and can be modern, minimal, or luxurious. These tiny homes are a fun and exciting endeavor to which you can easily add your own flavor. And because you can get a prefab tiny home delivered right to your door, the home buying process is as simple as the homes themselves.
If you want to check out more house styles you can visit our Tiny House page on Pinterest.
For more information on Windermere Evergreen please contact us here.
Selling your home: A step-by-step approach

 Whether you’re starting a family, moving for your job, getting ready to retire or embarking on a new chapter in your life, when your home no longer suits your current situation, it’s time to think about selling it. Although this can be a bit complicated, with the help of your agent, you can minimize the hassles, get the best possible price, and shorten the distance between “For Sale” and “Sold”.
Price it right
If you want to get the best possible price for your home and minimize the time it stays on market, you need to price it correctly from the beginning. Your agent can give you a clear picture of your particular market and can provide you with a comparative market analysis (CMA). A CMA contains detailed information on comparable homes in your area, including square footage, date built, number of bedrooms, lot size and more. It lists pending sales and houses sold in your area in the past six months, along with their actual sale prices.
By comparing your home to similar homes in your neighborhood and reviewing their list prices and actual selling prices, your agent can help you arrive at a fact-based assessment of your home’s market price.
Prepping your house for sale
You want to make a positive first impression when you list your home for sale. Here are some tips on how to enhance your home’s best features:
Work on your curb appeal
Get rid of moss on your roof. Power wash your front walk, porch, deck and patio. Mow the lawn, trim the hedges, weed the flowerbeds and add spots of color with container plants. Clean all the windows inside and out and repair them if they don’t open and close easily.
Refresh, repair and repaint
This goes for interiors and exteriors. If you see peeling paint, add a fresh coat. If your living room is bright lime green, consider painting it a more neutral shade. Make necessary repairs. You don’t want to turn off a buyer with a dripping faucet, a broken doorbell, a clogged downspout or a cracked windowpane.
Deep-clean, from floor to ceiling
Clean rugs, drapes and blinds and steam-clean carpeting. Get rid of any stains or odors. Make sure kitchen appliances, cupboards and counters are spotless and that bathrooms shine.
Declutter and depersonalize
Clean, light-filled, expansive rooms sell houses. So be sure to downsize clutter everywhere in your home, including cupboards, closets and counters. You might also consider storing some furniture or personal items to make rooms look more spacious. Take advantage of views and natural light by keeping drapes and blinds open.
Make an impact on the market
If you want to sell your home, you need to go where the buyers are, and today they’re on the Internet. According to the National Association of REALTORS®, in 2012 90 percent of homebuyers used the Internet as an information source, and for 41 percent of homebuyers it was the first step in the home-buying process.
By working with your agent, you can list your home on Windermere.com and other relevant websites. He or she will put together a listing with attractive photos, an appealing description and all the information a potential buyer needs. Your agent will also market your house, which may include advertising, direct mail and open houses.
Show your house
After you’ve taken care of all the repairs and cleaning tasks outlined above, your home is ready for its close-up: an open house. It’s actually best for you and your family to leave when potential buyers are present so they can ask your agent questions. But before you go, you might want to:
· Take your pets with you
· Open the shades and turn on the lights
· Light a fire in the gas fireplace
· Bake cookies
· Keep money, valuables and prescription drugs out of sight
Be flexible in negotiating
If you get offers below your asking price, there are a number of strategies you can try in your counteroffer. You could ask for full price and throw in major appliances that were not originally included in the asking price, offer to pay some of the buyer’s fees, or pay for the inspection. You could also counter with a lower price and not include the appliances. If you receive multiple offers, you can simply make a full-price counter.
Your agent can suggest other strategies as well and help you negotiate the final price.
If your house doesn’t sell or you’ve received only lowball offers, ask your agent to find out what these prospective buyers are saying about your house. It might reveal something you can consider changing to make your house more appealing in the future.
Breeze through your inspection
When a buyer makes an offer on your home, it’s usually contingent on a professional inspection. A standard inspection includes heating and cooling, interior plumbing and electrical systems; the roof, attic and visible insulation; walls, ceilings, floors, windows and doors; and the foundation, basement and visible structure. The inspector will be looking for cracks in cement walls, water stains and wood rot.
You can always opt for having an inspection done prior to putting your house on the market, so you can address any potential problems in advance. Your agent can give you several recommendations for qualified inspectors in your area.
Close with confidence
Whether this is your first time or your tenth, your agent can help guide you though the complex process of selling a home. Moreover, he or she can answer any questions you may have about legal documents, settlement costs and the status of your sale.
Your agent’s expertise, resources and extensive network also work for you when you’re buying your next house. Even if you’re moving out of the area, your agent can refer you to a professional agent in your new community.
If you have questions about the buying or selling process, or are looking for an agent in your area, we have professionals that can help you. Contact us here.
Real Estate Appraisals 101


Appraised value vs. market value
Appraisals are designed to protect buyers, sellers, and lending institutions. They provide a reliable, independent valuation of a tract of land and the structure on it, whether it’s a house or a skyscraper. Below, you will find information about the appraisal process, what goes into them, their benefits and some tips on how to help make an appraisal go smoothly and efficiently.
The appraised value of a property is what the bank thinks it’s worth, and that amount is determined by a professional, third-party appraiser. The appraiser’s valuation is based on a combination of comparative market sales and inspection of the property.
Market value, on the other hand, is what a buyer is willing to pay for a home or what homes of comparable value are selling for. A home’s appraised value and its market value are typically not the same. In fact, sometimes the appraised value is very different. An appraisal provides you with an invaluable reality check.
If you are in the process of setting the price of your home, you can gain some peace-of-mind by consulting an independent appraiser. Show him comparative values for your neighborhood, relevant documents, and give him a tour of your home, just as you would show it to a prospective buyer.
What information goes into an appraisal?
Professional appraisers consult a range of information sources, including multiple listing services, county tax assessor records, county courthouse records, and appraisal data records, in addition to talking to local real estate professionals.
They also conduct an inspection. Typically an appraiser’s inspection focuses on:
- The condition of the property and home, inside and out
- The home’s layout and features
- Home updates
- Overall quality of construction
- Estimate of the home’s square footage (the gross living area “GLA”; garages and unfinished basements are estimated separately)
- Permanent fixtures (for example, in-ground pools, as opposed to above-ground pools)
After considering all such information, the appraiser arrives at three different dollar amounts – one for the value of the land, one for the value of the structure, and one for their combined value. In many cases, the land will be worth more than the structure.
One thing to bear in mind is that an appraisal is not a substitute for a home inspection. An appraiser does a cursory assessment of a house and property. For a more detailed inspection, consult with a home inspector and/or a specialist in the area of concern.
Who pays and how long does it take?
The buyer usually pays for the appraisal unless they have negotiated otherwise. Depending on the lender, the appraisal may be paid in advance or incorporated into the application fee; some are due on delivery and some are billed at closing. Typical costs range from $275-$600, but this can vary from region to region.
An inspection usually takes anywhere from 15 minutes to several hours, depending on the size and complexity of your property. In addition, the appraiser spends time pulling up county records for values of the houses around you. A full report comes to your loan officer, a real estate agent or lender within about a week.
If you are the seller, you won’t get a copy of an appraisal ordered by a buyer. Under the Equal Credit Opportunity Act, however, the buyer has the right to get a copy of the appraisal, but they must request it. Typically the requested appraisal is provided at closing.
What if the appraisal is too low?
If you appraisal comes in too low it can be a problem. Usually the seller’s and the buyer’s real estate agents respond by looking for recent and pending sales of comparable homes. Sometimes this can influence the appraisal. If the final appraisal is well below what you have agreed to pay, you can renegotiate the contract or cancel it.
Where do you find a qualified appraiser?
Your bank or lending institution will find and hire an appraiser; Federal regulatory guidelines do not allow borrowers to order and provide an appraisal to a bank for lending purposes. If you want an appraisal for your own personal reasons, and not to secure a mortgage or buy a homeowner’s insurance policy, you can do the hiring yourself. You can contact your lending institution and they can recommend qualified appraisers and you can choose one yourself or you can call your local Windermere Real Estate agent and they can make a recommendation for you. Once you have the name of some appraisers you can verify their status on the Federal Appraisal Subcommittee website: https://www.asc.gov/National-Registry/NationalRegistry.aspx
Tips for hassle-free appraisals:
- What can you do to make the appraisal process as smooth and efficient as possible? Make sure you provide your appraiser with the information he or she needs to get the job done. Get out your important documents and start checking off a list that includes the following:
- A brief explanation of why you’re getting an appraisal
- The date you’d like your appraisal to be completed
- A copy of your deed, survey, purchase agreement, or other papers that pertain to the property
- If you have a mortgage, your lender, the year you got your mortgage, the amount, the type of mortgage (FHA, VA, etc.), your interest rate, and any additional financing you have
- A copy of your current real estate tax bill, statement of special assessments, balance owing and on what (for example, sewer, water)
- Tell your appraiser if your property is listed for sale and if so, your asking price and listing agency
- Any personal property that is included
- If you’re selling an income-producing property, a breakdown of income and expenses for the last year or two and a copy of leases
- A copy of the original house plans and specifications
- A list of recent improvements and their costs
- Any other information you feel may be relevant
By doing your homework, compiling the information your appraiser needs, and providing it at the beginning of the process, you can minimize unnecessary phone calls and delays.
For more information on Windermere Evergreen please contact us here.
How the American Home has Evolved

Owning a home has been an American tradition from the start. But the home itself has changed dramatically over the years.
For example, you may be surprised to learn how much the size of the average American home has increased since the turn of the 20th century—especially when you compare it to the size of the average family during the same time period.
In the year 1900, the average American family was relatively large with 4.6 members, but the average home featured just 1,000 square feet of usable floor space. By 1979, family size had shrunk to 3.11 members, but the floor space they shared had expanded to 1,660 square feet. And by 2007, the average family size was even smaller still—just 2.6 members—while the average home size had increased by the largest amount yet—this time to 2,521 square feet.
To accommodate those larger homes, property lots have also had to expand in size. In the 1930s and ‘40s, Bungalow homeswere usually built on lots measuring 60 by 100 feet (for a total of 6,000 square feet). However, by 1976, the average size of a single-family property lot had expanded to more than 10,000 square feet. In 1990, it expanded again (to 14,680 square feet). Today, the average property lot in America is a staggering 17,590 square feet.
Exterior building materials
Until the 1960s, the building materials used on the exterior of most homes were limited to brick, wood, or wood shingles. However, by the early 1960s, many Americans chose to cover their homes with a more affordable material that was also maintenance-free: aluminum and vinyl siding. Today, many homeowners are using low-maintenance siding materials made of cement fiber.
Interior building materials
The primary building material for interior ceilings and walls for much of the 20th century was plaster applied over wood lathe. Modern day sheetrock didn’t become popular until the 1950s. In the 1960s, wood paneling and textured walls became prevalent, largely for their quick and easy application. In the 1970s and ‘80s, “popcorn ceilings” became a common way to hide imperfections in ceilings. Today’s style again favors smooth walls and ceilings, which can result in a lot of work removing paneling and textures in older homes.

Throughout the early 1900s, the floors throughout most homes were almost always bare wood. Linoleum tile became a popular choice for kitchens, bathrooms, and bedrooms in the 1940s. However, by the 1960s and 1970s, wall-to-wall carpeting was all the rage—even in bathrooms and some kitchens. Homes today feature a wide array of flooring materials, depending on both the region and the room’s function. For example, tiles are a more popular choice in warm regions than cold ones because they tend to stay cool; wall-to-wall carpeting is still popular in rooms like bedrooms and family rooms, where people like to feel most comfortable, while durable and easy-to-clean hardwoods, tiles and linoleum are more favorable in kitchens and high-traffic areas.
The Kitchen
At the turn of the 20th century, the kitchen was a place where the woman of the house did all the cooking. Kitchens were typically small, closed off from the rest of the house by solid walls, and far more functional than fashionable. Dining took place in the dining room.
Throughout the 1920s and ‘30s, kitchens remained stark workplaces with very few appliances. Food was kept chilled with an icebox (a non-electric, insulated box about the same size as a modern refrigerator that used a block of ice to keep everything cold). However, by 1944, 85 percent of American households had switched from an icebox to a refrigerator.
In the mid 1950s, the kitchen changed dramatically. It not only became larger, it also transformed into the heart of the home, where the whole family gathered to help prepare and even eat meals.

The 1950s also brought a host of kitchen innovations, from the stainless steel sink to electric ovens and stovetops. But the most exciting of all was the dishwasher. The 1970s marked the introduction of the microwave.
Today, the kitchen is still a place where everyone gathers. So it’s not surprising that may people favor open-concept kitchens, with no walls separating them from the dining or family room.
Appliance and amenities
The 1940s census was the first to ask homeowners about some of the amenities in their homes. The results are startling (though perhaps less so when you consider that this was during the depression): Less than 50 percent of homes had hot water, an indoor toilet or a bath tub; about one in five didn’t have a home phone.

By the 1950s, however, things had changed dramatically for the better. That’s when many Americans got a refrigerator, an electric stove, a dishwasher, and, ah yes, air conditioning. Until then, most homes were cooled with nothing more than a ceiling fan at best.
Thanks to the larger, Ranch-style homes being constructing in the 1950s, walk-in closets also made their introduction. The fabulous ‘50s also ushered in the two-car attached garage.
And let’s not forget the television; it exploded onto the scene in the early 1950s and by 1955, half of all U.S. households had sets. Today, the average home has little less than three TVs.
What hasn’t changed
Despite all these changes, one thing has remained the same: The number one reason why Americans chose to buy a home. According to Dan McCue, research manager at Harvard’s Joint Center for Housing Studies, “It’s always been seen as the best way to build net worth and equity.”
Six Key Factors That Affect the Sales Price of Your Home


Pricing a home for sale is not nearly as simple as most people think. You can’t base the price on what the house down the street sold for. You can’t depend on tax assessments. Even automatic valuation methods (AVMs), while useful for a rough estimate of value, are unreliable for purposes of pricing a home for sale.
AVMs, like those used by Zillow and Eppraisal, have been used for many years by banks for appraisal purposes. They are derived from algorithms based on past sales. But producers of AVMs agree that they are not accurate indicators of home value. For example, Zillow.com states, “Our data sources may be incomplete or incorrect; also, we have not physically inspected a specific home. Remember, the Zestimate is a starting point and does not consider all the market intricacies that can determine the actual price a house will sell for. It is not an appraisal.”
So what does Zillow recommend sellers do instead? The same thing the real estate industry has been advising for decades: Ask a real estate agent who knows your neighborhood to provide you with a comparative market analysis. To accomplish that, I typically consider the following factors—plus others, depending on the house:
Location
The location of your home will have the biggest impact on how much it can sell for. Identical homes located just blocks apart can fetch significantly different prices based on location-specific conditions unique to each, including: traffic, freeway-access, noise, crime, sun exposure, views, parking, neighboring homes, vacant lots, foreclosures, the number of surrounding rentals, access to quality schools, parks, shops, restaurants and more.
Recommendation: Be willing to price your house for less if it’s located in a less desirable area or near a neighborhood nuisance.
Market
Another major factor that also can’t be controlled is your local housing market (which could be quite different from the national, state or city housing markets). If there are few other homes on the market in your local area (a situation known as a “sellers market”), you may be able to set a higher price. However, if there’s a surplus of homes like yours for sale (a “buyer’s market”), your pricing will also reflect that.
Recommendation: If it’s a buyer’s market and you can delay selling your home until things change, you should consider doing so. If you can’t wait, be willing to price your home extremely competitively, especially if you are in a hurry to sell.
Condition
The majority of buyers are not looking to purchase fixer-uppers, which is why any deferred maintenance and repair issues can also significantly impact the selling price of your home. When your home’s condition is different than the average condition of homes in your location, AVMs tend to produce the widest range of error.
Recommendation: Hire a professional home inspector to provide you with a full, written report of everything that needs upgrading, maintenance or repair, then work with your real estate agent to prioritize the list and decide what items are worth completing before the property is listed for sale, and what should be addressed through a lower list price. Also, some defects are best addressed during negotiations with buyers.
Widespread appeal
If you want to sell your home quickly and for the most money, you have to make it as appealing as possible to the largest pool of prospective buyers. The more universally attractive it is, the greater the interest and the faster competing offers will come.
Recommendation:
Hire a professional home stager (not a decorator) to temporarily stage the interior of your home. Also spend time making the exterior look its best: address any peeling paint, make sure the front door/ door hardware is attractive, prune bushes and trees, remove old play equipment and outdoor structures, etc.
Compare homes
The only neighboring homes that should be used to estimate the value of your home are those that have been carefully selected by a real estate professional with special training, access to all sales records, and in-depth knowledge of the neighborhood.
Recommendation: If you’re considering selling your home, ask your real estate agent to recommend a professional appraiser.
Searchability
When working with a prospective buyer, most real estate agents will search the available inventory only for the homes priced at (or less than) their client’s maximum, which is typically a round number. If you home is priced slightly above or below that amount (e.g., $510,000 or $495,000), it will appear in fewer buyer searches.
Recommendation: Be willing to adjust your selling price to maximize visibility.
Periodic price adjustments
Pricing a home isn’t a set-it-and-forget-it proposal. As with any strategy, you need to be prepared to adapt to fast-changing market conditions, new competition, a lack of offers and other outside factors.
Recommendation: After listing your house, be ready to adjust your asking price, if necessary. If you are looking for a qualified Real Estate Agent please contact us here.
