
 Facebook
 X
X
 Pinterest
 Copy Link
Find your Real Estate Agent


You have many tough choices to make as you start looking for the home of your dreams and prepare to make one of the largest financial decisions of your life. Finding the right agent to represent you shouldn’t add to your worries. I’ve met a few real estate agents over the years and here are 5 tips to help you find a great one.
-
- Ask your friends and neighbors. Most consumers find their agents’ through referrals from those close to them. You’ll get real world references (good and bad) from the people you trust.
- Search your online networks. Search for real estate agents within your professional network on LinkedIn.com. LinkedIn can show you the agents who are 2nd and 3rd degree connections within your network. LinkedIn will even show you the agent’s resume and recommendations, mutual connections and offer to introduce you.
- Search local listings. Spend some time looking at homes similar to the one you wish to purchase or plan to sell on your favorite real estate website. Which agents are posting the best photos and doing the best to represent homes through their marketing efforts? Which agents are the most active in the area?
- Search Yelp. Yelp.com started as a place where people could write reviews and rate restaurants and bars. Today, Yelp has become the one-stop site for reviews of local businesses and professionals. Take a look at the highest rated agents in your area and read what your neighbors have to say about their service.
- When in doubt, Google it. When you’ve narrowed your search down to a list of possible agents start typing their names into Google. Google is a quick and easy way to see how active an agent is in the online world. If your agent has a common name include location or company search terms as well. You’ll be able to see any blogging or community activities they are involved in. You will also be able to see how active they are on real estate sites like Zillow and Trulia. Working with an agent who is active online benefits you because they are more likely to have larger networks and a greater reach with marketing efforts.
For more information on Windermere Evergreen and our team please contact us here.
Top five words of advice for a seller today


As a seller today you are faced with a challenge when it comes to selling your home for a fair price and getting it done in a reasonable amount of time. Even though inventory is lower than it was five months ago, we are still looking at about 9 months of inventory in many areas. This large amount of inventory indicates there is a lot of competition out there to attract the right buyer.
We all know there are more than five steps involved when it comes to selling your home. We asked a few of our Windermere agents what advice they would give a seller today if selling your home came down to just five key things.
Top five by Liz Talley Windermere Ballard
-
- Declutter.
-
- Refresh the garden.
-
- Clear the entry and front porch.
-
- Minimalize & depersonalize.
-
- Price it a wee bit under the competition so that it pulls in buyers.
As always, market presence, professional photos, etc. all make an enormous difference but these five steps are the key right now.
Top five by Jamie Johnson Windermere Camano Island
-
- Price. Listen to your real estate expert and don’t try to “start high.”
-
- Clean and stage. You are competing with other great deals out there. Yours needs to stand out and shine.
-
- Follow a marketing plan. Drop your price 3% every 30 days.
-
- Ask yourself – what is your goal? Most sellers have a dream of making a lot of money off the sale of their home. If your goal is to purchase another home, you will make up for your “loss” there. It’s all relative.
-
- Hire a local expert. Interview at least three agents. Do your research. A good agent will do all that for you.
If you are looking for a great Real Estate agent please contact us here.
Questions to ask your home inspector


To get a quality home inspection, ask the right questions before you put your inspector to work. Here are some of the basics.
What does your inspection cover?
Insist that you get it in writing. Then make sure that it’s in compliance with state requirements and includes the items you want inspected.
How long have you been in business?
Ask for referrals, especially with newer inspectors.
Are you experienced in residential inspections?
Residential inspection is a unique discipline with specific challenges.
Do you do repairs or make improvements based on the inspection?
Some states and/or professional associations allow the inspector to perform repair work on problems uncovered in an inspection. If you’re considering engaging your inspector to do repairs, be sure to get referrals.
How long will the inspection take?
A typical single-family dwelling takes two to three hours.
How much will it cost?
Costs can vary depending upon a variety of things, such as the square footage, age and foundation of the house.
What type of report will you provide and when will I get it?
Ask to see samples to make sure you understand his reporting style. Also make sure the timeline works for you.
Can I be there for the inspection?
This could be a valuable learning opportunity. If your inspector refuses, this should raise a red flag.
Are you a member of a professional home inspector association? What other credentials do you hold?
Ask to see their membership ID; it’s some assurance.
Do you keep your skills up-to-date through continuing education?
An inspector’s interest in continuing education shows a genuine commitment to performing at the highest level. It’s especially important with older homes or homes with unique elements.
Any other good questions to ask? Post yours now!
For more information on Windermere Evergreen please contact us here.
Going from homeowner to home seller


How do we transition from the mindset of a homeowner to a home seller? Homes bring us shelter, comfort and are a place to express our individuality. But when it’s time to move on, that same home will now be the financial springboard to the next chapter in our lives.
We start by letting go of the home layer by layer.
Both buyer and seller benefit when the seller- perhaps with some judicious coaching from their skilled Realtor- peels away those things that made their home uniquely theirs. In essence, the serious packing begins once the decision has been made to sell; bookcases and closets should only suggest their function with a few items, rather than store seasons and years worth of books and clothes. Carefully removing prized collections and family photos is also vital- nothing should distract the buyer from seeing the house, and seeing themselves in it.
Personal colors are just as important to remove as objects. After all, if you were serving ice cream to a few thousand people (that’s how many will see your house photographed online)- would you serve them mango flavor? It’s a lot more likely you would choose vanilla- and that’s pretty much what the color of your walls should be- neutral or deep neutral tones.
The last touch is a good deep cleaning- ask your REALTORtm if they have the name of a reputable company.
The seller can then replace those familiar objects with a fresh new welcome mat at the front door.
This process allows the buyer the visual and emotional space to move in.
This process allows the seller to move on.
For more information on Windermere Evergreen please contact us here.
Investing in home: building a foundation for memories


“Of course, thanks to the house, a great many of our memories are housed, and if the house is a bit elaborate, if it has a cellar and a garret, nooks and corridors, our memories have refuges that are all the more clearly delineated. All our lives we come back to them in our daydreams.”
Gaston Bachelard, the Poetics of Space
I have been following the news about the housing market pretty closely and am pretty disappointed with some of the articles declaring a case against homeownership. I couldn’t disagree more. If anything, I see the value of homeownership: responsible financial investment, social stability and community connection as more important than ever.
I was particularly moved by the story in the Seattle Times yesterday about the Lutz family in Ballard, a family with seven adopted siblings that are helping their parents move from their family home to a smaller condo now that their children have left the nest. Though their story is far from typical, it really resonates how home is the center of family life, a place where memories are created and how houses tell the stories of the lives we build while in their shelter.
Homes do that for people. They are the places where some of our most intimate stories unfold.
Finding and creating a home is an emotional, psychological, social and financial investment. There is a lot of energy involved in finding the place to envision the future, raise a family, and perhaps retire. There is no other investment as enjoyable as your own home. Investments in gold or stocks cannot compare to the feelings about a place where you collect memories, create spaces that reflect your ideals and develop to fit your needs over time.
Beyond the emotional ties to home, a number of studies have shown that home ownership has a great impact on feelings of personal autonomy, life satisfaction and increased investment in the community. The sense of satisfaction goes beyond the ability to paint walls whatever color we want, or make improvements to our homes on our own terms. It goes deeper by improving our sense of well being. Furthermore, when we have a stake in the community we live in, we participate more, making our neighborhoods safer and healthier for all members.
Not all the news about the housing market is negative, actually there are many great articles: “in defense of home ownership”, “ten reasons to buy a home “and “a dream house after all” to name a few. But regardless of where you stand on the housing market right now, we can all likely agree that there is no place like a home.
All of our experiences of home are unique. Please share your best memories of home.
For more information on Windermere Evergreen please contact us here.
Does the Home of Your Dreams Really Exist?

 Agent: “So, what kind of a house are you looking for?”
Client: “Anything with 3 bedrooms and a couple baths. Oh, and a big yard would be cool, too.”
Agent: “I know of several that we can show you.”
Client: “Just pick three that you think I’ll like, and I’ll buy one of them.”
If only it were that easy. When you ask yourself to visualize the home of your dreams, what comes to mind? Certainly not a nondescript 3 bedroom, two bath home. It’s much more likely that your vision could include features like maple flooring, granite countertops, 6-panel doors, built-in speakers, or access to 220-electricity in the garage for a workshop. Everyone has their own custom needs and desires.
You’re allowed to be picky. Realistic is imperative, but picky is fine, too. If you’re holding out for diamond insets in the shower tile grout or solid gold door knobs, I’m afraid disappoint awaits you. Think about the most important things a home will represent to you. Do you work from home? Do you entertain large groups regularly? Do you enjoy yard work or do-it-yourself projects? Each family has their own needs, so your definition of the perfect home will be very different from even your closest friends or family members.
Not only does each family have their own needs, but each family member might have their own needs. Pets come into the picture, too. Is high-enough speed internet readily available? Is there a wall that will fit your 60” High-Def 3D TV? Will the family room have enough space that you can compete at Wii™ or Kinect™ without breaking lamps? Will the huge trees that are cooling in summer make the home darker than you like in the winter? Can you bike or run the neighborhood streets? Are you concerned about how your energy consumption will affect the environment? You’re encouraged to list all the things that are important to you.
Once you’ve made your list, prioritize it according to what is important. Figure out what’s a must-have and what would be nice, but not necessary. It might take looking at a few homes to figure out what you want versus what you need. You may love the idea of having Spanish copper sinks throughout the house, but if there were no houses on the market that had them, would you resign yourself to renting indefinitely? On the other hand, you may be working from home and need fantastic data transmission capability. You probably wouldn’t want to look in a rural area that still uses dial up, but promises to have high speed internet cables in the future.
Your agent will learn from your prioritized list, and they should be able to help you find that perfect house. Be brutally honest with yourself, think 10 years into the future, and share your desires freely with those that can help you. You may not find the house that’s 100% of what you wanted, but something very close to the home of your dreams is probably out there.
What are the “deal killers”? What are the most important features on your list?
For more information on Windermere Real Estate please contact us here.
Preparing to buy – Home resolutions
 If you are ready to make the move towards purchasing your first home or upgrading to a new home, there are some considerations you should keep in mind to make the process easier. The housing inventory is up in most markets with the start of the new year, giving you more options. Whether you are just starting to save for your future home or you are ready to start searching, here are some tips you may find useful:
Assess your financial situation: If you have just started thinking about purchasing a home, now is a good time to do some research to see how close you are to accomplishing this dream. Check your credit score, assess your debt, and make a plan for paying down your credit cards and loans. Look at homes in your area of interest to gauge the general market value of those with features you want, and use a mortgage calculator to estimate what the down payment, monthly mortgage payment and property taxes will be. Now that you know where you are starting from, you can begin (or continue) the process.
Ready, set, save: With your estimated home costs in hand, you can determine what amount you need to save before you can make a purchase. There are some great online and mobile tools to help you create and track your monthly budget so you can maximize your savings every month; mint.com is a great option. If you already have enough savings for a down payment, make sure your monthly income can support your future mortgage payments by saving the difference in expenses for a period of time.
Create a plan: Before you start shopping for your home, be sure to have a plan. You probably already have an idea of what you are looking for, but you can make your search easier by creating a list of what features are necessary and desired for your home. We all have priorities for our homes, be it location, size, style, number of rooms, amenities or countless other features, so make sure you know what you are looking for and what you can’t live without. If you have a deadline for moving, keep it front-of-mind as you go through the process.
Find an agent: Once you (and your partner and your children) know what you are looking for in your home, find a real estate agent that can help you find the right place for you. Selecting an agent is a personal process, as well as financial relationship. If you have friends or family that have worked with an agent for their own real estate needs, ask for referrals. If you don’t know an agent yet, you can find an office local to the area where you are interested in buying, and interview brokers. Keep in mind you will be spending a lot of time with your agent, so you need to feel confident he or she understands your needs; the deal-breakers, wish list, budget and timeline. A good agent will work with you in refining these to reflect the reality of the market, and guide you through the entire process from pre-approval, home searching, closing and resources, to get you into your new home.
Pre-approval: If you already have a real estate agent, they can help you find a lending officer. You can also work with your bank of choice to find a loan that works for your financial situation and start the approval process. The amount the bank is willing to loan you will determine the top-cost of the home you can purchase.
Purchasing Process: Your agent will be able to guide you through the purchasing process, from pre-approval, to purchase and sale agreement, to inspection, financing and closing. If this is your first home, keep in mind there are some factors that affect the purchase of your home. If you are looking at a short sale, a foreclosure or bank owned home, the process will take longer than a traditional home sale from the owner or developer of the property. Be prepared to work with your broker heavily during closing, as the negotiating process is a critical aspect of getting the home you want for the best price. Your agent can also offer you tips to avoid hiccups during your financing process, such as avoiding any major purchases until after your home has closed; even furniture purchases for your new home can create financing issues. To learn more information about the home-purchasing process, go here.
Setting up a home: Once you have closed on your home purchase and are ready to start making your new home yours, create another checklist to make your transition as easy as possible. Your agent will likely have some useful resources for you, from moving companies, to local utilities and near-by amenities, that can help make the process smooth and efficient. If you are moving with small children, here are some tips to help you through the process and give your kids the best transition possible. Once you are moved and settled, you can start the process of creating the dwelling of your dreams.
For more information on Windermere Real Estate please contact us here.
How an Investment in Green Technology Can Pay off for Today’s Homeowner


Studies continue to show that real estate buyers are willing to pay a substantial premium for homes that feature highly efficient, environmentally friendly “green energy” technology.
While the added value depends on the location of the home, its age, and whether it’s certified or not, three separate studies all found that newly constructed, Energy Star- or LEED-certified homes typically sell for about nine percent more than comparable, non-certified new homes. Plus, one of those studies discovered that existing homes retrofitted with green technologies, and certified as such, can command a whopping 30-percent sales-price boost.
Options include technologies that you may already be very familiar with, as well as some new breakthroughs that may surprise you:
Fuel cells
Fuel cells may soon offer an all-new source of electricity that would allow you to completely disconnect your home from all other sources of electricity. About the size of a dishwasher, a fuel cell connects to your home’s natural gas line and electrochemically converts methane to electricity. One unit would pack more than enough energy to power your whole home.
Past fuel cells have been far too expensive and unreliable. But Redbox Power Systems, a company that’s planning to launch its first fuel cell later this year, is using new materials, claims they’ll be able to cut the purchase price by 90 percent, and predicts the associated electricity-bill savings will allow homeowners to pay off that purchase price in just two years’ time.
Wind turbine
A wind turbine (essentially a propeller spinning atop an 80- to 100-foot pole) collects kinetic energy from the wind and converts it to electricity for your home. And according to the Department of Energy, a small version can slash your electrical bill by 50 to 90 percent.
But before you get too excited, you need to know that the zoning laws in most urban areas don’t allow wind turbines. They’re too tall. The best prospects for this technology are homes located on at least an acre of land, well outside the city limits.
Cool roof
Cool roofs keep the houses they’re covering as much as 50 to 60 degrees cooler by reflecting the heat of the sun away from the interior, allowing the occupants to stay cooler and save on air-conditioning costs. The most common form is metal roofing. Other options include roof membranes and reflective asphalt shingles.
Green roof
Another way to keep the interior of your house cooler—and save on air-conditioning costs—is to replace your traditional roof with a layer of vegetation (typically hardy groundcovers). This is more expensive than a cool roof and requires regular maintenance, but young, environmentally conscious home owners are very attracted to the concept.
Hybrid heating
Combining a heat pump with a standard furnace to create what’s known as a “hybrid heating system” can save you somewhere between 15 and 35 percent on your heating and cooling bills.
Unlike a gas or oil furnace, a heat pump doesn’t use any fuel. Instead, the coils inside the unit absorb whatever heat exists naturally in the outside air, and distributes it via the same ductwork used by your furnace. When the outside air temperature gets too cold for the heat pump to work, the system switches over to your traditional furnace.
Geothermal heating
Geothermal heating units are like heat pumps, except instead of absorbing heat from the outside air, they absorb the heat in the soil next to your house via coils buried in the ground. The coils can be buried horizontally or, if you don’t have a wide enough yard, they can be buried vertically. While the installation price of a geothermal system can be several times that of a hybrid, air-sourced system, the cost savings on your energy bills can cover the installation costs in five to 10 years.
Solar power
Solar panels capture light energy from the sun and convert it directly into electricity. For decades, you may have seen these panels sitting on sunny rooftops all across America. But it’s only recently that this energy-saving option has become truly affordable.
In 2010, installing a solar system on a typical mid-sized house would have set the homeowner back $30,000. But today, that price has been slashed to an average of just $19,000. Plus, some companies are now offering to rent solar panels to homeowners (the company retains ownership of the panels and sells the homeowner access to the power at roughly 10 to 15 percent less than they would pay their local utility).
Solar water heaters
Rooftop solar panels can also be used to heat your home’s water. The Environmental Protection Agency estimates that the average homeowner who makes this switch should see their water bills shrink by 50 to 80 percent.
Tax credits/rebates
Many of the innovative solutions summarized above come with big price tags attached. However, federal, state and local rebates/tax credits can often slash those expenses by as much as 50 percent. So before ruling any of these ideas out, take some time to see which incentives you may qualify for at dsireusa.org and the “tax incentives” pages at Energy.gov.
Regardless of which option you choose, these technologies will not only help to conserve valuable resources and reduce your monthly utility expenses, but also add resale value that you can leverage whenever you decide it’s time to sell and move on to a new home.
For more information on Windermere Evergreen please contact us here.
Moving on up!
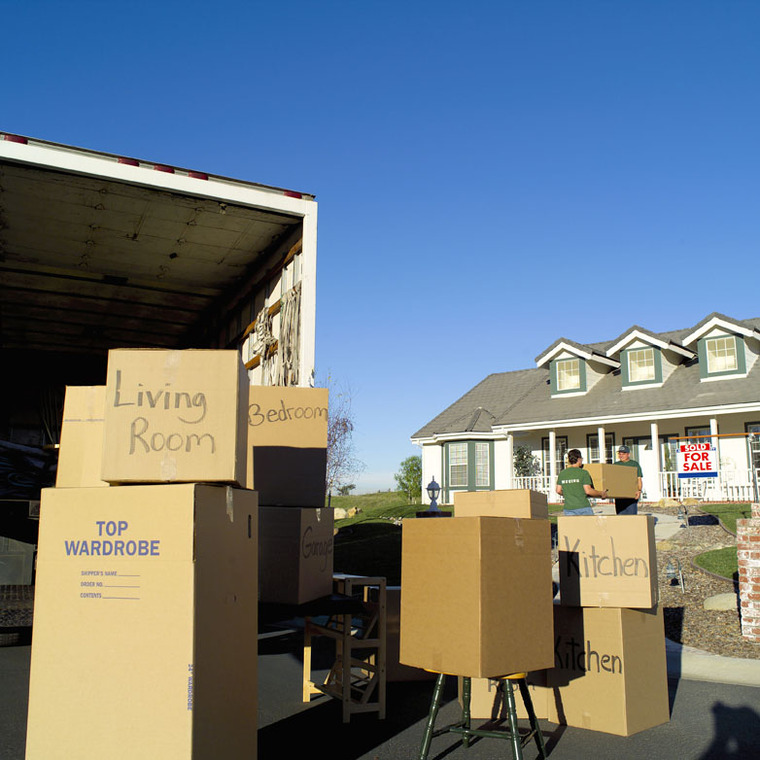
 Moving is stressful, whether it is across town or cross-country. Once you have closed on your house, the reality of packing, moving, and setting up a new home can become overwhelming. While no list can make a move “stress-free”, planning ahead and staying organized can help make your move a little smoother. Here is our list of tips:
Getting started:
· Once you know your prospective move date set up a quick timeline to make sure you can get all the important tasks done and ready in time for your move.
· Consider how much stuff you have by doing a home inventory. This can help you decide whether you need to hire movers to help you or if you will be managing your move on your own. Many moving companies supply inventory lists to help you assess the size of truck you will need. You can use your list as double duty for insurance purposes later.
· As soon as you decide how you will be moving, make your reservations. In general, moving companies and truck rental services are over-booked at the beginning and very end of the month. If you are planning on hiring a moving company, contact a few in your area for a price quote. To find companies ask your real estate agent, family, or friends, and consult online reviews. It is also a good idea to request a quote and compare companies.
Preparing for your move:
· Moving is a great opportunity to get rid of clutter, junk, or outdated items. Set aside some time to sort through your closets, storage spaces, files, drawers, and more. Go through cluttered areas and organize items by “keepers”, “give-aways” and “garbage”. You will have less to pack and an opportunity to update after you move. Contact a local nonprofit organization for your donations; some will arrange to pick up larger donations like furniture. If you have items of value, eBay or craigslist are good options.
· Changing your address is one of the more tedious tasks in the moving process. You will need to change your address with the United States Post Office. You can find the online form here: https://moversguide.usps.com/icoa/icoa-main-flow.do?execution=e1s1.
· You will also need to change your address with each account you have. Here is a list to get your started:
· Employers
· Bank(s)
· Utilities (Electric, Water/Sewage, Oil/Gas)
· Cable/ Telephone
· Cell phone service
· Credit Cards
· Magazine subscriptions
· Insurance companies (auto, home/renters, health, dental, vision, etc.)
· Pharmacy
· Other personal services
Let the packing begin:
· Before you start packing, it may help to visualize where everything you have will go. Perhaps furniture will fit better in a different room? Consider the floor plan of your new home and figure out what will go where. This will aid in packing and labeling as you box everything up.
· Use a tool like floorplanner.com to plan where furniture and items will go.
· When it comes to packing you have some options. You can work with a service that provides reusable boxes for moving or you can reuse or purchase cardboard boxes. Make sure you have enough boxes, packing tape, dark markers, and packing paper.
· Pack rooms according to your floor plan. Label boxes with contents and room. This will make it easier to unpack your home, knowing where everything is going.
· Real Simple magazine has some great tips on packing for your move.
· If you have to disassemble any of your furniture, make sure you keep all the parts and directions together.
· Make sure you set aside your necessities for the day you move. Being tired and unable to take a shower or make your bed can be hard at the end of a long moving day. Here are some ideas of what you may like to pack in your “day-of-move” boxes.
· Clean linens for the beds, pillows and blankets
· Clean towels
· Shower curtain, liner and hooks
· Toiletries, hand soap, tooth brush, etc.
· Disposable utensils, cups, napkins, etc
· Rolls of toilet paper
· Snacks and water
· Change of clothes
· Tools for reassembling furniture, installing hardware, and hanging photos
Making your move
· Come up with a game plan with your family, so everyone has a role and a part to play
· Once the house is empty, do a once over on your old place to make sure it is clean for the next owners/occupants. Here is a useful checklist for cleaning.
Warming your new home
· Once you have settled into your new home, warm it up by inviting friends and family over to celebrate. Here is a great infographic about housewarming traditions and symbolism.
· Announce your move to far-away friends and family through moving announcements to make sure you stay on the holiday card mailing list.
Do you have any other tips or advice for achieving a smooth move?
For more information on the Windermere Evergreen team please contact us here.
Keep Herbs Alive and Well in Winter With These 5 Tactics
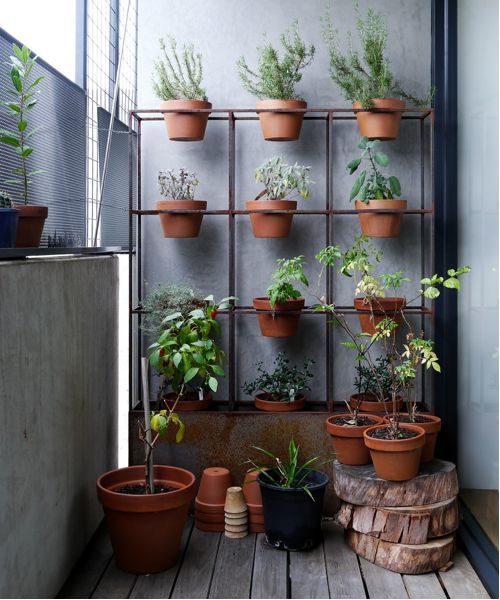

Temperatures may be dropping, but that doesn’t mean we have to bid farewell to our herb gardens. Cold-hardy herbs, such as chives, mint, oregano, parsley, sage and thyme, can often survive cold-winter temperatures while continuing to produce flavorful foliage, as long as they are provided with some protection or grown indoors. Even herbs like rosemary that are more cold-sensitive can survive winter using additional methods of protection. Let’s explore different ways we can prolong the herb harvest and enjoy the fresh taste of our favorite herbs throughout the cold of winter.
1. Protect herbs from the cold by placing them in a cold frame or cloche. Covering herbs helps trap the heat that rises from the soil, elevating the temperature inside by several degrees. This can extend the growing season in both fall and spring.
Cold frames are topped with glass panes that slope downward and are situated so they face south. This ensures that the most sunlight will reach the plants inside, creating an environment that is several degrees warmer than outside.
Cloches are a smaller and more portable way to protect plants from the cold. Traditional ones are bell-shaped and made from glass. They can be expensive, but you can make your own by cutting off the bottom of a 1-gallon plastic milk jug or other large plastic container. Place each one over individual herb plants and nestle the bottom inch or two of the cloche into the soil to anchor it.
2. Add a thick layer of coarse mulch over herbs. Many herbs can grow through the winter under the insulation provided from straw, shredded bark or other coarse mulch. In areas that experience moderate-winter cold, USDA Zone 6 and warmer, herbs will continue to produce some new growth despite some winter cold. Simply pull back the mulch and cut the herbs you need, then cover them back up. While they won’t produce as much new growth as they do in the warm season, you should be able to obtain a small harvest. Don’t worry if a layer of snow falls, as it will provide additional insulation for the herbs below. Once spring arrives, you can turn the mulch into the soil.
3. Pot up herbs and move them into a frost-free greenhouse or sun porch. If you’re growing herbs in the ground, you can transfer them to pots and move them to a protected spot. Select the herbs you want to keep growing over winter, such as chives, oregano, sage and thyme. Cut them back to 1 inch tall and, using a sharp shovel, divide them at their base, making sure to include the roots so each one will fit into the container. Use well-draining planting mix in the containers and plant each herb in a separate pot. They will grow back and you’ll be able to harvest their flavorful leaves until you transplant them back into the garden once spring arrives.
4. Grow herbs in front of a sunny window. Herbs can be grown from seed or cuttings and make a great addition to a sunny kitchen window that gets at least six hours of sunlight. If using artificial lighting, 14 hours is usually sufficient. The temperature should range between 60 and 70 degrees Fahrenheit, or 15.6 and 21.1 degrees Celsius, for best results. You can transplant herbs from the garden or begin from scratch by sowing seed.
The rewards of growing herbs indoors throughout the winter are great when the fresh flavor of summer is within arm’s reach. Chives, oregano, parsley and thyme are just a few of the easiest herbs to grow on a sunny windowsill. Use a well-draining planting mix in your container. Water deeply when the top inch of soil is almost completely dry.
5. Extend the life of fresh herbs by putting them in water. Herbs such as basil and mint grow quickly when placed in a container of water for a few weeks. Other herbs that work well in water are sage, oregano and thyme. When placed in water, they begin to produce roots and will grow new leaves. This is a useful way to prolong the harvest, whether you bring in cuttings from the garden or buy fresh herbs at the grocery store.
The process is easy. Simply cut the ends of each stem and put them in a small jar or cup filled with water. Be sure to remove any lower leaves so they won’t be submerged in the water. Place on a sunny windowsill.
The leaves produced indoors will be thinner and slightly less flavorful than those grown outdoors but will still add welcome flavor to your favorite dishes. Refill the water as needed and enjoy the prolonged harvest for several weeks to come.
Related: Elevate Plants to Reach Sunny Windows With These Plant Stands
By Noelle Johnson, Houzz
For more information on Windermere Real Estate please contact us here.
