
 Facebook
 X
X
 Pinterest
 Copy Link
6 Alternative Flooring Solutions to Refresh Your Home

Feeling ho-hum about classic hardwood floors? Here are six alternative floor solutions that can give any room in your house a fresh sense of personality, whether you’re starting from scratch or looking for an inexpensive DIY update.
1. Rubber. Often associated with commercial interiors, industrial rubber flooring can also be a sleek and smart solution for homes. Rubber is comfortable to stand on, easy to clean and durable enough to take on plenty of mess and abuse — great for an entry, a mudroom or a laundry room. From a style perspective, it gives a room a hint of an industrial edge, but in warm muted tones that still create an inviting air.
In a kitchen, a rubber floor is a chef’s dream, as it cushions the feet while the cook is standing to reduce fatigue. Plus, the textural surface reduces slipping hazards from spills and is very child-friendly. DHV Architects, original photo on Houzz
Want a rubber floor with a less industrial vibe? Choose sheets or tiles of rubber with a flat surface dyed to various hues that draw from the tones in stone tile. You wouldn’t guess this floor is rubber by looking at it, but your feet would be able to tell.
Cost: Rubber flooring can be extremely inexpensive but, in general, quality materials start at $12 per square foot. Anything below that would probably be of a quality that wouldn’t look appropriate inside a home.
2. Bamboo. Bamboo flooring is similar to wood flooring in many ways, but it imparts a Zen flair that can add a sense of peace to a room. And it is typically more moisture-resistant and hard-wearing than wood.
It should be noted that not every bamboo product is equally environmentally conscious. For one thing, shipping products from overseas can quickly make up for any carbon-footprint cost saved during production. However, if you are looking for a durable natural floor that’s sustainably grown, bamboo is a great option to consider.
It’s also worth noting that bamboo flooring can come in quite a variety of styles. A higher-contrast grain and stain can create an exotic look, for an effect that is playful and energetic rather than soft and tranquil.
If you love the look of walnut or zebrawood, bamboo can recreate that vibe with a stronger surface, and without cutting down any rare trees.
Keep in mind that the stains and adhesives involved in bamboo flooring can off-gas with an unpleasant odor, so those who are sensitive to chemicals may want to avoid the space immediately following an installation, or look at traditional hardwoods instead.
Cost: Bamboo is generally comparable in price to hardwoods, running about $2 to $8 per square foot.
3. Parquet. Everything old is new again, and while some homeowners (and many renters) are wishing away their parquet floors, others are installing them anew. These patterned wood floors add a sense of life and richness to a home, bringing visual interest and a sense of dynamic energy that typical straight-laid planks can’t match.
Installing wood in a parquet pattern also gives a lot more character to inexpensive local woods that might not have an exciting grain. For a patient DIYer, a parquet floor gives a high-fashion look with a much lower price tag than some other choices.
To give a classic block parquet layout a modern twist, use an oversized pattern in squares 12 inches or bigger. And, yes, a warm honey or orange tinted stain is back as well, especially mixed with classic modern furnishings in deep rich tones like chocolate, ruddy tan or espresso or crisp, airy whites.
Cost: Installation fees may be a bit higher than for straight-laid flooring, but the material cost can be as low as a few dollars per square foot.
See These Styles at Your Local Showroom
4. Painted. Think painted wood floors are only for cottages? As with walls, painting a floor can create as many different moods and effects as there are colors of paint. And if you choose a paint in a durable finish, it will hold up just as well as your wall paint does.
For a contemporary interior, consider a painted floor in a simple, natural hue like a muted beige or an off-white, and mix it with anything from antiques to midcentury classics or hip, trendy pieces.
You can kick up the style of a painted floor another notch by creating patterned effects that echo stone inlays, without that thousands-of-dollars investment. With a little painter’s tape and patience, this can be another great DIY approach to getting high style at home without ripping out your existing wood.
For those who do prefer a relaxed cottage air, a muted color adds a lot of charm, much like an accent wall, only underfoot. Try pale blue for a semi-neutral that will work with neutrals or other colors without clashing.
Cost: Paint and a top coat will cost a few dollars per square foot, and can be applied to existing flooring (with some good sanding and prep) or to inexpensive wood planks for a new installation.
5. Concrete. Concrete floors may sound like the domain of cold, minimalist works of architecture, but they can actually come in many forms to suit various tastes and personalities. Like wood, concrete can be stained (or tinted), allowing the material to feel quite warm and human in a way that beautifully suits transitional or traditional spaces.
Why choose concrete? Well, you can imagine that if the material can handle the wear and tear in an auto factory or warehouse, it can easily handle pets, children and sharp heels.
For an added seal and a gloss effect, concrete is sometimes finished with a coat of resin. This gallery-like look typically comes with a gallery price tag, but for those who enjoy a modern atmosphere with a perfect polish, this look is definitely photoshoot-ready.
It should be noted that concrete does not retain heat well, and thus can be chilly without a heated floor system, but extremely cozy with one installed.
Cost: With heated floors and a sleek finish, the cost can definitely add up. Your budget could range from $2 to $20 per square foot and beyond.
6. Cork. Cork flooring, like bamboo, can be developed very sustainably, making many cork products a smart choice for those hoping to reduce their environmental impact.
In the case of cork, the finish is very important to determining how water-resistant the product will be. However, cork has natural springiness that makes it feel extra comfortable (a little like rubber) and makes it resistant to dents and dings. Plus, it has a unique visual texture that’s a little like wood’s but with a twist, for a very livable sense of flair.
Cork works beautifully for sleek modern spaces or contemporary ones, as it has a natural softness that gives it a friendly vibe. If you’re considering using carpet in some rooms and wood in others, consider cork for the entire home, and get the best of both worlds along with a sense of harmony.
Cost: Cork ranges from $3 to $8 per square foot, but keep in mind that some products may require an additional sealant to hold up to moisture and possible stains.
By Yanic Simard, Houzz
For more information on Windermere Evergreen please contact us here.
New Year’s Tips for the Home Aficionado

 Now that the end of the year is upon us, it’s time to start thinking about some New Year resolutions. At Windermere, our resolutions change very little year after year. That’s because the highest expectation we can set for ourselves is to anticipate and respond to the needs of our clients, while supporting the communities in which we serve.
If you’re 2018 resolution is to buy or sell a home, here are some suggestions to help you along the way. For everyone else, we’ve added some tips about building equity and investing in updates to your home.
Buying:
If you’re in the market to buy your first home or if you’re upsizing/downsizing, here are some ideas that can help you make this dream a reality:
- Create a buying timeline and work towards your goal
- Check your credit scores and work to improve your rating
- Start or increase your savings for a down payment
- Start the loan pre-approval process
- Meet with your real estate agent
- Start looking for homes
Selling:
If you are planning to put your home on the market in 2018, here are some good places to start:
- Create a selling timeline to work towards having your home ready for market
- Make a list of home improvements and a plan on how to manage them
- Get rid of the clutter
- Contact a real estate agent
Building Equity:
You may not be moving this year, but you can create a plan to increase your equity in the home you have now. Here are some tips:
- Take advantage of low interest rates by refinancing to a lower rate
- Consider refinancing to a shorter term loan
- Make extra lump-sum payments. Consider using your tax refund, cash gifts, work bonuses, garage sale money, or any other unexpected income toward paying down your principal.
- Pay every two weeks instead of once a month. A biweekly payment plan can substantially reduce the amount of interest you pay because you are breaking the interest accrual down from 30 days to every 15.
- Pay a little extra each month. Even if you’re only rounding up to the next $100 increment, putting a little extra money towards your principal every month can add up.
Investing In Your Home
You can add a lot of value and additional enjoyment to your home by investing in improvements and upgrades.
- Choose a home improvement project that will yield a good return on investment when you do choose to sell
- Create a home checklist to track maintenance projects over the year
- Make eco-improvements to increase your home’s sustainability and reduce your utility payments over the long-term. These improvements are generally a good return on your investment when reselling.
o Upgrade furnace to an efficient model
o Upgrade windows for better insulation
o Add alternative energy resources, such as solar power
o Update toilets and showers to low-flow
o Install a programmable thermostat
o Update to energy-efficient appliances
What are your New Year’s resolutions?
For more information on Winderemere Evergreen please contact us here.
Homeowners Insurance: Protect your home and your loved ones

 In addition to providing shelter and comfort, our home is often our single greatest asset. And it’s important that we protect that precious investment. Most homeowners realize the importance of homeowners insurance in safeguarding the value of a home. However, what they may not know is that about two-thirds of all homeowners are under-insured. According to a national survey, the average homeowner has enough insurance to rebuild only about 80% of his or her house.
What a standard homeowners policy covers
A standard homeowner’s insurance policy typically covers your home, your belongings, injury or property damage to others, and living expenses if you are unable to live in your home temporarily because of an insured disaster.
The policy likely pays to repair or rebuild your home if it is damaged or destroyed by disasters, such as fire or lighting. Your belongings, such as furniture and clothing, are also insured against these types of disasters, as well as theft. Some risks, such as flooding or acts of war, are routinely excluded from homeowner policies.
Other coverage in a standard homeowner’s policy typically includes the legal costs for injury or property damage that you or family members, including your pets, cause to other people. For example, if someone is injured on your property and decides to sue, the insurance would cover the cost of defending you in court and any damages you may have to pay. Policies also provide medical coverage in the event someone other than your family is injured in your home.
If your home is seriously damaged and needs to be rebuilt, a standard policy will usually cover hotel bills, restaurant meals and other living expenses incurred while you are temporarily relocated.
How much insurance do you need?
Homeowners should review their policy each year to make sure they have sufficient coverage for their home. The three questions to ask yourself are:
· Do I have enough insurance to protect my assets?
· Do I have enough insurance to rebuild my home?
· Do I have enough insurance to replace all my possessions?
Here’s some more information that will help you determine how much insurance is enough to meet your needs and ensure that your home will be sufficiently protected.
Protect your assets
Make sure you have enough liability insurance to protect your assets in case of a lawsuit due to injury or property damage. Most homeowner’s insurance policies provide a minimum of $100,000 worth of liability coverage. With the increasingly higher costs of litigation and monetary compensation, many homeowners now purchase $300,000 or more in liability protection. If that sounds like a lot, consider that the average dog bite claim is about $20,000. Talk with your insurance agent about the best coverage for your situation.
Rebuild your home
You need enough insurance to finance the cost of rebuilding your home at current construction costs, which vary by area. Don’t confuse the amount of coverage you need with the market value of your home. You’re not insuring the land your home is built on, which makes up a significant portion of the overall value of your property. In pricey markets such as San Francisco, land costs account for over 75 percent of a home’s value.
The average policy is designed to cover the cost of rebuilding your home using today’s standard building materials and techniques. If you have an unusual, historical or custom-built home, you may want to contact a specialty insurer to ensure that you have sufficient coverage to replicate any special architectural elements. Those with older homes should consider additions to the policy that pay the cost of rebuilding their home to meet new building codes.
Finally, if you’ve done any recent remodeling, make sure your insurance reflects the increased value of your home.
Remember that a standard policy does not pay for damage caused by a flood or earthquake. Special coverage is needed to protect against these incidents. Your insurance company can let you know if your area is flood or earthquake prone. The cost of coverage depends on your home’s location and corresponding risk.
Replacing your valuables
If something happens to your home, chances are the things inside will be damaged or destroyed as well. Your coverage depends on the type of policy you have. A cost value policy pays the cost to replace your belongings minus depreciation. A replacement cost policy reimburses you for the cost to replace the item.
There are limits on the losses that can be claimed for expensive items, such as artwork, jewelry, and collectables. You can get additional coverage for these types of items by purchasing supplemental premiums.
To determine if you have enough insurance, you need to have a good handle on the value of your personal items. Create a detailed home inventory file that keeps track of the items in your home and the cost to replace them.
Create a home inventory file
It takes time to inventory your possessions, but it’s time well spent. The little bit of extra preparation can also keep your mind at ease. The best method for creating a home inventory list is to go through each room of your home and individually record the items of significant value. Simple inventory lists are available online. You can also sweep through each room with a video or digital camera and document each of your belongings. Your home inventory file should include the following items:
· Item description and quantity
· Manufacturer or brand name
· Serial number or model number
· Where the item was purchased
· Receipt or other proof of purchase \Photocopies of any appraisals, along with the name and address of the appraiser
· Date of purchase (or age)
· Current value
· Replacement cost
Pay special attention to highly valuable items such as electronics, artwork, jewelry, and collectibles.
Storing your home inventory list
Make sure your inventory list and images will be safe incase your home is damaged or destroyed. Store them in a safe deposit box, at the home of a friend or relative, or on an online Web storage site. Some insurance companies provide online storage for digital files. (Storing them on your home computer does you no good if your computer is stolen or damaged). Once you have an inventory file set up, be sure to update it as you make new purchases.
We invest a lot in our homes, so it’s important we take the necessary measures to safeguard it against financial and emotional loss in the wake of a disaster.
What tips do you have for creating a home insurance inventory?
For more information on Windermere Evergreen please contact us here.
New Year’s Tips for Buying and Selling

 Now that the end of the year is upon us, it’s time to start thinking about some New Year resolutions. If your 2018 resolution is to buy or sell a home, here are some suggestions to help you along the way. For everyone else, we’ve added some tips about building equity and investing in updates to your home.
Buying:
If you’re in the market to buy your first home or if you’re upsizing/downsizing, here are some ideas that can help you make this dream a reality:
- Create a buying timeline and work towards your goal
- Check your credit scores and work to improve your rating
- Start or increase your savings for a down payment
- Start the loan pre-approval process
- Meet with your real estate agent
- Start looking for homes
Selling:
If you are planning to put your home on the market in 2018, here are some good places to start:
- Create a selling timeline to work towards having your home ready for market
- Make a list of home improvements and a plan on how to manage them
- Get rid of the clutter
- Contact a real estate agent (If you don’t have an agent, click here to be introduced to a Windermere Real Estate agent.)
Building Equity:
You may not be moving this year, but you can create a plan to increase your equity in the home you have now. Here are some tips:
- Take advantage of low interest rates by refinancing to a lower rate
- Consider refinancing to a shorter term loan
- Make extra lump-sum payments. Consider using your tax refund, cash gifts, work bonuses, garage sale money, or any other unexpected income toward paying down your principal.
- Pay every two weeks instead of once a month. A biweekly payment plan can substantially reduce the amount of interest you pay because you are breaking the interest accrual down from 30 days to every 15.
- Pay a little extra each month. Even if you’re only rounding up to the next $100 increment, putting a little extra money towards your principal every month can add up.
Investing In Your Home
You can add a lot of value and additional enjoyment to your home by investing in improvements and upgrades.
- Choose a home improvement project that will yield a good return on investment when you do choose to sell
- Create a home checklist to track maintenance projects over the year
- Make eco-improvements to increase your home’s sustainability and reduce your utility payments over the long-term. These improvements are generally a good return on your investment when reselling.
- Upgrade furnace to an efficient model
- Upgrade windows for better insulation
- Add alternative energy resources, such as solar power
- Update toilets and showers to low-flow
- Install a programmable thermostat
- Update to energy-efficient appliances
For more information on Windermere Evergreen please contact us here.
An Agent in Seller’s Clothing


Have you ever wondered if your real estate agent understands what you are going through? They come into your house speaking confidently about your neighborhood and market trends. They have vendors ready to help you prepare your home for sale. But do they really think it’s that easy? Do they understand the conversations that follow once they’ve left your dining room table? Have they lain awake at night in worry?
You might be surprised.
I’ve been a real estate agent for eight years and recently attempted to sell my condo. My income hadn’t been what I’d planned; I was upside down and worried about the risks of holding onto it. I wanted less stress, so after months of consideration, I decided to sell.
Here’s how it went down:
-I chose my agent and sat down for a meeting. “Are you willing to meet the market?” she asked? That wasn’t easy to answer!The choices I’d made at purchase (lay out, upgrades, etc.) weren’t as valuable in her eyes as I had anticipated. I tried to fight the urge to feel that my home was worth more than she did.
-We moved out of the condo and hired a great stager to “edit” what we’d left behind. What?! You don’t like the black and white poster of John Lennon from my mother’s Let It Be album?!
-We had handiwork done and a professional photographer shot some great images. My agent listed the property, but after only one day on the market without an offer, I was already anxious.
-Then the Homeowners Association sued the developer (long story, but in short: not good for sales) and convinced me that I was definitely not prepared to meet the market. So, we removed the home from the market, and moved back in.
-Then, the phone rang. Agents wanted to show it, earnestly offering “My clients aren’t concerned with litigation.” Surprise: I didn’t believe it. Right or wrong, I suspected that these well-meaning people would not make it all the way to closing. I wasn’t ready to board that roller coaster.
And, it felt like the market was finally turning.
A property that had once seemed like a heavy weight began again to look like home; like a place that – from a post-tax perspective – is only marginally more costly than renting. So, here I am, happy with my decision to stay in my home and reminded what it’s like to walk in my sellers’ shoes – a win-win situation all the way around.
Michael Doyle is an agent with Windermere Real Estate’s Lakeview office in Seattle, WA.
For more information on Windermere Evergreen please contact us here.
6 Clever Ways to Disguise Trash Bins
 You probably don’t give much thought to your garbage cans, other than remembering to put them out on the right day. But we all have to store our trash and recycling bins somewhere, and doing so can be a challenge on a smaller property, especially if you don’t want them to be an eyesore. If you’re struggling to find a stylish way to store your bins, check out these smart and inspiring ideas. Now, is it black or green bin day this week?
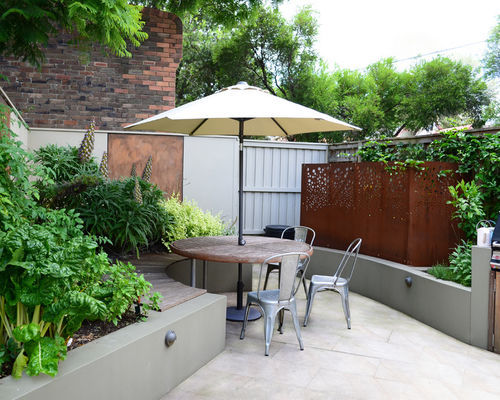
Garbage Bins 1: Outhouse Design, original photo on Houzz
Choose a screen. The curved screen in the corner of this courtyard is an attractive feature in its own right, thanks to the decorative cutwork pattern, and offers an elegant way to hide ugly plastic bins from view.
By using a screen like this, you can section off as much of the garden as you need — to store bikes or garden equipment as well as bins. To blend in the structure even further, you could grow climbers up and over the screen or along the wall behind.
Related: Outdoor Chairs to Entertain in the Garden
Create a brick shelter. Built in red brick to match the house, and tiled with slate, this practical storage area blends with the property’s exterior and actually enhances the space with its character and interest. The look is mirrored in the raised bed at the front of the drive for a coordinated finish.
A custom compartment on the left neatly houses the bin, while two smaller storage compartments on the right make room for stacking recycling boxes.
Make it part of the garden. The aim of this front garden design was to create a wildlife haven, and rather than see the bins as an unsightly obstacle to be hidden away, the owners decided to make them integral to the design.
They created a sturdy wooden structure with a living roof that works as an extension of the garden and is planted with wildlife-friendly flowers and foliage.
Related: Create a Wildlife Haven With a New Bird Bath
Design it into an outbuilding. In a larger space, an open-sided outbuilding like this one is ideal for storing and hiding bins. It’s painted a heritage shade and is partly screened in front with evergreen topiary to create a visually appealing feature — a great way to smarten up a drab drive.
This idea would complement a traditional or cottage exterior, but if your style is more contemporary than country, you could choose a sleeker style, or paint it a darker shade to tie in with the exterior of your home.
Tuck it into a border. Can you spot the trash bins on this drive? They’re neatly tucked away in the wooden box to the left of this image, and the impact of the structure has been much reduced by positioning it in a decorative floral border and planting low standard trees right alongside it.
The structure also has a green roof planted with succulents to further disguise the box and make it as visually appealing as possible.
Build a clever storage wall. If space is limited, why not make your recycling containers work extra hard by turning their storage area into a boundary wall, as these smart homeowners have. This neat wooden shelter screens the bins from the road while creating a clean, contemporary-style wall.
Related: More Designer Tips to Boost Curb Appeal
By Victoria Harrison, Houzz
For more information on Windermere Evergreen please contact us here.
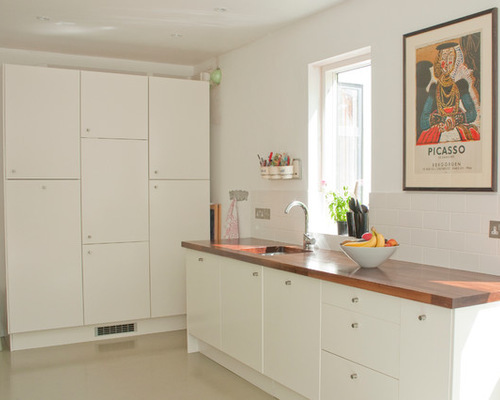
6 Ways to Personalize a White Kitchen

White-on-white kitchens have been a classic look for many years. Why does this trend endure? For starters, white connotes cleanliness, makes small spaces appear larger, and brightens rooms that are naturally dark.
Although many all-white kitchens are just lovely, some can appear a bit stark or cold. To help clients warm up their white, I recommend a variety of strategies, such as mixing metals and adding contrasting paint, fabric or wood. Read on for inspiration for personalizing your white kitchen so that it stands out from the crowd.
White Kitchen 1: Allard Ward Architects, original photo on Houzz
1. Warm metal accents. Copper, bronze, brass and polished nickel are just a few of the metals that can warm up an all-white kitchen. The gold sconces above the window and the white pendant lights, with their subtle hint of gold, add warmth and a touch of luxury to this all-white kitchen.
2. Color and metal. Moving beyond metallics alone, a single contrasting color when combined with metals can create drama in a white kitchen. In this photo, a modern white kitchen intermingles black pendants and countertops with gold seating. This combination contributes to the room’s sleek contemporary look.
3. Wallpaper. I love wallpaper, especially in kitchens. Wallpaper can introduce color, movement and dimension to a white kitchen. When applied to a lone wall, wallpaper can create a dynamic focal point, as shown in this photo. The bright white cabinets and crisp white walls are softened by the shades of blue in the fish swimming on the side wall. This kitchen’s under-the-sea motif is enhanced by the blue tile on the back wall and the sea urchin-shaped pendant lights.
4. Colorful island. Wood-stained islands often appear in white kitchens because of the richness and contrast they bring. This kitchen shows a creative alternative, pairing a chartreuse island with a chartreuse Roman shade. Together they lend a whimsical, personalized feel. To give your white kitchen a personal touch, consider painting your island your favorite color.
5. Tile rug. Layering in a rug is a great way to introduce color and texture to an all-white kitchen, but some clients worry that a rug could be an added source of dirt as well as a possible tripping hazard.
This clever kitchen resolves both issues with a tile rug instead of a fabric one.
6. Backsplash. A tile backsplash also can bring color and texture to your white kitchen. But who says a backsplash must be tile? This kitchen has a counter-level window in lieu of a tile splash. The window faces a luscious succulent garden, thus creating a green vista for an otherwise monochromatic kitchen.
By Barbra Bright, Houzz
For more information on Windermere Evergreen, please contact us here.
Home Staging Tips
 DIY Home Staging Tips:
 DIY Home Staging Tips:
With a little time, effort and imagination, you can stage your home to showcase its best features, sell it faster and get top dollar.
Clean up, pare down, and toss out: By simply getting rid of excess furniture and clutter, you can make any room look larger and more inviting.
Make it professional, not personal: Remove family photos, mementos and other personal items from the space. This not only eliminates clutter, it helps potential homebuyers envision their lives in the space.
Repurpose rooms: Do you have a “junk” room? You can transform a liability into an asset by turning an underused space into a reading nook, a craft room, a yoga studio or a home gym. Just clean it up, add a coat of paint, some furniture and the right accessories.
Lighten up: Light, airy rooms look bigger and more welcoming. You can create a pleasing effect by using the right wattage bulbs and multiple light sources. The right window treatments can also have a big impact. Choose fabrics that are light and gauzy, rather than dark and heavy.
Try a little color: Paint is the cheapest, easiest way to update your home. Stick with warm, natural hues, but try darker colors for accent walls and to highlight special features. You can give old furniture new life with a coat of shiny black paint—and freshen up the front door with a bold, cheerful color.
Add some decorative touches: Art, accessories, plants and flowers breathe life into a home. Make rooms more inviting with accessories that are carefully grouped, especially in threes. Pay attention to scale, texture and color. Bring the outdoors in with plants and flowers.
Picture-Perfect Staging:
When it comes to looking for a home most people start on the internet. The photos in your property listing can make a powerful first impression. According to a recent Wall Street Journal article, professional photos can increase home views up to 61%. Make sure your home is “ready for its close-up” by following these simple guidelines before the photographer shows up.
For exterior photography:
· Make sure no cars are parked in front of your house or in your driveway.
· Sidewalks and streets should be cropped out
· There should be up-close and angled shots, as well as long shorts that emphasize space.
· Clear away or trim vegetation blocking the front door or path to the door.
· Make sure lawns are mowed, hedges clipped, etc.
· Remove evidence of pets.
· Put away children’s toys.
· If you are selling a condo or townhome, such amenities as tennis courts, a gym, a garden patio or clubhouse should be photographed.
For interior photography:
· Make sure your house is spotless, windows are clean and rooms are decluttered.
· Repair all visible damage, e.g., bad water stains, gouges, chipped paing.
· Drapes and blinds should be open and lights on.
· Remove trash cans, close toilet seats.
· Use floral arrangements in kitchens and dining rooms.
· Make sure that interesting details and attractive features—e.g., wood floors, a carved mantel, marble countertops and ornamental tile backslashes, etc. – are photographed.
For more information on Windermere Evergreen please contact us here.
25 Ways to Make the Most of Small Spaces

Suburban homes—with their large spaces, big yards, and separate bedrooms for every child—will always be popular with families, especially families of four or more. But there’s also a contingent today that’s eager to live in a dense urban setting: a high-rise condominium in the downtown core, a small home in an urban neighborhood, a small apartment, or even a shared housing arrangement. For those people, designing, furnishing, and organizing these living spaces will require a very different approach.
Urban living spaces are usually much smaller than suburban homes, which means, if you use traditional furnishing and space-planning techniques, you’re bound to be frustrated by the outcome. But with a little planning and creativity, you can create a fully functional space that belies its size.
Small-space planning ideas
- Start with the biggest, most important piece in each room (the sofa, the dining room table, the bathroom sink, etc.), then plan the rest of the space around that item.
- Focus on the needs of those who will be living in the home full-time. Leave any accommodations for guests until later.
- Work to make every space multifunctional (e.g., a kitchen island that can also be used for eating; a home office that can also function as a TV room and/or guest room).
- Look for any opportunity to increase the amount of sunlight. Install glass doors and skylights, and leave windows unobstructed.
- The fewer walls separating spaces, the more open and spacious it will appear.
- Traditional staircases are an inefficient use of space. If you’re designing from the ground up, consider a spiral staircase instead.
- Light paint colors (especially white) will make a room look more spacious. The combination of light walls with a dark floor will magnify the effect even more. Consider painting one wall a contrasting color to create a stylish focal point.
Furnishing solutions for small spaces
- Your furnishings should be small mobile and, when possible, stackable. That way, spaces can be quickly reorganized to suit different situations.
- Furnishings that blend with the colors of your walls or floors (or are transparent) will make the space appear less cluttered. To add personality and warmth, accentuate with colorful throw pillows and rich fabrics.
- If you keep most furnishings against the walls, traffic flow will be improved, and it will make rooms feel larger.
- Furnishings that hang from the walls or have legs will also create the illusion of more space.
- In many cases, bench seating is better than individual chairs, because benches can accommodate more people and can be used as side tables when no one is sitting on them.
- Instead of a coffee table, consider small side tables. Instead of a full-size sofa, try a three-seat version, or even a love seat (just two cushions).
- A large, wall-mounted mirror will make the space appear larger.
- An open-sided bookshelf can do double-duty as an interesting room divider. Leaving it half empty will allow natural light to shine through.
- A table on wheels is good for the kitchen. Use it as an island in the center of the kitchen or roll it to the side and use is as a side counter.
- Consider using an under-counter refrigerator, together with an under-counter freezer, instead of one large, freestanding unit.
- In small spaces, there is no room for furnishings you don’t love. If something isn’t getting used much, or if you don’t really care for it, get rid of it.
Organizing small spaces
- The best furnishings are those that include storage space (a dining room table with drawers; an ottoman with a hollow interior; a bed that sits on a storage unit).
- Bookshelves and other wall-storage systems should be thin and as tall as possible to maximize storage while minimizing the amount of floor space used.
- Storage pieces with doors keep small rooms from looking cluttered and unkempt. Even glass doors can help achieve this effect.
- Remove food goods from their air-filled boxes and bags and store them in space-saving, stackable containers.
- Store larger things (like a vacuum cleaner, electronics, etc.) behind a free-standing decorative screen.
- A professionally designed closet storage system can double, and even triple, the space for your clothes. Removing the door(s) to the closet will ease access.
- Wall-mounted hooks are ideal for coats and much more. Pot racks are great for freeing up valuable cabinet storage space in the kitchen.
Many people think you need to sacrifice in order to live in a small space. But with these suggestions, you can simply adapt and enjoy your home to the fullest.
For more information on Windermere Evergreen please contact us here.
How the American Home has Evolved


Owning a home has been an American tradition from the start. But the home itself has changed dramatically over the years.
For example, you may be surprised to learn how much the size of the average American home has increased since the turn of the 20th century—especially when you compare it to the size of the average family during the same time period.
In the year 1900, the average American family was relatively large with 4.6 members, but the average home featured just 1,000 square feet of usable floor space. By 1979, family size had shrunk to 3.11 members, but the floor space they shared had expanded to 1,660 square feet. And by 2007, the average family size was even smaller still—just 2.6 members—while the average home size had increased by the largest amount yet—this time to 2,521 square feet.
To accommodate those larger homes, property lots have also had to expand in size. In the 1930s and ‘40s, Bungalow homeswere usually built on lots measuring 60 by 100 feet (for a total of 6,000 square feet). However, by 1976, the average size of a single-family property lot had expanded to more than 10,000 square feet. In 1990, it expanded again (to 14,680 square feet). Today, the average property lot in America is a staggering 17,590 square feet.
Exterior building materials
Until the 1960s, the building materials used on the exterior of most homes were limited to brick, wood, or wood shingles. However, by the early 1960s, many Americans chose to cover their homes with a more affordable material that was also maintenance-free: aluminum and vinyl siding. Today, many homeowners are using low-maintenance siding materials made of cement fiber.
Interior building materials
The primary building material for interior ceilings and walls for much of the 20th century was plaster applied over wood lathe. Modern day sheetrock didn’t become popular until the 1950s. In the 1960s, wood paneling and textured walls became prevalent, largely for their quick and easy application. In the 1970s and ‘80s, “popcorn ceilings” became a common way to hide imperfections in ceilings. Today’s style again favors smooth walls and ceilings, which can result in a lot of work removing paneling and textures in older homes.
Throughout the early 1900s, the floors throughout most homes were almost always bare wood. Linoleum tile became a popular choice for kitchens, bathrooms, and bedrooms in the 1940s. However, by the 1960s and 1970s, wall-to-wall carpeting was all the rage—even in bathrooms and some kitchens. Homes today feature a wide array of flooring materials, depending on both the region and the room’s function. For example, tiles are a more popular choice in warm regions than cold ones because they tend to stay cool; wall-to-wall carpeting is still popular in rooms like bedrooms and family rooms, where people like to feel most comfortable, while durable and easy-to-clean hardwoods, tiles and linoleum are more favorable in kitchens and high-traffic areas.
The Kitchen
At the turn of the 20th century, the kitchen was a place where the woman of the house did all the cooking. Kitchens were typically small, closed off from the rest of the house by solid walls, and far more functional than fashionable. Dining took place in the dining room.
Throughout the 1920s and ‘30s, kitchens remained stark workplaces with very few appliances. Food was kept chilled with an icebox (a non-electric, insulated box about the same size as a modern refrigerator that used a block of ice to keep everything cold). However, by 1944, 85 percent of American households had switched from an icebox to a refrigerator.
In the mid 1950s, the kitchen changed dramatically. It not only became larger, it also transformed into the heart of the home, where the whole family gathered to help prepare and even eat meals.
The 1950s also brought a host of kitchen innovations, from the stainless steel sink to electric ovens and stovetops. But the most exciting of all was the dishwasher. The 1970s marked the introduction of the microwave.
Today, the kitchen is still a place where everyone gathers. So it’s not surprising that may people favor open-concept kitchens, with no walls separating them from the dining or family room.
Appliance and amenities
The 1940s census was the first to ask homeowners about some of the amenities in their homes. The results are startling (though perhaps less so when you consider that this was during the depression): Less than 50 percent of homes had hot water, an indoor toilet or a bath tub; about one in five didn’t have a home phone.
By the 1950s, however, things had changed dramatically for the better. That’s when many Americans got a refrigerator, an electric stove, a dishwasher, and, ah yes, air conditioning. Until then, most homes were cooled with nothing more than a ceiling fan at best.
Thanks to the larger, Ranch-style homes being constructing in the 1950s, walk-in closets also made their introduction. The fabulous ‘50s also ushered in the two-car attached garage.
And let’s not forget the television; it exploded onto the scene in the early 1950s and by 1955, half of all U.S. households had sets. Today, the average home has little less than three TVs.
What hasn’t changed
Despite all these changes, one thing has remained the same: The number one reason why Americans chose to buy a home. According to Dan McCue, research manager at Harvard’s Joint Center for Housing Studies, “It’s always been seen as the best way to build net worth and equity.”
