
 Facebook
 X
X
 Pinterest
 Copy Link
Don’t Get Spooked! These Are a Buyer’s Warning Signs of a Haunted House

Posted in Buying by John Trupin

While you hear a lot about ghosts in October, they’re actually a year-round phenomenon (and they’re not all as friendly as Casper). Specters come in all shapes and sizes in real estate, and they can be spookiest to prospective buyers. So, if you’re in the market for a home right now, you might want to consider your threshold for the paranormal. Here are some ways to identify – and avoid – ending up with a haunted house.
Something doesn’t feel right. When it comes to finding a home, we talk a lot about how a home feels. People generally feel it in their gut when they have found “the one”. Same goes for ghosts. If you feel like something is off, but you just can’t put your finger on it, you probably want to investigate a little further. This is the perfect time to break out the Ouija board and grab a bottle of something strong for your nerves (caution: seeing ghosts may or may not be due to alcohol consumption).
Follow the history of the home. Hit the interwebs and do a little online investigation to find out if the home has any skeletons in its closets (literally). Did anyone die in the house? Was it built on an ancient burial gravesite? Both of these could be DEAD giveaways for paranormal activity. Public records can be helpful for basic information, or you can check out this handy website: www.diedinhouse.com. If you don’t mind the house’s sordid past, use it as leverage to knock some zeros off the asking price. What’s a house filled with dead people if you can get it for a steal?
Meet the neighbors. It’s always a good idea to get to know the neighborhood before moving in. Learn about the schools, check out the local shops and amenities, and take a good look at who your neighbors will be. If you walk next door and the equivalent of the Adams family is staring you in the face, it might be a good time to look at other options. And if you have no other options, it’s never too early to invest in a respectable tombstone. Hey, if you can’t beat ’em, join ’em.
Follow the paperwork. When selling a home, homeowners are required to fill out a “Self Disclosure Form” to reveal any known issues. In some states, this includes revealing if the home has any paranormal activity. In fact, if a home is known to be haunted, it can be deemed a “stigmatized home” which can impact the sale. But keep in mind, self-disclosure of paranormal activity is hard to qualify and prove, so buyers beware.
Look for more overt signs. Did you feel a tap on your shoulder, but nobody was there? Is there blood oozing through the walls or furniture moving by itself? Or maybe a spirit physically manifested itself in front of you. Well, this might be a ghost trying to get your attention. If you have an experience like this, it’s probably a good idea to find the nearest exit as quickly as possible and move onto the next home.
Let logic be your guide. So you’ve fallen in love with a home, but you suspect that it’s haunted. There could be a totally plausible explanation. Start by trying to explain the phenomena you are feeling. Could the creaks and bangs come from pests or plumbing issues? Perhaps the chills you feel are caused by a draft? Are you watching too many horror movies? Do you need to make an appointment with your shrink? What you think are signs of a haunting could all be in your head.
5 Dangers of Overpricing a Home

Posted in Selling by Windermere Guest Author

It is still a great time to be a seller, but in much of the Western U.S., the local real estate market has begun to soften. With significant increases in inventory, buyers now have more choices and less sense of urgency. If you are thinking about selling your home, pricing it correctly the first time is critical. Here’s why:
1. If you overprice your home, it won’t show up in some search results.
Buyers search for homes using the parameters they desire. Price range is one of the most critical. If you set an unrealistic price of $850,000 for your home, all the buyers searching for homes up to $825,000 will fail to see your property in their search results.
2. An overpriced home attracts the wrong buyer.
An overpriced home will not compare favorably with the realistically-valued homes in a buyer’s price bracket. If your home is missing the amenities, square footage or other features of homes within the price range you’ve placed it in it won’t sell.
3. Overpriced homes linger on the market and risk becoming “stale”.
The interest in a home is always highest when the listing first hits the market. When an overpriced home goes unsold for a long period of time buyers often wonder what is wrong with the property. When a buyer moves on from a listing they rarely come back, even if you drop the price.
4. You run the risk of getting less for your home than if you priced it correctly the first time.
A Zillow study showed that homes that linger on the market tend to sell for significantly less than their listing price. When a home sits on the market for an extended period of time, buyers feel they have lots of room to negotiate.
5. The longer your home remains on the market, the more expenses you incur.
Every month your home goes unsold you put out money for mortgage payments, utilities and other home expenses that you will never recover.
Setting a realistic price for your home from the start is critical. If you’re thinking of selling, our highly trained experts at Windermere Real Estate can provide you with a comprehensive pricing analysis based on current market conditions.
How Staging Your Home Well Impacts Its Value

Posted by John Trupin
 For more than 20 years, the benefits of staging a home have been well documented. Numerous studies show that staging helps sell a home faster and for a higher price. According to the National Association of REALTORS®, 88 percent of homebuyers start their search online, forming impressions within three seconds of viewing a listing. When a home is well staged, it photographs well and makes the kind of first impression that encourages buyers to take the next step.
Studies also indicate that buyers decide if they’re interested within the first 30 seconds of entering a home. Not only does home staging help to remove potential red flags that can turn buyers off, it helps them begin to imagine living there. Homes that are professionally staged look more “move-in ready” and that makes them far more appealing to potential buyers.
According to the Village Voice, staged homes sell in one-third less time than non-staged homes. Staged homes can also command higher prices than non-staged homes. Data compiled by the U.S. Department of Housing and Urban Development indicate that staged homes sell for approximately 17 percent more than non-staged homes.
A measurable difference in time and money
In a study conducted by the Real Estate Staging Association in 2007, a group of vacant homes that had remained unsold for an average of 131 days were taken off the market, staged, and relisted. The newly staged properties sold, on average, in just 42 days, – which is approximately 68 percent less time on the market.
The study was repeated in 2011, in a more challenging market, and the numbers were even more dramatic. Vacant homes that were previously on the market for an average of 156 days as unstaged properties, when listed again as staged properties, sold after an average of 42 days—an average of 73 percent less time on the market.
Small investments, big potential returns
Staging is a powerful advantage when selling your home, but that’s not the only reason to do it. Staging uncovers problems that need to be addressed, repairs that need to be made, and upgrades that should be undertaken. For a relatively small investment of time and money, you can reap big returns. Staged properties are more inviting, and that inspires the kind of peace-of-mind that gets buyers to sign on the dotted line. In the age of social media, a well-staged home is a home that stands out, gets shared, and sticks in people’s minds.
What’s more, the investment in staging can bring a higher price. According to the National Association of REALTORS, the average staging investment is between one percent and three percent of the home’s asking price, and typically generates a return of eight to ten percent.
In short, less time on the market and higher selling prices make the small cost of staging your home a wise investment.
Interested in learning more? Contact your real estate agent for information about the value of staging and referrals for professional home stagers.
Gardening Trends For 2018


Outdoor living during the spring and summer months is extremely popular. Months of cold, wet winters are followed by glorious spring colors and warm summer days of vivid blue skies. In this post, we thought that now would be the best time to share some pretty garden trends for 2018.
Wabi-Sabi

Leisure time should be just that: relaxing and rejuvenating. So why labor relentlessly to create and maintain a perfect landscape? Wabi-sabi, is the Japanese art of accepting transience and imperfect beauty. Relax and appreciate nature as it is, with humble imperfections, weeds and all. Recognize (and tell others) that dandelions and clover in untreated lawns are not blights. They are status symbols for ecological horticulture. Consider natural grasses and groundcovers as low-maintenance substitutes for sod. Opt for perennials instead of annuals, let flowers go to seed and give nature license to evolve on her own.
Reclaiming Small Outside Spaces

For many of us these days, space is at a premium and with house prices continually on the rise, more and more people are living in apartment blocks or tiny lots. Garden designers are determined to make even the smallest of spaces useful and attractive, and manufacturers have taken notice. Look for a better choice in planters that slot onto balcony rails. New models will have coverings for protecting plants from cold temperatures so that you can even grow seeds and vegetables on your balcony alongside your flowers.
Self-watering wall planter systems have been improved for 2018 and the hanging macramé plant holder is having a bit of a revival. Add a small patio heater and you have an outside space you can enjoy all year round with minimal effort.
Purple Passion

Pantone’s Ultra Violet is the color of the year. Maybe that’s why you find purple flowers in this year’s plant varieties and garden design. It’s easy to incorporate this color in the garden as there are many flowers and shrubs with this beautiful color. However, there are also several edible purple plants that you can grow. Purple vegetables are not only interesting and pretty, their unique color denote anthocyanins which are very beneficial to your health.
Re-Wilding

This is a style that keeps popping up time and again. However, 2018 has taken the re-wilding trend up another notch. It is still all about working with nature, growing wildflowers and supporting our pollinating insects. Re-wilding means adjusting plant selections to better support local wildlife and growing both seed-producing and berry-bearing plants. However, now it is also about using ‘green’ gardening products, natural solutions to bug and slug killers instead of chemicals and insecticides and using peat-free products.
Alfresco Living

Outdoor entertaining and kitchen areas are tipped to be a key trend for Spring/Summer 2018. We are not talking about a little nook corner just off the kitchen. Alfresco dining spaces are being pushed out into the garden itself and made into a major feature. These dedicated outdoor dining areas are surrounded by in-ground and container plants for that lush feeling. Special flooring, comfy furniture and mood lighting turn it into a little haven. Complete the trend with a sunken fire pit, barbecue or pizza oven and you might never want to leave.
Lighting The Way

Adding lighting to your garden is not a new thing. However, in this age of renewable energy, garden lighting companies are turning away from the more traditional lighting solutions we have seen in the past. The advances in solar energy capture, means that we can light up our gardens in a variety of fun, affordable and better ways. No more changing batteries or wiring up the garden with electricity.
The wide range of lighting methods allows you to create whatever ambience you want. Simple stand-alone lights can mark pathways, either discreetly embedded into the path edges or standing loud and proud along the side. Multi-colored fairy lights can be tangled among the overhead branches of a tree creating dazzling shapes and textures. Solar Mason jars can be hung from above or used as table lighting. Festoon lights can create an ambient glow around any outdoor space creating romantic nooks.
6 Foyers That Invite in Style
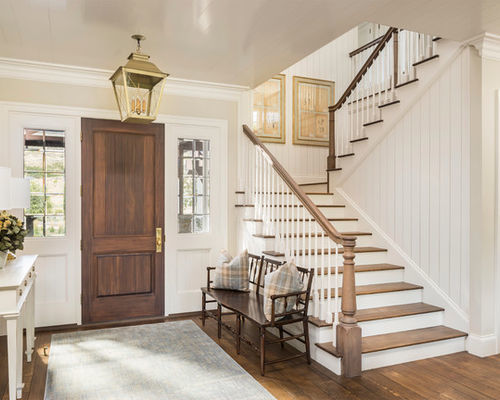

With a side entrance to your home, you can be a little more forgiving when it comes to messes. But with a front-door entry, through which you and your guests get a first impression of your home, you’ve got to be a little more on top of your style and storage game. The following are some of the most popular front-entry photos recently, as measured by the number of people who saved them to their Houzz ideabooks from January through March. Let us know which will inspire your next project.
Entryway 1: Jackson and LeRoy, original photo on Houzz
6. A classic wooden bench offers a spot to take off and put on shoes in this farmhouse-style entryway in Utah.
Related: Wipe Your Shoes on a Durable Outdoor Rug

Entryway 2: Nicole Benveniste Interior Design, original photo on Houzz
5. Benjamin Moore’s Plaster of Paris paint on the walls sets the soothing tone for this spacious San Francisco entry. A large painting featuring pale swaths of color hangs over a few well-chosen accessories atop a weathered wood table, starting this home off on the right foot.

Entryway 3: Brian Paquette Interiors, original photo on Houzz
4. Here, a burl-wood-type table and vibrant abstract art create movement and excitement.
Related: Flower Vases for the Entryway

Entryway 4: Tim Barber Ltd Architecture, original photo on Houzz
3. A rich wood built-in helps organize this Los Angeles entry. A frosted, ribbed glass window obscures the view into the living room.

Entryway 5: NEST Interior Design Group, original photo on Houzz
2. An eclectic mix of art and accessories beckons guests into this Houston home. A table offers a spot for keys and wallets, while wire baskets below can handle shoes and bags.

Entryway 6: Fluidesign Studio, original photo on Houzz
1. Creamy shiplap walls, rich wood floors and a wood console table establish a refreshing air in this Minneapolis home.
By Mitchell Parker, Houzz
Find a New Home in Four Steps


Whether you’re a first-time homebuyer or a current owner looking for a bigger home, the ideas below will help you better navigate that all-important first step: Finding a property that you like (and can afford).
The search for a new home always starts out with a lot of excitement. But if you haven’t prepared, frustration can soon set in, especially in a competitive real estate market. The biggest mistake is jumping into a search unfocused, just hoping to “see what’s available.” Instead, we recommend you first take some time to work through the four steps below
Step 1: Talk to your agent
Even if you’re just thinking about buying or selling a house, start by consulting your real estate agent. An agent can give you an up-to-the-minute summary of the current real estate market, as well as mortgage industry trends. They can also put you in touch with all the best resources and educate you about next steps, plus much more. If you are interested in finding an experienced agent in your in your area, we can connect you here.
Step 2: Decide how much home you can afford
It may sound like a drag to start your home search with a boring financial review, but when all is said and done, you’ll be glad you did. With so few homes on the market now in many areas, and so many people competing to buy what is available, it’s far more efficient to focus your search on only the properties you can afford. A meeting or two with a reputable mortgage agent should tell you everything you need to know.
Step 3: Envision your future
Typically, it takes at least five years for a home purchase to start paying off financially, which means, the better your new home suits you, the longer you’ll most likely remain living there.
Will you be having children in the next five or six years? Where do you see your career heading? Are you interested in working from home, or making extra money by renting a portion of your home to others? Do you anticipate a relative coming to live with you? Share this information with your real estate agent, who can then help you evaluate school districts, work commutes, rental opportunities, and more as you search for homes together.
Step 4: Document your ideal home
When it comes to this step, be realistic. It’s easy to get carried away dreaming about all the home features you want. Try listing everything on a piece of paper, then choose the five “must-haves,” and the five “really-wants.”
For more tips, as well as advice geared specifically to your situation, connect with an experienced Windermere Real Estate agent by clicking here.
13 Appliance Tips & Hacks for Household Chores


Modern home appliances make our lives so much easier: They tackle dreaded household chores, saving us time and effort. There are lots of ways to use them, however, that you may not have thought of before. From cleaning your ceiling fixtures in the dishwasher to vacuuming your pet, here are 13 little-known tricks for getting more than your money’s worth from your appliances.
- Sanitize small toys and more. Use your dishwasher to wash and sanitize teething rings, small plastic toys, mouth guards, and even baseball caps. Place items on the top rack and run the dishwasher as usual with detergent (without any dirty dishes). Put smaller items in a small mesh laundry bag so that they don’t move around.
- Clean ceiling fixtures. At least once or twice a year, remove and clean your glass ceiling fixtures and light covers in an empty dishwasher. Run the machine on the normal cycle.

- Eliminate wrinkles from clothing. To smooth out wrinkled clothes or linens left too long in the dryer, toss a damp, lint-free cloth in with them. Run the load on the lowest setting for 10 to 15 minutes. Newer dryers also feature a steam setting that removes wrinkles and refreshes clothing between wears.
- Disinfect sponges and dishcloths. Kitchen sponges and dishcloths contain billions of germs. Clean and disinfect them daily by zapping them on high in the microwave for 2 minutes to kill germs.
- Freshen up your curtains. Vacuum heavy drapes with the upholstery attachment. Use the dusting brush attachment for lighter drapes. Wash sheer curtains in the washing machine on the delicate cycle, then hang them up while they’re damp to prevent wrinkles.
- Remove wax from fabric or carpet. To get rid of wax on a tablecloth, place it in your freezer until the wax is hard. Then put a flat paper bag over the wax and another under the fabric. Iron the top bag with a medium-hot iron until all the wax transfers to the bag. To remove wax from a carpet or rug, place an ice pack on the spot until the wax hardens. Shatter the wax and vacuum up the chips.
- Clean baseboards. Dusting baseboards can be a backbreaking chore. Use your vacuum cleaner and the dusting brush attachment to avoid having to bend down. Do the same to clean chair and table legs.

- Organize your fridge. Use the built-in features of your refrigerator to organize food by category. Designate certain shelves or areas for leftovers, preferably front and center, so you don’t forget they’re in there. Use special-purpose bins for their intended use: crispers for vegetables, deli trays for deli meats and cheeses, cold storage trays for meats. Newer models also feature convertible cooling zones to keep food fresh.
- Dust blinds. Extend the blinds fully and turn the slats to the closed position. Use the dusting brush attachment on your vacuum cleaner to clean the slats from top to bottom. Then open and reclose the slats in the opposite direction and repeat the process.
- Clean your microwave. The best time to clean your microwave is immediately after using it. Thanks to residual steam, all you have to do is wipe it out with a paper towel or damp sponge. To clean old messes, microwave 2 cups of water on high for 5 minutes. The steam will soften cooked-on spills, which you can wipe off with a paper towel or cloth.

- Exterminate dust mites. Dust mites live off human and animal dander and other household dust particles. They thrive in sofas, carpets, and bedding. Use the upholstery attachment to vacuum your mattress and upholstered furniture regularly to minimize dust mites. Be sure to empty the canister in an outdoor trashcan.
- Groom your pet. If your dog or cat doesn’t hide when you get out your vacuum cleaner, try using the dusting brush attachment to brush your pet. It’s a gentle way to collect shedding fur.
- Remove grime from shower liners. Wash plastic shower curtain liners in the washing machine with hot water and detergent on the regular cycle. Throw in a small bath towel to help “scrub” mildew and soap scum off the liner. Then rehang the liner and let it air-dry.
Have you found any unusual cleaning hacks for your appliances? Share in the comments below!
Organizing and cleaning expert Donna Smallin Kuper writes for The Home Depot about easy organization hacks, including the best ways to use your appliances. To view The Home Depot’s selection of appliances, click here.
For more information please contact us here.
This article is editorial content that has been contributed to our site at our request and is published for the benefit of our readers. We have not been compensated for its placement.
Windermere Foundation by the Numbers


For the past 29 years, the Windermere Foundation has been helping those in need in our communities through donations to local organizations that provide services to low-income and homeless families. In 2017, the Windermere Foundation raised over $2.4 million in donations, bringing the total to over $35 million raised since we started this effort in 1989. The following infographic details exactly how these funds were dispersed in 2017 and the types of organizations that benefited from them. For more information please visit windermere.com/foundation.
Fruit Trees for a Small Garden


I have a very small backyard, but I still dream of planting a garden with a few fruits and vegetables like tomatoes, kale or strawberries. I never thought I had enough space for a fruit tree until I recently discovered dwarf fruit trees. Even if you have a large garden area, dwarf fruit trees are a great option as they take much less space.
Dwarf fruit trees:
Come in many types – apples, cherries, lemons, oranges, pears and more
-
- Grow anywhere from 3 to 15 feet tall
-
- Can grow in an 8″ diameter pot or in the ground
-
- Yield full size fruit
-
- Require 8-10 hours of full sun
-
- Usually the variety of fruit is grafted to a type of rootstock that keeps the tree shorter (a rootstock is a type of root that is specifically grown for other plants to be attached to)
Where can you find one?
Your local nursery is the best place to find a dwarf fruit tree.
Glean extra fruit for your local food bank
If you end up with more fruit than you can eat, be sure to find a gleaning organization in your area. These groups can collect the extra fruit throughout a neighborhood and donate the harvest to a local food bank.
For more information on Windermere Evergreen, please contact us here.
How Tax Reform Affects Homeowners


New tax legislation was signed into law at the end of 2017, and it included some significant changes for homeowners. These changes took effect in 2018 and do not influence your 2017 taxes. Here’s a brief overview of this year’s tax changes and how they may affect you*.
The amount of mortgage interest you can deduct has decreased.
Under the old law, taxpayers could deduct the interest they paid on a mortgage of up to $1 million. The new law reduces the mortgage interest deduction from $1 million to $750,000. These changes do not affect mortgages taken out before December 15, 2017.
The home equity loan deduction has changed.
The IRS states that, despite newly-enacted restrictions on home mortgages, taxpayers can often still deduct interest on a home equity loan, home equity line of credit (HELOC) or second mortgage, regardless of how the loan is labeled. The Tax Cuts and Jobs Act of 2017, enacted December 22, suspends from 2018 until 2026 the deduction for interest paid on home equity loans and lines of credit, unless they are used to buy, build or substantially improve the taxpayer’s home that secures the loan.
The property tax deduction is capped at $10,000.
Previously taxpayers could deduct all the state, local and foreign real estate taxes they paid with no cap on the amount. The new law limits the deduction for all state and local taxes – including income, sales, real estate, and personal property taxes – to $10,000.
The casualty loss deduction has been repealed.
Homeowners previously could deduct unreimbursed casualty, disaster and theft losses on their property. That deduction has been repealed, with an exception for losses on property located in a federally declared disaster area.
The capital gains exclusion remains unchanged.
Homeowners can continue to exclude up to $500,000 for joint filers or $250,000 for single filers for capital gains when selling their primary residence as long as they have lived in the home for two of the past five years. An earlier proposal would have increased that requirement to five out of the last eight years and phase out the exclusion for high-income households, but it was struck down. Find out more about 2018 tax reform.
How does tax reform affect your plans for buying or selling a home?
The changes in real estate related taxes may change your strategy. Contact your Windermere agent to learn more. If you need help finding an agent, we’re happy to help.
*Please consult your tax advisor if you have any questions about how the new tax reform impacts you
For more information on Winderemere Evergreen, please contact us here.
