
 Facebook
 Twitter
 Pinterest
 Copy Link
5 Mid-century Modern Homes That Make the Most of Their Small Design

Posted in Houzz.com and Architecture by Houzz.com
Midcentury modern homes were small out of necessity. Money was in short supply after World War II, so architects and builders had to keep houses compact yet functional to stay within homeowners’ budgets. At the same time, lifestyles were changing. Smart architects took on a new approach and designed homes with an open feel, which differed greatly from the boxy designs of the previous era.
Related: Why You Should Embrace Your Midcentury Modern Kitchen

Midcentury Modern 1: Flavin Architects, original photo on Houzz
I’ve been enamored with midcentury modern homes since my childhood in California, where I was privileged to spend time in the intimate houses designed by Frank Lloyd Wright apprentice Mark Mills. Mills was the on-site architect for Wright’s famous Walker House, or Cabin on the Rocks, in Carmel, California, pictured. It was during this time that Mills learned an important lesson from Wright: Reject a larger house in favor of a modest home with flowing spaces and no excess.
The following ideas show how midcentury modern homes beautifully make the most of their space in ways that can easily be incorporated in homes today.

Midcentury Modern 2: Wheeler Kearns Architects, original photo on Houzz
1. Open floor plan.
Above all else, the open floor plan is the defining characteristic of midcentury modern homes. Closed-off rooms gave way to flowing spaces that strung one room to the next to form fluid kitchen, living and dining areas.
In a small home, the key to making the open floor plan work is to understand which rooms need privacy, and when. Of course, bedrooms and bathrooms need separation from the main areas of the home, but it’s also good to consider other areas that need privacy: for example, a study where a parent can work without interruption while the kids play nearby.
In this lake house by Wheeler Kearns Architects, the common areas are located in a centralized area, while the more private areas are off to the side or tucked away on another level.

Midcentury Modern 3: Balodemas Architects, original photo on Houzz
2. Expanded sightlines.
The tendency of midcentury modern homes to have open floor plans speaks to the elegant details often seen within these houses. Without trying to be too sparse, midcentury designers included functional details in their homes that were as uncomplicated as they were beautiful. Finding the balance between sophistication and openness was in the hands of the architect.
Take, for example, the stairs in midcentury modern homes. In this remodel of a midcentury home by Balodemas Architects, they preserved much of the original stair and design. The riser, or the vertical part that connects the stair treads, was simply left out for a lighter appearance. The stair was no longer in a hall but fully opened up and integrated into a room. Walls were often dispensed with entirely. Instead, partial-height screens inspired by Japanese shoji were used to subtly separate spaces.

Midcentury Modern 4: Steinbomer, Bramwell & Vrazel Architects, original photo on Houzz
3. An instance to avoid “open.”
While photographs of midcentury modern homes often feature great walls of glass, what’s often not shown, perhaps because they are not as photogenic, are the equally generous opaque walls.
These walls are key to the home’s aesthetic success. They provide a protective backing to the composition, since the opaque side of the home often faces the road, as with this house by Steinbomer, Bramwell & Vrazel Architects. Although the back of the house is open, with lots of glass and a sense of ease between inside and out, the street-facing side would never give that away. An opaque wall creates a boundary to the outside world while extending the perceived size of the home. Walls of glass are expensive, so opaque walls are also an economical design move.

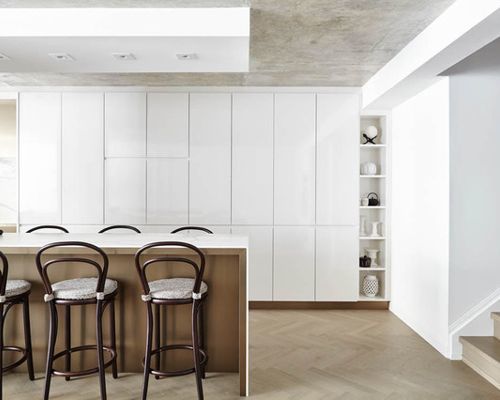
Midcentury Modern 5: Flavin Architects, original photo on Houzz
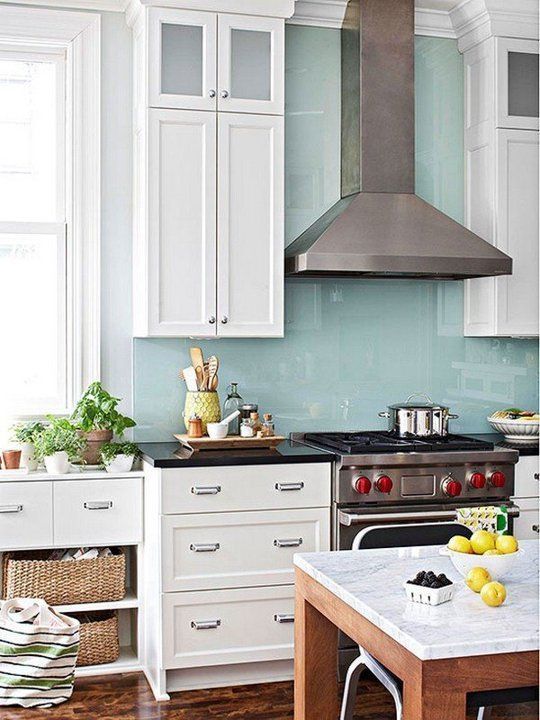
4. Everything in its place.
Thoughtful storage is a another key aspect of what makes a small midcentury home completely livable. Most midcentury modern homes, particularly those on the West Coast, had no basements or attics, so storage closets needed to be located among the main living spaces. In part, the answer was to do more with less by having well-designed storage throughout and daily items close at hand, as in this kitchen. This has to be married to an ethic of keeping only what you need and having periodic yard sales.

Midcentury Modern 6: Koch Architects, Inc. Joanee Koch, original photo on Houzz
5. Display with a purpose.
In a small home with innovative but limited storage, it’s important to have display areas for the pieces that don’t need to be tucked away in drawers or closets. This was done beautifully in midcentury modern homes by integrating display areas as a means of aiding with the potential conundrum of scarce storage.
This restoration by Koch Architects shows this exact notion at work. Every other step in the stair has an integrated bookshelf. This would make a perfect rotating library with a range of titles easily seen while ascending the stair.
By Colin Flavin, Houzz
Choosing the Right Backsplash for Your Kitchen
Posted in Living by John Trupin
Every chef’s kitchen should have a style that matches the delicious food that comes out of it. But even if you’re doing little more than making mac and cheese out of a box, your kitchen still can be a place of color and creativity. Kitchen backsplashes are nothing new, but they’ve seen a recent surge in popularity. We’re fortunate to see homes every day with creative takes on this tiling trend, so we decided to showcase some popular backsplash designs to serve as inspiration.
Glass Tile

Image Rights – Better Homes & Gardens
- When designing a kitchen, function and flair should work hand in hand. The appeal of glass tiling is that it’s easy to clean.
- Backing up the functionality is affordability. While glass tiling runs more expensive than ceramic, the cost is typically below stainless steel, and even some stones.
- Glass tiling is perfect for those with an artistic flair. Whether it’s simply a splash of color, a full mosaic, or even an intricate design, glass tile lets your inner artist shine.
- While the initial cost may be greater, glass tiling can more easily be found in pre-set sheets, making DIY installation far easier than many other types of tiles.
Ceramic Tile

Image Rights – Kitchen-Design-Ideas.org
- If you need a backsplash that can hold up to consistent use, ceramic tile is a great fit.
- The most cost-effective tile to professionally install, ceramic tiling offers a glazed shine with a variety of color options.
- Creating a clear, simple, ceramic backsplash is a great way to add a colorful flair to your kitchen.
- Between the cost-effectiveness and its low-maintenance nature, ceramic is unsurprisingly the most common type of kitchen tiling.
Metallic Tile

Image Rights – Architecture Art Designs
- Stainless steel is one of the more popular backsplash options for those interested in a metallic finish, but we’re also seeing more aluminum, copper, and bronze tiles.
- The range in metal type obviously impacts the cost, but most metal tiles are much more expensive than their ceramic counterparts – at least $10 per square foot more.
- For that extra cost, however, you’ll receive a sturdy backsplash with a modern sheen that is easy to clean.
- With stainless steel in particular, consistent maintenance is necessary to avoid a dulling of the backsplash’s shine.
Stone Slab

Image Rights – Houzz.com
- Sturdy? Check. Waterproof? Check. Classy? Check. From soapstone to marble to granite to good old-fashioned brick, there is no more low-maintenance backsplash base than stone.
- For the pleasure of acquiring a stone backsplash, you’ll typically pay more than most other materials. Between installation and material cost, the up-front payment can approach $1,000 for less than 30 square feet of wall space.
- With a wide range of stone to choose from, a number of color options are available at varying costs.
- If that upfront payment is manageable, the results will blend both aesthetics and function, and stone’s resiliency makes any follow-up costs minimal.
For an expert DIY challenge, there are many other ways to create a satisfying backsplash that fits your fancy, including vinyl wallpaper, wood, and even beadboard. What’s your dream backsplash style?
Fruit Trees for a Small Garden

I have a very small backyard, but I still dream of planting a garden with a few fruits and vegetables like tomatoes, kale or strawberries. I never thought I had enough space for a fruit tree until I recently discovered dwarf fruit trees. Even if you have a large garden area, dwarf fruit trees are a great option as they take much less space.
Dwarf fruit trees:
Come in many types – apples, cherries, lemons, oranges, pears and more
-
- Grow anywhere from 3 to 15 feet tall
-
- Can grow in an 8″ diameter pot or in the ground
-
- Yield full size fruit
-
- Require 8-10 hours of full sun
-
- Usually the variety of fruit is grafted to a type of rootstock that keeps the tree shorter (a rootstock is a type of root that is specifically grown for other plants to be attached to)
Where can you find one?
Your local nursery is the best place to find a dwarf fruit tree.
Glean extra fruit for your local food bank
If you end up with more fruit than you can eat, be sure to find a gleaning organization in your area. These groups can collect the extra fruit throughout a neighborhood and donate the harvest to a local food bank.
For more information on Windermere Evergreen, please contact us here.
12 Tips for Making Your Bedroom Cozier
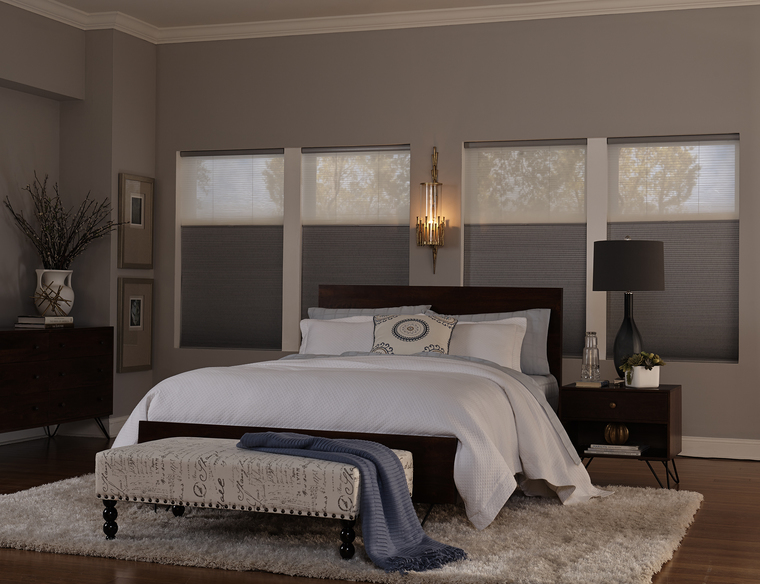

At the end of a long day, your bedroom should be a sanctuary of comfort that welcomes you in. But, as a room that guests rarely see and in which homeowners spend most of their time with their eyes closed, its upkeep frequently gets pushed to the bottom of the to-do list. Thankfully, there are some little design tricks that can make a big difference. Turn your bedroom into a restful retreat when you up its coziness factor with a few of these easy ideas.
- Layer textures. Sheepskin rugs, a down comforter, plush pillows and knit blankets can add a softness to the room that will make you want to sink right in. Lift these textures upward, with a canopy, tufted headboard, billowy curtains and hanging textiles (like a weaving) so even the walls and ceiling feel snuggly.
- Pick the right paint. Dark, saturated colors make a room feel like it’s embracing you, which is ideal for setting a sleepy environment. But if you’re nervous to commit to a dark color on the wall, choose a pale dusty blue, sage green or another light natural color for a soothing tone (just steer clear of energetic hues). Have you ever wanted to sleep on a cloud? Go with all-white paint and decor which makes even a basic bedroom feel soft and spa-like.
- Personalize it with reminders of the places and things that make you feel at home. Do you have a fondness for flowers? Bring floral patterns in on your textiles. Do you dream of vacation at the lake? Frame a photo of your favorite spot! Photos or paintings of uncluttered natural landscapes—like a sunset reflecting on water or a hammock under the shade of an oak—can rekindle memories of relaxation and are perfect for creating a sense of calm.
- Add mood lighting. Soften the light to mimic dusk for an intimate mood with dimmer switches, lamps, lanterns or even string lights. Just make sure you can reach the switch from bed, so you don’t have to disturb your peace to get up and turn it off when you’re ready to roll over and fall asleep.
- Skip metallic finishes. Choose warm natural decor options like wood and fabric instead of cold, manufactured metallics. This goes for everything from your bedroom furniture to window treatments. Faux wood blinds, especially when paired with floating curtains, fit with a cozy aesthetic and let you filter out harsh sunlight and maintain privacy for a truly sheltered slumber.
- Bring on the books! Stacks of good reads invite you to snuggle in and get lost in another world. A true retreat is a room with plenty of books that begs you to stay.
- Fix up—or fake—a fireplace. If your bed sits hearthside, embrace this romantic accent with styled logs and a decorated mantle. If you don’t have such a luxury, create a faux fireplace to add comfort and warmth through your décor: Arrange oversized candles and lanterns safely within a homemade hearth to bring in that cozy fireside feeling without changing the structure of your home.
- Keep the room uncluttered. When you want to settle in, a mess distracts you from finding comfort, so minimize the amount of stuff that makes it to your bedroom. Watch your nightstand, which often becomes a catch-all, by making a point to rehome any wandering wares now, and put things away as soon as they enter the room in the future. If you’re apt to let laundry pile up, keep it behind the closed doors of your closet so it doesn’t crowd your peace.
- Create a sense of timelessness. Tuck clocks and electronics away so they’re nearby if you need them, but their wires and harsh silhouettes aren’t reminding you of life outside your sanctuary. The hush that falls in a room devoid of gadgets will allow you to easily disengage from the stresses of reality.
- Rethink your bedding. Add a pillow-top pad to your mattress so it feels like your bed is hugging you when you climb in. Or, bring in a contoured body pillow which actually can hug you! Linen sheets feel luxe compared to cotton and are a simple swap to boost your bower. Many people also swear by skipping the top sheet while dressing their beds, which allows them to burrow directly into a fluffy comforter.
- Appeal to your sense of smell. Aromatherapy can have a huge impact on your perception of a space, so find some soothing essential oils or a sweet candle to blanket the room with an ambiance you adore. As soon as you open the door, you’ll be eager to plunge into your little oasis.
- Nestle into nooks. A window seat, a reading nook or an upholstered seating area are all inviting spaces that can draw you in from the doorway. The more intimate alcoves you can create, the cozier your bedroom will feel!
Flooded with soft lighting, plush textures and other comfy touches, your bedroom environment will envelope you at day’s end. And, perhaps even better than the idea of your bedroom refresh itself, is knowing that none of these tips take longer than a weekend to complete! So, slide into your slippers as you settle on which cozy updates you’ll select for your new favorite room of the house.
For more information on Windermere Evergreen, please contact us here.
Increase your living space—and your home’s value


Cooking and dining alfresco is arguably the single greatest thing about warm weather in spring and summer, but most backyard barbeques involve a million trips to and from the kitchen. As such, one of the hottest trends in new home construction is outdoor kitchens. Outdoor kitchens typically feature a comfortable eating area with a combination of cabinets, sinks, warming drawers, prep counters, ranges, and refrigerators—all within arm’s reach of the grill. Outdoor kitchens provide a natural gathering spot for friends and family and can add to the value of your home.
How elaborate your outdoor kitchen should be depends on how often you plan to use it. Some people enjoying dining outdoors every evening, while others reserve it for special occasions and social gatherings. Regardless of the frequency of use, you need to use materials that do well in all kinds of weather. Stone sinks, stainless steel cabinets, and slate countertops will withstand the Seattle rain, as well as the months that pass between barbeque seasons. Many outdoor kitchens also feature pergolas or other roof structures to shield guests from sun and rain. Something else to consider is adding an outdoor gas heater or fireplace, which will extend the amount of time you can use your outdoor kitchen into the fall and winter months.
In addition to the convenience of having all your grilling accoutrements within a handy distance, a well-built outdoor kitchen also adds to the value of your home. And you don’t have to have a new home to reap the benefits. With the right space and backyard layout, owners of existing homes can easily add-on an outdoor kitchen area. When adding an outdoor kitchen to an existing home, power, gas, and water lines often have to be extended from the home, so be sure to hire a qualified contractor to do the work for you. By extending your living space outside, you have essentially increased the square footage of your home. In many cases the increase in your home’s value will equal or even sometimes exceed the cost of the project itself.
The benefits of an outdoor kitchen area and living space are many. And with the convenience of having your drinks, condiments, meat, and cooking space all in one easy-to-reach place, you can spend the precious summer moments right where you should—outside with friends and family.
What features would you include in an outdoor kitchen?
For more information on Windermere Evergreen and our agents, please contact us here.
Spatially Limited Gardening: The Indoors is the New Outdoors
 It is the official start to the gardening season! For those who have large outdoor spaces, it is the perfect time of year to make a trip to the home and garden store, work in your gardens, and plant new growth. For those who live in smaller city quarters and whose outdoor space comfortably holds little more than a potted plant, we are forced to be more creative with our green space.
Decorative plants and nurturing vegetation is something that makes my house a home, even if small city living quarters has forced us to learn to take the outdoors- in and work with what space we have. Indoor plants, flowers, and gardens are a pleasing alternative when you do not have the space or the desire to be outdoors. Adding some green to your home can be decorative, fragrant, and even edible. Planting and nurturing your growth is a fun do-it-yourself project that can be a whole household activity.
Where to start
How will you grow and what supplies will you need? First decide on your method of growing.
Traditional Potted Plants are a great starting point for the non-gardening types. Potting plants is relatively simple, cost efficient, and spatially low maintenance. Check out these ideas for potting and planting in small spaces.
Vertical Gardens break away from the customary terracotta pot. They are both modern and space saving. In a vertical garden you are able to grow a variety of plants, flowers, herbs, and vegetables. They can be practical and decorative inside or out. Learn more about creating your own vertical garden here.
Hydroponic Systems are a soil-free gardening solution that can involve little to no pesticide use. Green Tree’s Hydroponicsreports that the growth rate of a hydroponic plant is 30-50 percent faster than that of a soil plant. Here’s what it takes to build your own, however you can also purchase hydroponic systems online.
Terrariums are “making a comeback” according to the New York Times. Terrariums can be uniquely ornamental and perfect for tight spaces that need a hint of green. Check out some samples and get design ideas here.
What growing methods have worked well for you?
What to grow?
That are good to eat …
Herbs: growing edible items can be very rewarding. Herbs are my go-to item to grow inside because they are low maintenance and take up little space. I prefer to pot basil, parsley, chives, thyme, cilantro, and oregano.
Grasses, like wheat grass, are becoming popular to grow indoors and decorate your home with.
Fruits and vegetables tend to take up more space and are more demanding. However tomatoes, peppers, radishes, leaf lettuce, potatoes, and carrots are a few fruits/vegetables that will grow well indoors.
That are good to look at …
Several flowers and house plants will flourish and bloom indoors. I enjoy the fragrance of Gardenia and the appeal of a Boston Fern in a hanging basket. However, using a plant encyclopedia will help you find which plant is right for you and your home.
What do you prefer to grow?
Making it look good?
The great part about bringing your garden inside is that it lets you use vegetation as a decoration. Whether you prefer to arrange flowers, string kokedama, or paint a fun plant pot, your vegetation and the way you display it can have an impact to your overall décor. How do you decorate with your vegetation?
For more information on Windermere Evergreen, please contact us here.
Outdoor Living Trends


Summer is just around the corner and there is no better way to prepare than indulging in some exciting backyard inspiration. Your outdoor living space can be more than just a place to spend time with family and friends; it can be your sanctuary as well. This year is the time to turn your backyard into your own personal vacation spot.
If you don’t have a tub already, consider adding a sunken hot tub into your backyard with a deck of natural stone, tall grasses, and outdoor curtains for privacy. Include pillar candles and some twinkling lights for ambiance.
If you entertain a lot, a kitchen is the ideal outdoor space for summer entertaining. Bring out your inner Bobby Flay with a cooking station that includes a high-end grill, refrigerator, wine chiller, and elegant washbasin. Round this all out with a concrete counter, bluestone tile floor, and stainless steel.
Nothing says summer like outdoor movies and your own personal drive-in. All you need is a projector to watch your favorite movie, some dangling lights in the trees, blankets, and pillows. You could also watch it from a hanging bench or my personal favorite, a floating bed.
Gardening can go beyond being a relaxing pastime; consider growing your favorite foods and join the “farm to table” movement. In 2012, people spent $1.2 billion more dollars on food gardening than they did flower gardening. An easy way to incorporate this is to use blueberries as foundation plants or other fruits, such as raspberries. If you already have flowers planted, tuck a pepper plant or basil in between your flowers.
A reading nook outdoors is the perfect way to get lost in your favorite book or magazine. You can convert a small shed into a private reading spot, an arbor with a bench surrounded by clematis, or a relaxing hammock. These hideaway spots are what turn your home into a staycation resort.
Is your ideal summer situated by a campfire? Build a fire pit and enjoy s’mores in the comfort of your backyard. Use an old wine barrel, bricks, stones, or a concrete bowl. A lowered fire pit is great if you want to use sand for a beachy atmosphere. On a warm summer night a campfire sets just the right mood for outdoor fun.
Having a water feature in your backyard instantly creates a Zen space. They can deflect unwanted attention by drowning out unwelcome sounds. Add a fountain, pondless waterfall, or small stream to complete the vibe. If you want a smaller commitment, a shallow recirculating foundation will also do the trick. All you need is a simple foundation and recirculating pump.
To enhance your space with little to no cost, add dangling vines or twinkling lights as a finishing touch to create your backyard haven. Time is something there never seems to be enough of, but these low-maintenance enhancements will enable you to spend that time in your very own outdoor living space.
For more outdoor living ideas, follow our Pinterest board.
For more information on Windermere Evergreen, please contact us here.
5 Creative Ways to Dress Up a Ceiling

A crisp white ceiling is a classic look, but it’s not the only option for making a room look polished. Here are a few other design considerations to bring some personality to your ceiling.
The sky is the limit when it comes to the amount of creativity and beautiful layering you can put into creating a decorative statement on the ceiling. But before we discuss the many stylish or unusual treatments to consider, let’s start with a classic finish you’ve probably seen before.
Ceiling 1: Toronto Interior Design Group | Yanic Simard, original photo on Houzz
Exposed Concrete
In my own design projects, I find many clients are excited to remove a popcorn ceiling treatment, and this is usually my preference as well. The results can be subtle, yet striking.
In some cases, the results can be dramatic. Removing a popcorn ceiling, and the entire drywall layer above, can often reveal architectural finishes, such as a cool concrete surface.
An exposed concrete ceiling gives a room a bit of industrial, architectural flair, adding drama and texture in a modern way. Of course, not every home has a concrete ceiling to reveal, so it’s important to speak with your designer or contractor before making any plans.
It’s also important to note that stripping a ceiling back to the concrete will leave no space for recessed ceiling lights. For this reason I usually include an area of dropped ceiling to allow potlights, define a gathering space or focal point and visually break up the look a bit.

Ceiling 2: Victoria Gerts, original photo on Houzz
Flat Drywall
From my experience, the most popular contemporary ceiling style is the simple flat drywall ceiling. If a room includes other sound-absorbing materials like rugs, curtains or a fabric headboard, you can skip the acoustic ceiling treatment without worrying about echoes.
As I mentioned before, it is not always easy to achieve a perfectly crisp drywall ceiling, but skilled tradespeople can install either a new drywall ceiling or scrape the texture paint from an existing ceiling to reveal a much more sleek, modern surface.
Trimming a ceiling with crown molding painted to match the ceiling hue is a great alternative way to hide subtle imperfections in the slope of the ceiling and achieve a bright, airy, classic look.

Ceiling 3: Jade N Timmerman Interiors, original photo on Houzz
Paint
A drywall ceiling doesn’t only come in one shade, so while we’re discussing this finish, let’s touch on some differing paint choices.
White. A white or just-off-white ceiling is popular because it’s a great way to make any room feel open and airy and let light bounce from any windows or light fixtures back into the room.
For a contemporary or modern home, plain white can work great, but for a more traditional home or a space with definite warm tones (like this room with a lot of welcoming beige), choose a subtle off-white that complements the tone of the walls.
For a fun, trendy take, cheat the ceiling line a bit by starting the ceiling paint 12 to 24 inches down the wall (or only painting the walls up to that point, whichever way you think of it). The result is a breezy modern effect without using any bold hues or new materials.
Gray. Using a darker hue on the ceiling than on the walls visually brings the ceiling down, which can make a room feel more intimate.
Using a neutral gray shade (or one with a hint of cool blue) achieves this effect without drawing too much attention, so the room still feels serene and sophisticated.
This makes gray a great choice for bedrooms, dens and nurseries, bringing a peaceful, cozy atmosphere.
Accent colors. For a room with a unique personality, adding an accent color to the ceiling infuses a lot of drama in an unexpected spot.
I won’t lie: As a DIY task, painting the ceiling is not nearly as easy as painting a wall, and even for professionals it usually requires the room be fully emptied first. So, it’s best to be absolutely sure that you love a hue before applying it to the “fifth wall.” The upside is that the ceiling is often a relatively small surface area, meaning that splash of color is a more controlled dose than painting the walls.
While a painted ceiling is immediately noticeable in a room with stark white walls, when a room has a lot of interesting and eclectic finishes on other surfaces, a rich hue can actually blend in better than a white ceiling. It’s a daring look for sure, but for those who love a lot of personality in their home, a colorful ceiling can be a very livable choice.
For the best of both worlds, a navy, deep teal or royal blue shade will feel dramatic but still appear neutral enough to not overwhelm you.
Matching ceilings and walls. Painting the ceiling to match the walls may sound overwhelming, but sometimes it can actually be the more subtle choice. When the ceiling and the walls (or even just a few walls) are the same hue, the lack of contrast makes the ceiling less of a dramatic feature and more of a singular background color. Of course, this applies best to softer hues like gentle pink, watery blue or heritage butter yellow.

Ceiling 4: Toronto Interior Design Group | Yanic Simard, original photo on Houzz
I personally match the ceiling to the walls quite often when using light neutral shades. While it may appear white on your screen, the walls, ceiling and molding in this project are all Benjamin Moore’s Classic Gray, a subtle, warm gray shade. In an older home, using an all-over hue is a great way to deemphasize imperfections such as sloped ceilings that don’t meet walls in a perfectly straight line.
Two-tone paint. Using a dark or dramatic paint color on the ceiling doesn’t have to be an all-or-nothing decision. Like the opposite of an area rug, painting just part of a ceiling can help define a particular zone. Lining up the edge or edges with another element in the room will help it make visual sense.
Paint Finishes
Semigloss. The higher the degree of gloss in a paint, the more visual depth it will have and the lighter the perceived color will be. So, when choosing a darker shade especially, selecting a semigloss or more subtle satin finish can make a color seem less aggressive and more multidimensional and help keep the paint from absorbing all of the light in the room.
Matte. Matte and eggshell finishes represent the less-glossy end of the spectrum, and thus reflect less light. This will make a color seem more pure and vivid, and a bit darker. For those who don’t want to shy away from a rich statement, a matte finish gives a crisp contemporary look.
Gloss. Ultra-high-gloss paint is not easy to apply to a ceiling because it has a slower drying time and thus lots of opportunity to drip or become uneven. But it’s not impossible for expert professionals, and the results can be stunning, especially when paired with sparkling ceiling fixtures and beautiful natural light.
Alternately, a “stretched ceiling” uses a layer of high-tech material suspended just below the true ceiling to create a gloss effect (or other finishes) that paint alone cannot achieve.

Ceiling 5: Legacy Custom Homes Inc, original photo on Houzz
Paneling
Wood planks are most often seen on the floor, but they look just as beautiful above.
While wood-paneled ceilings are often associated with cottages and farmhouses, they can work with a variety of styles of home. Panelling works well for transitional homes, especially in controlled doses like the small strip seen here, bringing texture and richness to the ceiling that a solid color can’t match.
Generally, thinner strips of wood, and species with more knots, will appear more cottage-inspired, while wider planks or sheets, often with a less-grainy finish, will carry a more modern appearance.
Both types work well in kitchens with airy white or off-white cabinetry, taking a classic “white kitchen” and giving it added warmth and a natural appeal.

Ceiling 6: Buchanan Construction, original photo on Houzz
Pressed Tin
While these panels are not necessarily made from tin, the pressed-tin look endures as a charming option for traditional kitchens, or contemporary or transitional kitchens that want to add some classic flair.
These panels can be visually quite dominant with their glam or antiqued finishes and busy patterning, so they work well in rooms with otherwise simple palettes, or as a small accent over an island or seating group.
To keep the look fresh and bright, try using classic tin panels with stainless steel appliances, so the primary metal tone repeats and the room feels cohesive.
For more information on Windermere Real Estate and our agents, please contact us here.
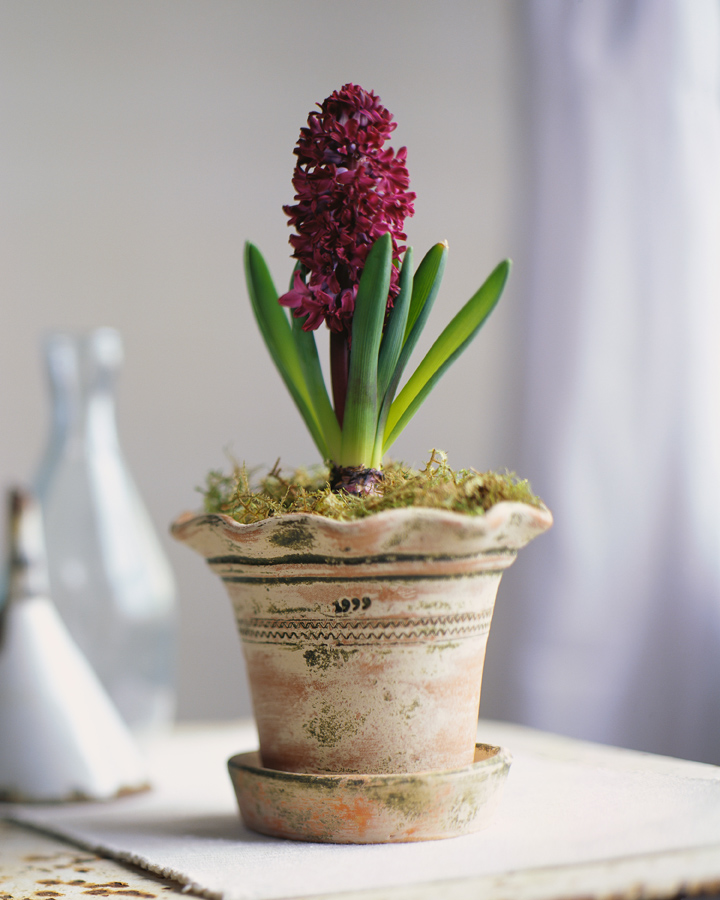
Indoor gardens: cultivate while keeping the winter doldrums at bay

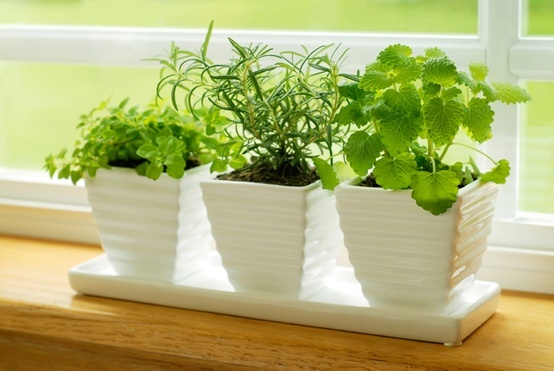
In many parts of the country it is still too early to start thinking about gardening. After a chilly winter, adding some green to your home’s interior may be just what the doctor (or decorator) ordered. Consider an indoor garden to liven up your home with color and clean air. There are many ways to introduce houseplants into your home décor, from edible to ornamental. Here are some tips to get you started:
Cultivate herbs or fungi on your windowsill.

Create or find an indoor greenhouse:

Or maximize your space with a hydroponic tower:


Plant a lemon tree, or a whole orchard:

Make a statement with a hanging garden:


Keep your houseplants in unexpected rooms:

If you have young children or pets, you will want to consider the toxicity of some of your plant choices.
Indoor plants have their benefits, including cleaning the air you breathe. Some plants are more effective at recycling the CO2 in your home than others.
We’d love to hear your tips for adding indoor plants and gardens.
Check out more home ideas on our Pinterest page.
For more information, please visit Windermere Evergreen.
A Peaceful Slice of Mountain Heaven
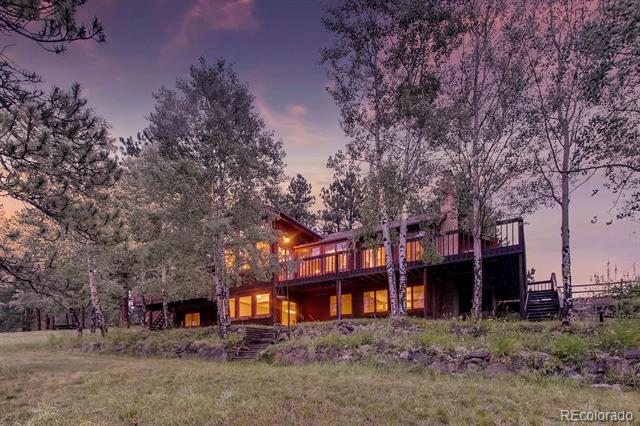
Featuring 5 Bedrooms and 4 Bathrooms

A very peaceful slice of Mountain Heaven while only being thirty minutes from Denver. A Colorado Ranch style home that offers main floor living. 3.6 Acres of very gentle expansive land and graceful trees with a large home and great barn (wonderful for horses, cars or a workshop). The back side of the house faces south and mountain views encircle the property. Master bath and kitchen have been updated.
For more information on 22398 Blue Jay Road in Morrison please go to the Listing Website. You may also call Yvette Putt at 303-882-2245 or John Putt at 720-201-1332.


