
 Facebook
 X
X
 Pinterest
 Copy Link
Farmhouse Interior Design
Known for its signature chic comfort, the farmhouse style is a popular method of interior design for homeowners looking to blend elements of modern and traditional design. With a rustic charm at its heart that recalls images of the countryside and wide-open landscapes, the farmhouse style steadily picked up steam in the 2010s and continues to grow in the 2020s. The following information is a guide to understanding the characteristics that make up the farmhouse style and how you can translate them into your home.
What is farmhouse style?
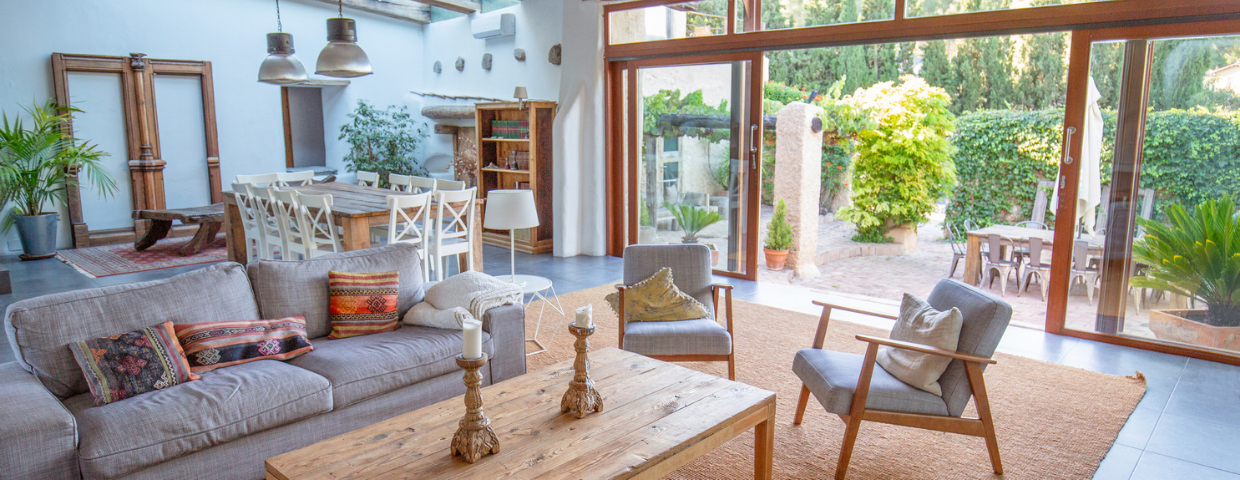
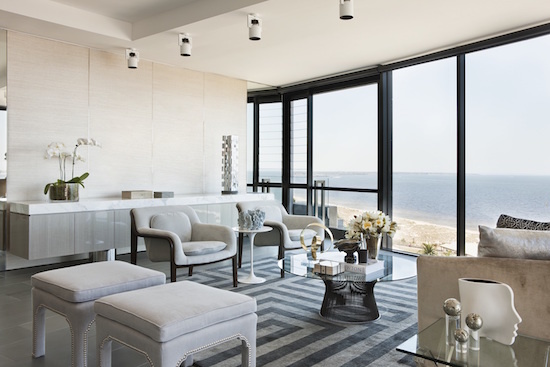
The farmhouse style predominantly uses a white/grey/beige color palette which provides a foundation for complementing elements and brighter colors. Against this clean backdrop, rustic materials can really shine. Exposed wood beams of timber or reclaimed wood, shiplap, and wrought iron are materials typically used help to round out the aesthetic, creating that rural-with-a-touch-of-modern feeling that the farmhouse style is known for. These combinations create a sense of openness and simplicity in the spaces where they’re used. In the kitchen, the farmhouse style feels clean and inviting; in the living room, it beckons members of the household and guests alike to sit back and relax; and in the dining room, it creates the perfect setting for enjoying a meal together.
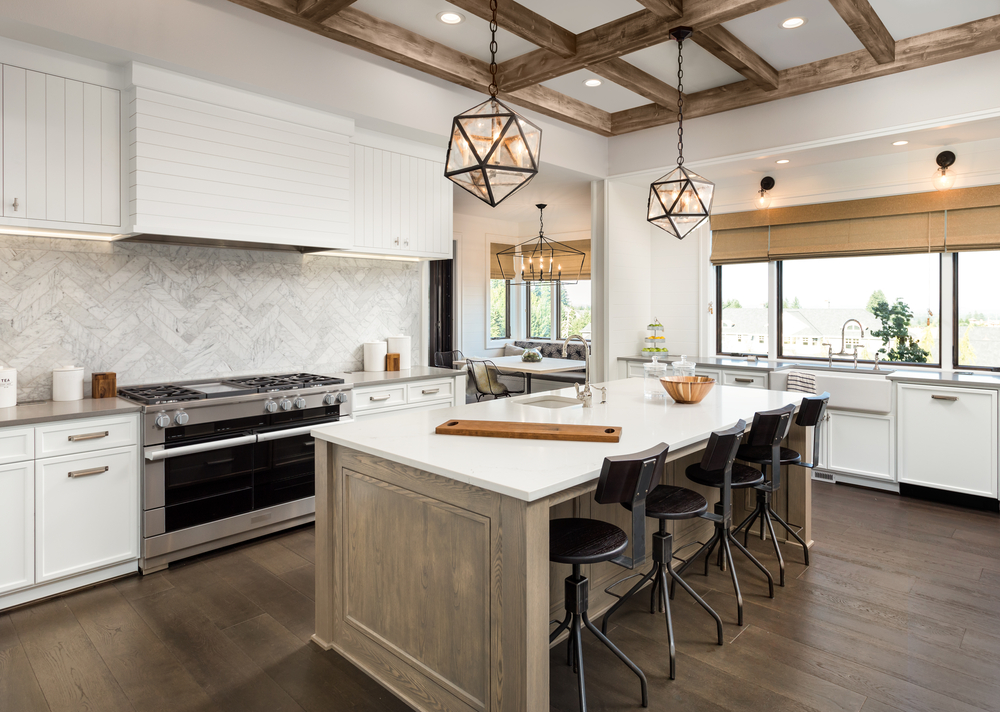
Image Source: Shutterstock – Image Credit: Breadmaker
How to Decorate in a Farmhouse Style
When it comes to furniture, there are specific choices you can make that will help reinforce your personal farmhouse style. Functionality is a core principle of farmhouse design, exemplified by its use of reclaimed and found materials. When looking at furniture, tune your radar to pieces that are simple and functional rather than ornate and complex. Farmhouse’s warmth contrasts the colder feel of minimalism, so when thinking about texture, know that you’re not bound to selecting only the cleanest possible lines—feel free to experiment! With natural elements like stone and wood already providing a varied blend of textures, you can afford to be bold in your choice of throw pillows, blankets, carpeting, and furniture set pieces.
The farmhouse style will give you license to decorate with antiques and vintage materials. Items like armoires, wooden iceboxes, and vanities will find a fitting home among your complementary decorative items. With a prevalence of wood, choose grain patterns and wood tones that complement each other well without clashing. Clutter can get in the way of the coziness that the farmhouse style naturally evokes, so it’s important to keep your main living areas well maintained to truly let your home’s interior design flourish.
With the farmhouse style, it all comes back to comfort. If you’re looking to make the spaces in your home more comfortable, either fully adopting or borrowing from the farmhouse style may be just the ticket. For more helpful tips on home design, read our blog post on how to upgrade your bedroom:
How Staging Your Home Well Impacts Its Value
Posted in Selling by John Trupin

For more than 20 years, the benefits of staging a home have been well documented. Numerous studies show that staging helps sell a home faster and for a higher price. According to the National Association of REALTORS®, 88 percent of homebuyers start their search online, forming impressions within three seconds of viewing a listing. When a home is well staged, it photographs well and makes the kind of first impression that encourages buyers to take the next step.
Studies also indicate that buyers decide if they’re interested within the first 30 seconds of entering a home. Not only does home staging help to remove potential red flags that can turn buyers off, it helps them begin to imagine living there. Homes that are professionally staged look more “move-in ready” and that makes them far more appealing to potential buyers.
According to the Village Voice, staged homes sell in one-third less time than non-staged homes. Staged homes can also command higher prices than non-staged homes. Data compiled by the U.S. Department of Housing and Urban Development indicate that staged homes sell for approximately 17 percent more than non-staged homes.
A measurable difference in time and money
In a study conducted by the Real Estate Staging Association in 2007, a group of vacant homes that had remained unsold for an average of 131 days were taken off the market, staged, and relisted. The newly staged properties sold, on average, in just 42 days, – which is approximately 68 percent less time on the market.
The study was repeated in 2011, in a more challenging market, and the numbers were even more dramatic. Vacant homes that were previously on the market for an average of 156 days as unstaged properties, when listed again as staged properties, sold after an average of 42 days—an average of 73 percent less time on the market.
Small investments, big potential returns
Staging is a powerful advantage when selling your home, but that’s not the only reason to do it. Staging uncovers problems that need to be addressed, repairs that need to be made, and upgrades that should be undertaken. For a relatively small investment of time and money, you can reap big returns. Staged properties are more inviting, and that inspires the kind of peace-of-mind that gets buyers to sign on the dotted line. In the age of social media, a well-staged home is a home that stands out, gets shared, and sticks in people’s minds.
What’s more, the investment in staging can bring a higher price. According to the National Association of REALTORS, the average staging investment is between one percent and three percent of the home’s asking price, and typically generates a return of eight to ten percent.
In short, less time on the market and higher selling prices make the small cost of staging your home a wise investment.
Interested in learning more? Contact your real estate agent for information about the value of staging and referrals for professional home stagers.
Choosing the Right Backsplash for Your Kitchen
Posted in Living by John Trupin
Every chef’s kitchen should have a style that matches the delicious food that comes out of it. But even if you’re doing little more than making mac and cheese out of a box, your kitchen still can be a place of color and creativity. Kitchen backsplashes are nothing new, but they’ve seen a recent surge in popularity. We’re fortunate to see homes every day with creative takes on this tiling trend, so we decided to showcase some popular backsplash designs to serve as inspiration.
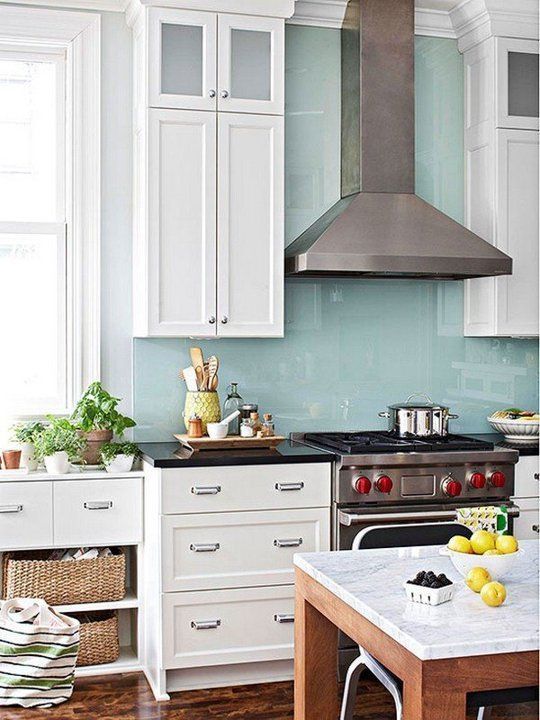
Glass Tile

Image Rights – Better Homes & Gardens
- When designing a kitchen, function and flair should work hand in hand. The appeal of glass tiling is that it’s easy to clean.
- Backing up the functionality is affordability. While glass tiling runs more expensive than ceramic, the cost is typically below stainless steel, and even some stones.
- Glass tiling is perfect for those with an artistic flair. Whether it’s simply a splash of color, a full mosaic, or even an intricate design, glass tile lets your inner artist shine.
- While the initial cost may be greater, glass tiling can more easily be found in pre-set sheets, making DIY installation far easier than many other types of tiles.
Ceramic Tile

Image Rights – Kitchen-Design-Ideas.org
- If you need a backsplash that can hold up to consistent use, ceramic tile is a great fit.
- The most cost-effective tile to professionally install, ceramic tiling offers a glazed shine with a variety of color options.
- Creating a clear, simple, ceramic backsplash is a great way to add a colorful flair to your kitchen.
- Between the cost-effectiveness and its low-maintenance nature, ceramic is unsurprisingly the most common type of kitchen tiling.
Metallic Tile

Image Rights – Architecture Art Designs
- Stainless steel is one of the more popular backsplash options for those interested in a metallic finish, but we’re also seeing more aluminum, copper, and bronze tiles.
- The range in metal type obviously impacts the cost, but most metal tiles are much more expensive than their ceramic counterparts – at least $10 per square foot more.
- For that extra cost, however, you’ll receive a sturdy backsplash with a modern sheen that is easy to clean.
- With stainless steel in particular, consistent maintenance is necessary to avoid a dulling of the backsplash’s shine.
Stone Slab

Image Rights – Houzz.com
- Sturdy? Check. Waterproof? Check. Classy? Check. From soapstone to marble to granite to good old-fashioned brick, there is no more low-maintenance backsplash base than stone.
- For the pleasure of acquiring a stone backsplash, you’ll typically pay more than most other materials. Between installation and material cost, the up-front payment can approach $1,000 for less than 30 square feet of wall space.
- With a wide range of stone to choose from, a number of color options are available at varying costs.
- If that upfront payment is manageable, the results will blend both aesthetics and function, and stone’s resiliency makes any follow-up costs minimal.
For an expert DIY challenge, there are many other ways to create a satisfying backsplash that fits your fancy, including vinyl wallpaper, wood, and even beadboard. What’s your dream backsplash style?
Home Decor Through the Decades

As we celebrate our 45th anniversary here at Windermere, we’re feeling a bit nostalgic. The fundamentals of helping our clients buy and sell homes haven’t changed much over the past 45 years, but the way we decorate our homes sure has. Let’s take a trip down memory lane and explore interior design trends from the past four decades—the good (farmhouse sinks), the bad (macramé owls), and the ill-advised (carpeted bathrooms!).

1970s
Inspired by the hippie movement, interior design in the 1970s centered around bringing the outdoors inside. Wood paneling could be found in bedrooms and basements alike, and wood accents adorned appliances in the kitchen.
Earth tones dominated throughout the house. If your refrigerator wasn’t avocado or burnt sienna and your shag carpet wasn’t harvest gold, you were not keeping up with the times.

1980s
In the 1980s, we wanted to make homes as cozy as possible, which for a lot of folks meant chintz, Laura Ashley–inspired florals, and tons of pastels.
The “country” look gained huge popularity during this decade as well. Even high-rise city apartments were filled with objects that seemed more at home on a ranch in Texas, including bleached cow skulls and weathered-wood dining tables and chairs.

1990s
Perhaps as a reaction to the excess of the decade before, the 1990s saw a rise in Japanese-inspired minimalism. Sparsely furnished rooms with rock gardens, clean lines, and simple colors were all the rage.
On the opposite end of that spectrum was the shabby chic craze. Distressed furniture, soft colors, and oversized textiles combined to create this look.
Texturized walls were also a big hit. Wall paper and paint brushes were out, and sponges became the way to get the chicest look for your home.

2000s
It’s hard to believe, but we’re nearly a decade out from the early aughts. And that perspective makes it easier to spot trends that felt of-the-moment only a few years ago but are waning in popularity today. One example is Tuscan-style kitchens. It seemed every new home—especially homes on the upper end of the market—included a kitchen with stone tiles, granite countertops, hanging vines, and beige and tan tones.
Another popular item from the early 2000s that is now facing a bit of a backlash is mason jars. Once a staple of homes looking to incorporate a rustic feel, mason jars are now so common in decorating both homes and restaurants that they no longer feel special or nostalgic.

Today
Trends are always evolving, but if you’re looking for some cutting-edge interior design ideas for 2018, here are a couple to consider.
Embrace super saturated colors, especially warmer tones like yellow and red. These bold hues no longer need to be saved for accent pieces like pillows or lamps. Larger pieces of furniture and entire walls make a bigger splash.
Incorporate geometric patterns. There’s really no wrong way to get on board with this trend. Whether your couch features large circles, you add patterned backsplash in your kitchen, or you cover your ceiling with octagonal wallpaper, geometric shapes will help your home feel fresh.
6 Foyers That Invite in Style

Entryway 1: Jackson and LeRoy, original photo on Houzz
With a side entrance to your home, you can be a little more forgiving when it comes to messes. But with a front-door entry, through which you and your guests get a first impression of your home, you’ve got to be a little more on top of your style and storage game. The following are some of the most popular front-entry photos recently, as measured by the number of people who saved them to their Houzz ideabooks from January through March. Let us know which will inspire your next project
A classic wooden bench offers a spot to take off and put on shoes in this farmhouse-style entryway in Utah.
Related: Wipe Your Shoes on a Durable Outdoor Rug

Entryway 2: Nicole Benveniste Interior Design, original photo on Houzz
Benjamin Moore’s Plaster of Paris paint on the walls sets the soothing tone for this spacious San Francisco entry. A large painting featuring pale swaths of color hangs over a few well-chosen accessories atop a weathered wood table, starting this home off on the right foot.

Entryway 3: Brian Paquette Interiors, original photo on Houzz
Here, a burl-wood-type table and vibrant abstract art create movement and excitement.
Related: Flower Vases for the Entryway

Entryway 4: Tim Barber Ltd Architecture, original photo on Houzz
A rich wood built-in helps organize this Los Angeles entry. A frosted, ribbed glass window obscures the view into the living room.

Entryway 5: NEST Interior Design Group, original photo on Houzz
An eclectic mix of art and accessories beckons guests into this Houston home. A table offers a spot for keys and wallets, while wire baskets below can handle shoes and bags.

Entryway 6: Fluidesign Studio, original photo on Houzz
Creamy shiplap walls, rich wood floors and a wood console table establish a refreshing air in this Minneapolis home.
By Mitchell Parker, Houzz
6 Foyers That Invite in Style
With a side entrance to your home, you can be a little more forgiving when it comes to messes. But with a front-door entry, through which you and your guests get a first impression of your home, you’ve got to be a little more on top of your style and storage game. The following are some of the most popular front-entry photos recently, as measured by the number of people who saved them to their Houzz ideabooks from January through March. Let us know which will inspire your next project.
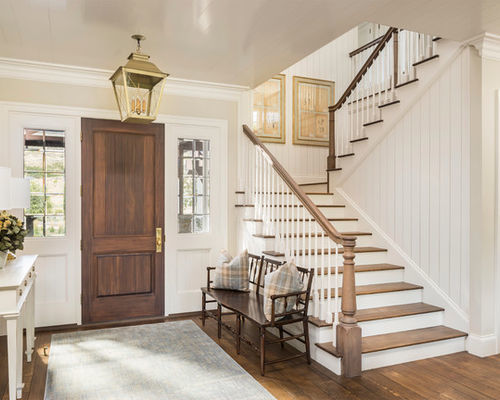
Entryway 1: Jackson and LeRoy, original photo on Houzz
6. A classic wooden bench offers a spot to take off and put on shoes in this farmhouse-style entryway in Utah.
Related: Wipe Your Shoes on a Durable Outdoor Rug
Entryway 2: Nicole Benveniste Interior Design, original photo on Houzz
5. Benjamin Moore’s Plaster of Paris paint on the walls sets the soothing tone for this spacious San Francisco entry. A large painting featuring pale swaths of color hangs over a few well-chosen accessories atop a weathered wood table, starting this home off on the right foot.
Entryway 3: Brian Paquette Interiors, original photo on Houzz
4. Here, a burl-wood-type table and vibrant abstract art create movement and excitement.
Related: Flower Vases for the Entryway
Entryway 4: Tim Barber Ltd Architecture, original photo on Houzz
3. A rich wood built-in helps organize this Los Angeles entry. A frosted, ribbed glass window obscures the view into the living room.
Entryway 5: NEST Interior Design Group, original photo on Houzz
2. An eclectic mix of art and accessories beckons guests into this Houston home. A table offers a spot for keys and wallets, while wire baskets below can handle shoes and bags.
Entryway 6: Fluidesign Studio, original photo on Houzz
1. Creamy shiplap walls, rich wood floors and a wood console table establish a refreshing air in this Minneapolis home.
By Mitchell Parker, Houzz
13 Appliance Tips & Hacks for Household Chores

Modern home appliances make our lives so much easier: They tackle dreaded household chores, saving us time and effort. There are lots of ways to use them, however, that you may not have thought of before. From cleaning your ceiling fixtures in the dishwasher to vacuuming your pet, here are 13 little-known tricks for getting more than your money’s worth from your appliances.
- Sanitize small toys and more. Use your dishwasher to wash and sanitize teething rings, small plastic toys, mouth guards, and even baseball caps. Place items on the top rack and run the dishwasher as usual with detergent (without any dirty dishes). Put smaller items in a small mesh laundry bag so that they don’t move around.
- Clean ceiling fixtures. At least once or twice a year, remove and clean your glass ceiling fixtures and light covers in an empty dishwasher. Run the machine on the normal cycle.

- Eliminate wrinkles from clothing. To smooth out wrinkled clothes or linens left too long in the dryer, toss a damp, lint-free cloth in with them. Run the load on the lowest setting for 10 to 15 minutes. Newer dryers also feature a steam setting that removes wrinkles and refreshes clothing between wears.
- Disinfect sponges and dishcloths. Kitchen sponges and dishcloths contain billions of germs. Clean and disinfect them daily by zapping them on high in the microwave for 2 minutes to kill germs.
- Freshen up your curtains. Vacuum heavy drapes with the upholstery attachment. Use the dusting brush attachment for lighter drapes. Wash sheer curtains in the washing machine on the delicate cycle, then hang them up while they’re damp to prevent wrinkles.
- Remove wax from fabric or carpet. To get rid of wax on a tablecloth, place it in your freezer until the wax is hard. Then put a flat paper bag over the wax and another under the fabric. Iron the top bag with a medium-hot iron until all the wax transfers to the bag. To remove wax from a carpet or rug, place an ice pack on the spot until the wax hardens. Shatter the wax and vacuum up the chips.
- Clean baseboards. Dusting baseboards can be a backbreaking chore. Use your vacuum cleaner and the dusting brush attachment to avoid having to bend down. Do the same to clean chair and table legs.

- Organize your fridge. Use the built-in features of your refrigerator to organize food by category. Designate certain shelves or areas for leftovers, preferably front and center, so you don’t forget they’re in there. Use special-purpose bins for their intended use: crispers for vegetables, deli trays for deli meats and cheeses, cold storage trays for meats. Newer models also feature convertible cooling zones to keep food fresh.
- Dust blinds. Extend the blinds fully and turn the slats to the closed position. Use the dusting brush attachment on your vacuum cleaner to clean the slats from top to bottom. Then open and reclose the slats in the opposite direction and repeat the process.
- Clean your microwave. The best time to clean your microwave is immediately after using it. Thanks to residual steam, all you have to do is wipe it out with a paper towel or damp sponge. To clean old messes, microwave 2 cups of water on high for 5 minutes. The steam will soften cooked-on spills, which you can wipe off with a paper towel or cloth.

- Exterminate dust mites. Dust mites live off human and animal dander and other household dust particles. They thrive in sofas, carpets, and bedding. Use the upholstery attachment to vacuum your mattress and upholstered furniture regularly to minimize dust mites. Be sure to empty the canister in an outdoor trashcan.
- Groom your pet. If your dog or cat doesn’t hide when you get out your vacuum cleaner, try using the dusting brush attachment to brush your pet. It’s a gentle way to collect shedding fur.
- Remove grime from shower liners. Wash plastic shower curtain liners in the washing machine with hot water and detergent on the regular cycle. Throw in a small bath towel to help “scrub” mildew and soap scum off the liner. Then rehang the liner and let it air-dry.
Have you found any unusual cleaning hacks for your appliances? Share in the comments below!
Organizing and cleaning expert Donna Smallin Kuper writes for The Home Depot about easy organization hacks, including the best ways to use your appliances. To view The Home Depot’s selection of appliances, click here.
For more information please contact us here.
This article is editorial content that has been contributed to our site at our request and is published for the benefit of our readers. We have not been compensated for its placement.
A little goes a long way: a top ten list for making the most of your home improvement

 This weekend I spent the greater part of Saturday taking care of the ongoing household to do list and the transformation made a huge impact. There certainly is more to do, as is the nature of home improvement, but having a finite list of things to accomplish and making time to enjoy them made all the hard work worth it! Here is my top ten list of how to make the most of your time when tackling home-improvement projects.
1. Imagine your perfect place. Your home should reflect your personality, the way you spend your time, and fit your needs. If you want a place to entertain, to relax and meditate, to create art, nurture your children, or display your collections, you will want to consider your priorities. Once you have explored the possibilities the next step is to prioritize your to-do list in order to make the most impact.
2. Make a list. Some home project lists could go on and on (and on), so it’s a good idea to write out a list and discuss the details with the members of your household so you know where to start and who is responsible for what.
3. Prioritize. Once you know what needs to be done it’s time to prioritize the list. If there is something timely (like getting gutters before the fall) keep that in mind when prioritizing, but also think about those projects that will bring you the most joy in daily life.
4. Do one project that really makes a difference. I recently finished sprucing up the living and dining rooms with new curtains and new furniture for storage and display. These are the rooms I spend the most time in at home, so the difference is palpable to how I view my home. Now we are ready for a big dinner party which is one of the most important things in our household. From this experience, I realized that small changes and some cleanup can make a huge difference.
5. Keep it reasonable. Make sure your list is reasonable. The goal isn’t to get everything done in one weekend, which typically isn’t feasible anyway. Rather, you want the time you invest in your home to be enjoyable and give you the sense of satisfaction (and motivation to do more).
6. Gather your tools. Nothing will derail a project like not having the right tools. Once you know what you are going to accomplish make sure all your supplies are ready. You’ll be far more efficient if you hit the hardware store, fabric store, gas station, etc. prior to getting started.
7. Work together. Some projects are two-people projects. If you share your household, enlist other members to share the work. Some projects need two people to lift, spot, hand tools, push, pull, etc. If you live alone, have a work party by inviting a friend over to help. You can return the favor if they ever need help with a household project.
8. Enjoy the process. Blast music, take breaks, and step back to reflect on your household improvement. If you need to dedicate a weekend to doing your chores, you may as well still enjoy it!
9. Get the list done. If you’ve taken the time to make your list reasonable you shouldn’t have any trouble completing it. Doing so will reaffirm your sense of accomplishment, so when you look at what was done, you won’t be thinking about what you have to do next.
10. Bask in your success. Focus on the improvement, enjoy your space, and most importantly, use it! If you made your bedroom a sanctuary, light a candle and relax with a good book. If you reconfigured your kitchen for more efficient use, have your own Iron Chef moment and cook a huge meal. Just remember, all your planning and hard work should be enjoyed.
What are your tips for making the most out of your home?
For more information on Windermere Evergreen, please contact us here.
Myths and Truths About Millennial Home Buyers


In recent years there has been a lot written about millennials and their impact on the housing market. Because of this, there are also a lot of misconceptions about what this generation wants from a home. To start, it’s important to know that there are more than 71 millennials, which are defined as those aged 22-37. They also represent 34 percent of all home buyers which makes them tremendously important to the real estate market. We were curious if what we’ve read about millennial home buying habits is true and here’s what we found.
Simple, Functional, Minimal Maintenance

Millennials do not appear to be drawn to fixer uppers in the same way as prior generations. They want something that is “move-in” ready with minimal maintenance. They also value simplicity and function over extravagance which means they’re drawn to spaces that serve dual purposes and furniture that doubles as storage. The old adage “less is more” takes on new meaning for millennial buyers.
Location

Similar to older generations, millennials place a great deal of importance on location. The convenience to their job, friends, family, entertainment, and shopping is a must. But the rumor out there that they only want to live in city dwellings is a myth. Millennials are getting older and starting to have families, so like prior generations, many of them are moving away from the hustle and bustle of the city and into nearby neighborhoods with good schools and family-friendly amenities.
Digitally Engaged

Millennials have grown up surrounded by technology, so smart home technology is a high priority for these buyers. And they’re willing to pay more for it: a survey conducted by Wakefield Research states that millennials are willing to pay a 20 percent premium for smart home technology, such as voice assisted devices, smart phone-controlled security systems, electronic door locks, and doorbell cameras.
Experience over Luxuries

One of the main things we’ve learned about millennials is that they are not prone to conformity. They’re a practical bunch who places a very high priority on experiences and quality of life. Studies show that millennials would rather have discretionary income to pay for things like healthy food, gym memberships, and international travel than blowing their budget on an expensive home. In other words, they’re happy with a modest space so they have money left to spend on their quality of life.
In the end, millennial buyers aren’t that different from prior generations. They’re clearly a pragmatic group that sees their home more as a functional space than a symbol of their success. Technology definitely plays a far greater role for them than their baby boomer parents, but ultimately they still want a home in a nice neighborhood with good schools and access to friends, family, and nearby amenities.
For more information on Windermere Evergreen and our agents, please contact us here.
Spring in your step: smart ways to get rid of the clutter and update your décor

 Our bulbs went full bloom at my house a few weeks ago, which prompted the awakening of spring fever: mostly the urge to air out the house and get rid of clutter (again, didn’t we just do this?). In my desire to purge, I have been trying to find the best ways to get rid of things; to sell some items in order to reinvest in updated accessories, to support local charities, and just get rid of the junk in the most environmentally-friendly way possible. I am not as methodical as I’d like to be, but I am already seeing a difference with the reduced clutter. Here are some of my tips and favorite resources:
Office
Are you a piler or a stasher? We create stacks in our household, which we have to go through weekly, then move to our respective offices, where they wait (indeterminate lengths of time) to get filed. One of my first steps in clearing out the junk was to deal with the piles of paper. I shredded anything that should be shredded and recycled and filed the rest. If you are supremely organized, I suggest taking this time to note what bills you actually get paper invoices for, and move towards electronic billing. Also, if you haven’t already, take a moment to stop your junk mail, saving yourself a step in the filing process and reducing some paper use.
I finally went through the stack of magazines piling up next to the bed, tearing out any recipes, articles and ideas I wanted to reference later, and throwing the rest away. If you are looking for an electronic alternative to the magazine clutter, read your magazines online and save your favorite articles with a social bookmarking tool such as delicious.com to easily search your saved files with your own key words.
If there is a bookcase in our house, it will be filled so, instead of investing in ANOTHER bookshelf, I decided to make space for all the books I will likely buy this year by getting rid of books I probably won’t read. We will be reselling some books to amazon.com while others will either go to the local used bookstore for store credit or be donated to a local charity.
You can also gain a lot of space by going through your media. If you still have DVDs and CDs, inventory them and decide if you can move to a digital archive. It may take some time, but downloading and backing up your media could make you more organized in the long run and eliminate unnecessary clutter. Get rid of the disks once these have been backed up, reclaiming that shelf space.
As more and more of our lives are kept in digital files, it is important to take precautions to protect our files as well as the hardware that stores them. If you store important documents, family photos, media, or other items on your hard drive, make sure you have a backup plan. Learn more about digital storage options so if anything happens to your hardware you don’t lose everything.
Garage/ Basement
Whenever I go to the hardware store, I must suffer from temporary memory loss; what else would explain the multiples we acquire? This year we are doing an audit. If we have enough stuff to justify it, we will do a garage sale, but most likely we will sell what we can on craigslist or eBay and give away the rest on freecycle.org. These are all great options for ridding yourself of unwanted, outdated and duplicate items. We also have a pile of electronics to get rid of: an old microwave, tv, toaster oven, printers, juicer, etc. We don’t want to dump these if they can be recycled. We are looking into e-cycle options in our area, including local Windermere offices holding e-cycle events regularly, which also benefit the Foundation.
The same rules apply to our excess storage.
As you de-clutter and reorganize, make updates to your home inventory list. Spring is a great time to make sure your list of household items is up-to-date for insurance purposes. It is also a good time to check on your major appliances to determine if your furnace/water tank/septic or other major systems need to be serviced.
Closets
As the seasons change, it is a good idea to go through your clothes in order to renew and refresh your wardrobe. If you have items that can be updated with a few alterations, make a plan to spend some time with your tailor. Otherwise, look critically at the clothes you have. If you didn’t wear it in the last year and it cannot be altered to work with the rest of your wardrobe, consider donating it to Goodwill or your preferred charity. Throw any soiled or damaged clothes away. Spring is also a great time to get rid of any old linens and towels that have seen better days.
Furniture
You will likely be surprised by how light your load is once you have really gotten into the de-cluttering process. If you have furniture you don’t use or that doesn’t fit with your décor, consider your options. You may be able to repurpose your furniturefor more efficient use, such as a console table as a landing strip next to the door, an armoire for playroom storage, or even old doors as a headboard. Or you may breathe new life into your furniture by painting or re-staining. If you can’t repurpose, why not recycle? You can donate your furniture, sell it on craigslist or give it away on freecycle.org. Getting rid of excess furniture can revitalize a room almost as much as buying new furniture.
Spring Forward
Once you have cleared the clutter and made way for a fresh perspective, figure out what will help keep the clutter at bay, and add design elements that inspire you. Decorative baskets keep magazines in order; decorative vases with flowers add natural elements help keep the indoors fresh; and new lighting or a new paint color can brighten up a room in an instant. Subtle updates in your rooms can make all the difference once the clutter is gone.
What are your tips for preparing for spring? What are your favorite spring rituals, once the cleaning is done?
For more information on Windermere Evergreen, please contact us here.
