
 Facebook
 X
X
 Pinterest
 Copy Link
Spring in your step: smart ways to get rid of the clutter and update your décor

 Our bulbs went full bloom at my house a few weeks ago, which prompted the awakening of spring fever: mostly the urge to air out the house and get rid of clutter (again, didn’t we just do this?). In my desire to purge, I have been trying to find the best ways to get rid of things; to sell some items in order to reinvest in updated accessories, to support local charities, and just get rid of the junk in the most environmentally-friendly way possible. I am not as methodical as I’d like to be, but I am already seeing a difference with the reduced clutter. Here are some of my tips and favorite resources:
Office
Are you a piler or a stasher? We create stacks in our household, which we have to go through weekly, then move to our respective offices, where they wait (indeterminate lengths of time) to get filed. One of my first steps in clearing out the junk was to deal with the piles of paper. I shredded anything that should be shredded and recycled and filed the rest. If you are supremely organized, I suggest taking this time to note what bills you actually get paper invoices for, and move towards electronic billing. Also, if you haven’t already, take a moment to stop your junk mail, saving yourself a step in the filing process and reducing some paper use.
I finally went through the stack of magazines piling up next to the bed, tearing out any recipes, articles and ideas I wanted to reference later, and throwing the rest away. If you are looking for an electronic alternative to the magazine clutter, read your magazines online and save your favorite articles with a social bookmarking tool such as delicious.com to easily search your saved files with your own key words.
If there is a bookcase in our house, it will be filled so, instead of investing in ANOTHER bookshelf, I decided to make space for all the books I will likely buy this year by getting rid of books I probably won’t read. We will be reselling some books to amazon.com while others will either go to the local used bookstore for store credit or be donated to a local charity.
You can also gain a lot of space by going through your media. If you still have DVDs and CDs, inventory them and decide if you can move to a digital archive. It may take some time, but downloading and backing up your media could make you more organized in the long run and eliminate unnecessary clutter. Get rid of the disks once these have been backed up, reclaiming that shelf space.
As more and more of our lives are kept in digital files, it is important to take precautions to protect our files as well as the hardware that stores them. If you store important documents, family photos, media, or other items on your hard drive, make sure you have a backup plan. Learn more about digital storage options so if anything happens to your hardware you don’t lose everything.
Garage/ Basement
Whenever I go to the hardware store, I must suffer from temporary memory loss; what else would explain the multiples we acquire? This year we are doing an audit. If we have enough stuff to justify it, we will do a garage sale, but most likely we will sell what we can on craigslist or eBay and give away the rest on freecycle.org. These are all great options for ridding yourself of unwanted, outdated and duplicate items. We also have a pile of electronics to get rid of: an old microwave, tv, toaster oven, printers, juicer, etc. We don’t want to dump these if they can be recycled. We are looking into e-cycle options in our area, including local Windermere offices holding e-cycle events regularly, which also benefit the Foundation.
The same rules apply to our excess storage.
As you de-clutter and reorganize, make updates to your home inventory list. Spring is a great time to make sure your list of household items is up-to-date for insurance purposes. It is also a good time to check on your major appliances to determine if your furnace/water tank/septic or other major systems need to be serviced.
Closets
As the seasons change, it is a good idea to go through your clothes in order to renew and refresh your wardrobe. If you have items that can be updated with a few alterations, make a plan to spend some time with your tailor. Otherwise, look critically at the clothes you have. If you didn’t wear it in the last year and it cannot be altered to work with the rest of your wardrobe, consider donating it to Goodwill or your preferred charity. Throw any soiled or damaged clothes away. Spring is also a great time to get rid of any old linens and towels that have seen better days.
Furniture
You will likely be surprised by how light your load is once you have really gotten into the de-cluttering process. If you have furniture you don’t use or that doesn’t fit with your décor, consider your options. You may be able to repurpose your furniturefor more efficient use, such as a console table as a landing strip next to the door, an armoire for playroom storage, or even old doors as a headboard. Or you may breathe new life into your furniture by painting or re-staining. If you can’t repurpose, why not recycle? You can donate your furniture, sell it on craigslist or give it away on freecycle.org. Getting rid of excess furniture can revitalize a room almost as much as buying new furniture.
Spring Forward
Once you have cleared the clutter and made way for a fresh perspective, figure out what will help keep the clutter at bay, and add design elements that inspire you. Decorative baskets keep magazines in order; decorative vases with flowers add natural elements help keep the indoors fresh; and new lighting or a new paint color can brighten up a room in an instant. Subtle updates in your rooms can make all the difference once the clutter is gone.
What are your tips for preparing for spring? What are your favorite spring rituals, once the cleaning is done?
For more information on Windermere Evergreen, please contact us here.
Childproofing: Protect Your Family and Your Home from Potential Hazards

 When you think of your home, it likely conjures up feelings of safety, shelter, and comfort. However, accidental injuries in the home are one of the leading causes of harm to children 14 and younger. By taking certain precautions, many of these accidents can be prevented.
While supervision is the best way to keep your children safe at home, you can’t watch them every second. Childproofing, to whatever degree you are comfortable, will go a long way toward keeping your littlest loved ones safe and healthy at home.
Here are some tips to get you started.
Many accidents happen with or around water.
If you have children at home, it’s advisable to adjust your water heater to no higher than 120 degrees to prevent scalding. Furthermore, you should never leave a small child unattended in a bath tub, even for a few seconds. And be sure to safely secure doors that lead to swimming pools and hot tubs, including pet doors. When cooking or boiling water, turn pot handles in, or better yet use the back burners, to prevent little hands from pulling them off the stove.
Household chemicals can be very harmful to children.
It’s important not to keep poisonous materials under the sink, even if you have a cabinet guard in place. Keep dangerous chemicals up high and in a room that isn’t accessible to your little ones. Seemingly innocuous medicines can also be dangerous. Make sure your medicine cabinet is out of sight, mind, and reach.
Use safety latches and gates.
It’s advisable that you use safety latches on drawers, cabinets, toilets, and windows, as well as place covers on all electrical outlets. Gate off stairways and entrances to rooms, such as garages, that contain dangerous or fragile objects.
Secure furniture and other objects.
Heavy furniture, electronics, and lamps must be secured to prevent a child from pulling them over. Bookshelves and entertainment centers often come with devices that attach them to walls so that a climbing child won’t topple the furniture. The end-caps on door stoppers can be a choking hazard, so it’s advisable to remove them. Place plastic bumpers on sharp corners or edges of coffee tables, entertainment centers, and other furniture to prevent cuts and bruises.
Install a carbon monoxide detector.
The U.S. Consumer Product Safety Commission (CPSC) recommends that consumers purchase and install carbon monoxide detectors in addition to smoke alarms. Be sure to test both devices regularly and replace batteries as needed. The American Red Cross advises families to learn first aid and CPR, and to devise an emergency evacuation plan for fires and earthquakes.
Emergency contact info.
Last, but not least, in case an emergency does happen, always keep numbers for your child’s doctor, your work and cell, and other emergency contact info in an easily found place, preferably near the phone.
Accidents can and will happen, but by following a few small steps you can have peace of mind knowing that you’ve done everything you can to protect your family from harm in your home.
For more information on Windermere Evergreen, please contact us here.
How to Save Energy in your Home


With the increased emphasis on global warming in recent years, combined with rising energy costs, more and more people are asking what they can do to make their homes more energy efficient. Energy conservation can be as simple as closing your curtains at night, changing a light bulb, turning down your thermostat, or closing the fireplace damper. Many of the most inexpensive solutions quickly pay for themselves in conservation, which you ultimately benefit from when you get your power bill.
One of the biggest ways you can conserve energy is to take advantage of “off-peak” hours. This is a step that everyone can take because it simply involves shifting your power use of major appliances, such as washing machines, dryers, and dishwashers. Puget Sound Energy recommends using these appliances outside of peak hours—peak hours are between 6am-10am and 5pm-9pm. Studies show that by shifting a portion of your energy use, consumers can significantly lower wholesale electricity prices, which saves everyone money in the long run.
Another way you can save energy is by washing your clothes in cold water and only running full loads. When using the dryer, toss in a couple of dry towels with your clothes to help speed up the drying process. It’s also important to clean the lint trap in your dryer after every load and make sure the dryer hose and vent are clear.
There are several steps you can follow to reduce your home’s demand on heating during the winter months. Conventional measures, such as setting back your thermostat, are effective at reducing energy consumption. It is recommended that you keep your thermostat set between 65 and 72 degrees during the winter months. Keep in mind that by simply lowering your thermostat one degree, your furnace will use seven percent less energy overall. It’s also important to clean your furnace filter frequently—doing so will enable your heating system to run more efficiently and cost-effectively.
It’s estimated that lighting accounts for 10 percent of your overall home energy bill, so another way you can conserve is by using energy-saving fluorescent light bulbs, known as CFL light bulbs. CFLs use approximately one-quarter of the energy of equivalent incandescent bulbs, they give off warm, indirect light, and they last ten times longer than average light bulbs. When shopping for CFLs, look for those with the Energy Star label on them—this ensures that you’re purchasing a product that has been approved by the U.S. Environmental Protection Agency (EPA) and the U.S. Department of Energy (DOE).
For more information about energy conservation, please visit www.energystar.org.
For more information on Windermere Evergreen, please contact us here.
5 Creative Ways to Dress Up a Ceiling

A crisp white ceiling is a classic look, but it’s not the only option for making a room look polished. Here are a few other design considerations to bring some personality to your ceiling.
The sky is the limit when it comes to the amount of creativity and beautiful layering you can put into creating a decorative statement on the ceiling. But before we discuss the many stylish or unusual treatments to consider, let’s start with a classic finish you’ve probably seen before.
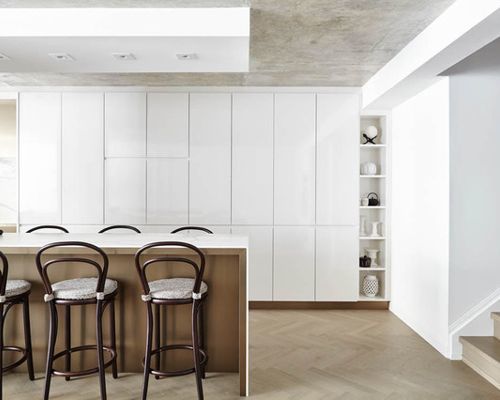
Ceiling 1: Toronto Interior Design Group | Yanic Simard, original photo on Houzz
Exposed Concrete
In my own design projects, I find many clients are excited to remove a popcorn ceiling treatment, and this is usually my preference as well. The results can be subtle, yet striking.
In some cases, the results can be dramatic. Removing a popcorn ceiling, and the entire drywall layer above, can often reveal architectural finishes, such as a cool concrete surface.
An exposed concrete ceiling gives a room a bit of industrial, architectural flair, adding drama and texture in a modern way. Of course, not every home has a concrete ceiling to reveal, so it’s important to speak with your designer or contractor before making any plans.
It’s also important to note that stripping a ceiling back to the concrete will leave no space for recessed ceiling lights. For this reason I usually include an area of dropped ceiling to allow potlights, define a gathering space or focal point and visually break up the look a bit.

Ceiling 2: Victoria Gerts, original photo on Houzz
Flat Drywall
From my experience, the most popular contemporary ceiling style is the simple flat drywall ceiling. If a room includes other sound-absorbing materials like rugs, curtains or a fabric headboard, you can skip the acoustic ceiling treatment without worrying about echoes.
As I mentioned before, it is not always easy to achieve a perfectly crisp drywall ceiling, but skilled tradespeople can install either a new drywall ceiling or scrape the texture paint from an existing ceiling to reveal a much more sleek, modern surface.
Trimming a ceiling with crown molding painted to match the ceiling hue is a great alternative way to hide subtle imperfections in the slope of the ceiling and achieve a bright, airy, classic look.

Ceiling 3: Jade N Timmerman Interiors, original photo on Houzz
Paint
A drywall ceiling doesn’t only come in one shade, so while we’re discussing this finish, let’s touch on some differing paint choices.
White. A white or just-off-white ceiling is popular because it’s a great way to make any room feel open and airy and let light bounce from any windows or light fixtures back into the room.
For a contemporary or modern home, plain white can work great, but for a more traditional home or a space with definite warm tones (like this room with a lot of welcoming beige), choose a subtle off-white that complements the tone of the walls.
For a fun, trendy take, cheat the ceiling line a bit by starting the ceiling paint 12 to 24 inches down the wall (or only painting the walls up to that point, whichever way you think of it). The result is a breezy modern effect without using any bold hues or new materials.
Gray. Using a darker hue on the ceiling than on the walls visually brings the ceiling down, which can make a room feel more intimate.
Using a neutral gray shade (or one with a hint of cool blue) achieves this effect without drawing too much attention, so the room still feels serene and sophisticated.
This makes gray a great choice for bedrooms, dens and nurseries, bringing a peaceful, cozy atmosphere.
Accent colors. For a room with a unique personality, adding an accent color to the ceiling infuses a lot of drama in an unexpected spot.
I won’t lie: As a DIY task, painting the ceiling is not nearly as easy as painting a wall, and even for professionals it usually requires the room be fully emptied first. So, it’s best to be absolutely sure that you love a hue before applying it to the “fifth wall.” The upside is that the ceiling is often a relatively small surface area, meaning that splash of color is a more controlled dose than painting the walls.
While a painted ceiling is immediately noticeable in a room with stark white walls, when a room has a lot of interesting and eclectic finishes on other surfaces, a rich hue can actually blend in better than a white ceiling. It’s a daring look for sure, but for those who love a lot of personality in their home, a colorful ceiling can be a very livable choice.
For the best of both worlds, a navy, deep teal or royal blue shade will feel dramatic but still appear neutral enough to not overwhelm you.
Matching ceilings and walls. Painting the ceiling to match the walls may sound overwhelming, but sometimes it can actually be the more subtle choice. When the ceiling and the walls (or even just a few walls) are the same hue, the lack of contrast makes the ceiling less of a dramatic feature and more of a singular background color. Of course, this applies best to softer hues like gentle pink, watery blue or heritage butter yellow.

Ceiling 4: Toronto Interior Design Group | Yanic Simard, original photo on Houzz
I personally match the ceiling to the walls quite often when using light neutral shades. While it may appear white on your screen, the walls, ceiling and molding in this project are all Benjamin Moore’s Classic Gray, a subtle, warm gray shade. In an older home, using an all-over hue is a great way to deemphasize imperfections such as sloped ceilings that don’t meet walls in a perfectly straight line.
Two-tone paint. Using a dark or dramatic paint color on the ceiling doesn’t have to be an all-or-nothing decision. Like the opposite of an area rug, painting just part of a ceiling can help define a particular zone. Lining up the edge or edges with another element in the room will help it make visual sense.
Paint Finishes
Semigloss. The higher the degree of gloss in a paint, the more visual depth it will have and the lighter the perceived color will be. So, when choosing a darker shade especially, selecting a semigloss or more subtle satin finish can make a color seem less aggressive and more multidimensional and help keep the paint from absorbing all of the light in the room.
Matte. Matte and eggshell finishes represent the less-glossy end of the spectrum, and thus reflect less light. This will make a color seem more pure and vivid, and a bit darker. For those who don’t want to shy away from a rich statement, a matte finish gives a crisp contemporary look.
Gloss. Ultra-high-gloss paint is not easy to apply to a ceiling because it has a slower drying time and thus lots of opportunity to drip or become uneven. But it’s not impossible for expert professionals, and the results can be stunning, especially when paired with sparkling ceiling fixtures and beautiful natural light.
Alternately, a “stretched ceiling” uses a layer of high-tech material suspended just below the true ceiling to create a gloss effect (or other finishes) that paint alone cannot achieve.

Ceiling 5: Legacy Custom Homes Inc, original photo on Houzz
Paneling
Wood planks are most often seen on the floor, but they look just as beautiful above.
While wood-paneled ceilings are often associated with cottages and farmhouses, they can work with a variety of styles of home. Panelling works well for transitional homes, especially in controlled doses like the small strip seen here, bringing texture and richness to the ceiling that a solid color can’t match.
Generally, thinner strips of wood, and species with more knots, will appear more cottage-inspired, while wider planks or sheets, often with a less-grainy finish, will carry a more modern appearance.
Both types work well in kitchens with airy white or off-white cabinetry, taking a classic “white kitchen” and giving it added warmth and a natural appeal.

Ceiling 6: Buchanan Construction, original photo on Houzz
Pressed Tin
While these panels are not necessarily made from tin, the pressed-tin look endures as a charming option for traditional kitchens, or contemporary or transitional kitchens that want to add some classic flair.
These panels can be visually quite dominant with their glam or antiqued finishes and busy patterning, so they work well in rooms with otherwise simple palettes, or as a small accent over an island or seating group.
To keep the look fresh and bright, try using classic tin panels with stainless steel appliances, so the primary metal tone repeats and the room feels cohesive.
For more information on Windermere Real Estate and our agents, please contact us here.
Outdoor Living Inspiration


Can you believe that it’s already the middle of February? Summer is just around the corner and there is no better way to prepare than indulging in some exciting backyard inspiration. This year, turn your backyard or patio into the ultimate hangout. We’re talkin’ friends-never-want-to-leave kind of spot. Here are some ways to make that happen:
Sunken Hot Tub
We know what you’re thinking; hot tubs are so 80s. Not anymore! Consider adding a sunken hot tub to your backyard with a deck of natural stone, tall grasses, and outdoor curtains for privacy. Include pillar candles and some twinkling lights for added ambiance.
Outdoor Kitchen
If you entertain a lot, an outdoor kitchen is the ideal space for summer entertaining. Bring out your inner Tom Douglas with a cooking station that includes a high-end grill, refrigerator, wine chiller, and elegant washbasin. Round this all out with a concrete counter, bluestone tile floor, and stainless steel.
Outdoor Theater
Nothing says summer like outdoor movies, so why not create your own personal drive-in? All you need is a projector to watch your favorite movies, some dangling lights in the trees, blankets, and pillows. You could also watch it from a hanging bench or a floating bed. Get über creative and buy an inflatable flat screen for your pool area and turn it into a full-fledged theater, inflatable lounge chairs and all. This way you’ll never have to choose between movies and precious pool time.
Tiki Bar
Before you say no, say yes. Tiki Bars are entirely underrated; we think they’re the quintessential piece to any stay-cation. If you’re going for a tropical retreat feel, this is the place to start. Just don’t forget the hanging lanterns, bamboo, and ice-cold margaritas.
Fire Pit
Is your ideal summer situated by a campfire? Then add a fire pit and enjoy s’mores in the comfort of your own backyard. It’s easy to make your own. Use an old wine barrel, bricks, stones, or a concrete bowl. A lowered fire pit is great if you want to use sand for a beachy atmosphere. On a chilly summer night a campfire sets just the right mood for outdoor fun.
To enhance your space with little to no cost, add dangling vines or twinkling lights. And a splash of color here and there immediately changes the vibe. Choose one or all of the ideas above and start planning your debut party!
For more outdoor living ideas, follow our Pinterest board. For more information about Windermere Evergreen, please contact us here.
How to Style Your Bookshelf
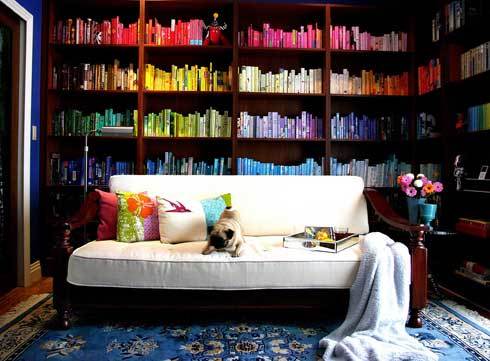

Whether you have a library full of books or only hold onto a few favorites, a bookshelf is one of those furniture pieces most homes are guaranteed to have, and yet, few have them are properly “styled”. We have some easy DIY tips that will transform your shelves, while still allowing your books to stay center stage.
Start with a blank canvas. Take everything off your shelves before you decide to start putting your books back on.
Mix it up. Don’t have all of the books vertical or horizontal (but never stack anything on top of vertical stacks). Layer them on top of each other in different ways on all of the various shelves. Bigger books on bottom of stacks, smaller ones on top. Place your most attractive books at eye level.
Accessorize. Add items in between, in front, and on top of books. This can mean collectibles, candles, small plants, pictures, you name it. You can use a variety of shapes and sizes, but try to keep all non-book items to the same theme/color.
Leave Space. Adding just a little bit of space between items gives space for the eye to breathe and helps your book and collectibles to stand out.
Little details. Don’t follow the same pattern on each shelf otherwise it could end up looking too stiff. Try to zig-zag your way down (or up).
Add color. If you’re ready for a full-fledged redo, paint the back of the bookshelves to add dimension and character before styling. If you don’t want to permanently color your bookcases, try fabric or wallpaper. For example, if you have glossy accessories, choose a metallic wallpaper to turn your bookshelf into a shimmering showpiece.
Have too many books or don’t feel like accessorizing? No problem. Color code your books ROYGBIV style to make a bold and fun statement in your room.
For more information on Windermere Evergreen, please contact us here.
How long should they last?

 Nothing in life lasts forever – and the same can be said for your home. From the roof to the furnace, every component of your home has a life span, so it’s a good idea to know approximately how many years of service you can expect from them. This information can help when buying or selling your home, budgeting for improvements, and deciding between repairing or replacing when problems arise.
According to a National Association of Home Builders (NAHB)study, the average life expectancy of some home components has decreased over the past few decades. (This might explain why you’re on your third washing machine while Grandma still has the same indestructible model you remember from childhood.) But the good news is the life span of many other items has actually increased in recent years.
Here’s a look at the average life spans of some common home components (courtesy of NAHB).
Appliances. Of all home components, appliances have the widest variation in life spans. These are averages for all brands and models, and may represent the point which replacing is more cost-effective than repairing. Among major appliances, gas ranges have the longest life expectancy, at about 15 years. Electric ranges, standard-size refrigerators, and clothes dryers last about 13 years, while garbage disposals grind away for about 10 years. Dishwashers, microwave ovens, and mini-refrigerators can all be expected to last about nine years. For furnaces, expect a life span of about 15 years for electric, 18 for gas, and 20 for oil-burning models. Central air-conditioning systems generally beat the heat for 10 to 15 years.
Kitchen & Bath. Countertops of wood, tile, and natural stone will last a lifetime, while cultured marble will last about 20 years. The life span of laminate countertops depends greatly on use and can be 20 years or longer. Kitchen faucets generally last about 15 years. An enamel-coated steel sink will last five to 10 years; stainless will last at least 30 years; and slate, granite, soapstone, and copper should endure 100 years or longer. Toilets, on average, can serve at least 50 years (parts such as the flush assembly and seat will likely need replacing), and bathroom faucets tend to last about 20 years.
Flooring. Natural flooring materials provide longevity as well as beauty: Wood, marble, slate, and granite should all last 100 years or longer, and tile, 74 to 100 years. Laminate products will survive 15 to 25 years, linoleum about 25 years, and vinyl should endure for about 50 years. Carpet will last eight to 10 years on average, depending on use and maintenance.
Siding, Roofing, Windows. Brick siding normally lasts 100 years or longer, aluminum siding about 80 years, and stucco about 25 years. The life span of wood siding varies dramatically – anywhere from 10 to 100 years – depending on the climate and level of maintenance. For roofs, slate or tile will last about 50 years, wood shingles can endure 25 to 30 years, metal will last about 25 years, and asphalts got you covered for about 20 years. Unclad wood windows will last 30 years or longer, aluminum will last 15 to 20 years, and vinyl windows should keep their seals for 15 to 20 years.
Of course, none of these averages matter if you have a roof that was improperly installed or a dishwasher that was a lemon right off the assembly line. In these cases, early replacement may be the best choice. Conversely, many household components will last longer than you need them to, as we often replace fully functional items for cosmetic reasons, out of a desire for more modern features, or as a part of a quest to be more energy efficient.
Are extended warranties warranted?
Extended warranties, also known as service contracts or service agreements, are sold for all types of household items, from appliances to electronics. They cover service calls and repairs for a specified time beyond the manufacturer’s standard warranty. Essentially, warranty providers (manufacturers, retailers, and outside companies) are betting that a product will be problem-free in the first years of operation, while the consumer who purchases a warranty is betting against reliability.
Warranty providers make a lot of money on extended warranties, and Consumers Union, which publishesConsumer Reports, advises against purchasing them. You will have to consider whether the cost is worth it to you; for some, it brings a much needed peace of mind when making such a large purchase. Also, consider if it the cost outweighs the value of the item; in some cases it may be less expensive to just replace a broken appliance than pay for insurance or a warranty.
For more information on Windermere Evergreen, please contact us here.
Five Essentials for Your Home Office
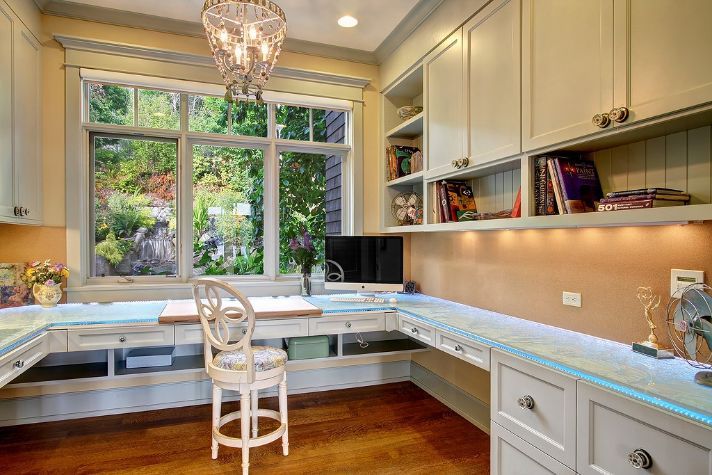
 Most people dream of working from home, but ask anyone who does it on a regular basis, and they’ll tell you how hard it can be to stay productive when you work where you live. The most disciplined telecommuters will tell you that you need a structured routine and organization to rise and grind and get into work mode.
Having a designated work space is quite possibly the most important piece to the WFH pie. Even if you live in a small space, you need to find a balance between home and office. People who work from home often have a difficult time separating work hours from their non-work hours because it’s so easy to keep at it late into the night. But maintaining a balance and shutting down the computer is important for overall wellbeing. What are some other must-haves for a successful home office? Here are the top five:
- Natural Light – Study upon study tells us that natural light is needed to boost productivity and mood. Make sure to set your desk up as close to a window as you can. If being near a window isn’t an option, a natural light lamp is the next best thing. It helps balance your body clock and leaves you feelings rested and refreshed.
- To-Do List or Planner – Start each day off by making a to-do list outlining what you need to get done before the end of the work day. Make sure to set a realistic time frame in which all of that should be completed, so you can check each one off the list and feel immense accomplishment once you’ve completed them all.
- Storage – If you have a big enough space, put in a large bookshelf where you can organize everything (think storage boxes). It reduces clutter and looks stylish. Using your walls and cabinetry is the most efficient use of space.
- Calendar – Many people tend to rely on digital calendars these days because of their convenience. When all of your devices sync together and pop up with reminders, you never have to worry about missing an appointment. However, many people find that it helps to keep a paper calendar handy too so you can easily view your whole month at a glance.
- Space for Inspiration – It doesn’t matter what field you work in, having a source of inspiration in your work space is essential. Whether it’s a photo of your family, your dream car, or that vacation you’ve been dying to take, having that inspiration right in front of you provides a constant reminder of why you do what you do.
For more information on Windermere Evergreen, please contact us here.
Three Projects, Three Ways: Valentine’s Gifts for Your Loved Ones


The ladies at “A Beautiful Mess” have amazing craft ideas, so we decided to try out their flower collage. The results are so fun!
Supply list:
A favorite family picture- blown up to 5*7 or larger
Fabric flowers; you can find these at a local craft store. For a fun touch, pick up some fabric butterflies too
Hot glue gun and glue sticks
A shadow box or a picture frame with the glass popped out
Directions:
Let inspiration be your guide; mock up your design before breaking out the glue gun
Glue flowers around the frame
Let the glue dry and then display your work of art!
Difficulty level: 1
A heart shaped picture collage:
Do you have so many favorite photos that you can’t pick just one? Are you an Instagram addict? Then this fun project is for you. You can use as many pictures as your frame will fit.
Supply list:
A picture frame
A piece of cardstock or paper cut to fit your frame
Cardstock cut into a stencil heart shape
A pile of your favorite photos
Scissors
Craft glue or scrapbooking adhesive
Fancy accent paper (optional)
Directions:
Decide the quantity of photographs you want to display
Arrange your photos on your blank sheet to determine the best placement
Cut each photo into the same size heart (use a stencil heart or heart shaped paper punch for this)
Arrange your pictures on the card stock
If you want to add some dimension, cut out hearts from the fancy accent paper to display behind your photos
Once everything is exactly how you like it, glue it all down
Let everything dry and finish by adding your frame!
Difficulty level: 2
The writing’s on the wall
Do you have a favorite quote about love? Make a modern wall hanging with some simple tools and your favorite words!
Supply list:
A wood frame for stretching canvas (can be found online or your local craft store)
Dark denim (enough to fit over canvas with a couple of extra inches all around)
A white fabric pencil
White fabric paint
Small acrylic paint brushes (with stiff bristles)
Masking tape
A staple gun and staples
A printed template of your favorite quote, as you would like to see it displayed
A window with natural light
Directions:
Tape your printed quote to a window with natural light shining through
Tape your fabric swatch over your template, and position the image/text in the middle of your fabric swatch (dark side facing you)
Using the white pencil, trace the quote and/or image clearly on your dark fabric
Once done, remove your fabric from the window and tape to a flat surface like a desk or table
Use the paint brush and white fabric paint to trace over your white sketches to make your text and/or image visible
Let your masterpiece dry for a few hours (amount of time varies based on the thickness of the applied paint)
Position your fabric over your wooded canvas frame. Make sure the placement is straight and where you want it
Hold your fabric in place over the frame and staple the sides to the back of the wooden frame, checking to make sure your image on the front is straight and the fabric is taught on the frame
If the fabric on the back of your frame is too long, you may want to consider trimming so it doesn’t peek out when the frame is hung on the wall
Find the perfect spot to hang your masterpiece or the perfect person to gift it to!
Difficultly level: 3
Happy Valentine’s Day! From all of us at Windermere Evergreen.
Home Security Systems: Protecting the People and Things You Value the Most

Home Security Systems: Protecting the People and Things You Value the Most
With warmer weather come open windows and extended vacations, so it should come as no surprise that the highest percentage of home burglaries happen during the summer months. With that in mind, now is a good time to start thinking about the security of your home. From old-school security tricks to new digital home monitoring tools, there are many options when it comes to keeping our homes safe. Read on to learn more about how you can modify your home and keep it safe from intruders.
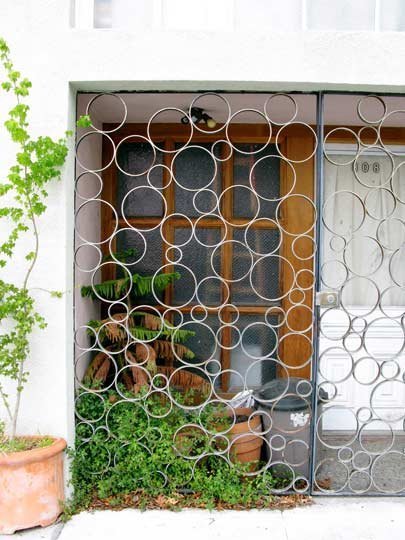
Security bars and gates:
Sometimes the simplest security is just deterring people from trying to get in. While security bars across windows are a great way to keep intruders out of your home, they can be a real eyesore. Luckily, there are now options for decorative security bars that simultaneously protect your home while enhancing its beauty.
Upgrade you locks:
A poorly installed deadbolt can make it easy for an intruder to kick in your door. Start by making sure that your doorframes are in good condition and then look into getting a higher quality deadbolt. You’ll find everything from classic models with keys, or digital options that require passcodes or a fingerprint.
It’s also a good idea check all the locks on your windows. Some older models are easy to jimmy open with a little wiggling. For ground floor windows, you may want to consider double locks. It goes without saying, leaving windows open during the summer is a bad idea – especially those that can be easily accessed.
Exterior and interior home lighting:
Having your exterior lights on timers or motion sensors is a good way to deter nighttime snoopers. Add sensor lights to key entry points on your home, including the front door, back door, and/or basement entries. If you have an unused side yard, consider lighting there too. Keeping your home lit makes unwanted visitors weary of being seen.
If you will be gone from your home for an extended period of time, consider using timed lighting options in your home to make it appear someone is around. You can select timers for bedrooms or living areas. Also, you can program a radio to turn on and off for sound.
Alarm systems:
If you are considering an alarm, you have an array of options that vary from self-install motion detection kits to full-service home security systems. If you choose to do-it-yourself, you will want to install motion detectors on doors and windows – especially those that can be easily accessed on the ground floor. In most cases, these kits also offer a 24 hour call service for an extra fee.
Full-service security systems can include everything from an alarm system and panic buttons to and integration with your smoke detectors/ fire prevention system. These services are expensive up front, but usually have a reasonable monthly rate. And keep in mind, having a home security system installed can also reduce your insurance rates.
If installing an alarm system is cost-prohibitive or does not fit your lifestyle, consider purchasing stickers and a sign that state that your home is monitored by a trusted security system, and place them so they are visible at every entrance.
Security cameras:
Security cameras are readily available for home installation. You can install these in prominently viewed places to deter burglars. There are do-it-yourself install options, and professional systems that come along with monitoring services. There are even options that will work with your smart phone. If the cost for security cameras is too steep for your budget, you can purchase fake cameras to act as a visible deterrent for intruders.
Build your community:
Programs like Neighborhood Watch are very successful in some communities, by creating an environment where everyone is looking out for each other. Building close-knit relationships with your neighbors can go a long way in making you feel safe at home. Whether this is through a formalized program, or a shared agreement with your community, developing relationships with your neighbors is a great way to keep your home safe.
Sometimes the best part of security systems is the peace of mind that comes with knowing your home is protected. Many of our personal items can be replaced thanks to homeowners insurance, but you cannot put a price on feeling safe at home. How do you keep your home safe?
For more information on Windermere Evergreen please contact us here.
