
 Facebook
 X
X
 Pinterest
 Copy Link
The Value of Home Staging
When you put your home on the market, you want it to sell quickly and for the best possible price. Staging your property can help you do both. Below, you will find tips that can help you showcase your home’s strong points, minimize its problem areas, and increase its appeal for prospective buyers.
For more than 20 years, the benefits of staging a home have been well documented. Numerous studies show that staging helps sell a home faster and for a higher price. According to the National Association of REALTORS®, 88 percent of homebuyers start their search online, forming impressions within three seconds of viewing a listing. When a home is well staged, it photographs well and makes the kind of first impression that encourages buyers to take the next step.
Studies also indicate that buyers decide if they’re interested within the first 30 seconds of entering a home. Not only does home staging help to remove potential red flags that can turn buyers off, it helps them begin to imagine living there. Homes that are professionally staged look more “move-in ready” and that makes them far more appealing to potential buyers.
According to the Village Voice, staged homes sell in one-third less time than non-staged homes. Staged homes can also command higher prices than non-staged homes. Data compiled by the U.S. Department of Housing and Urban Developmentindicate that staged homes sell for approximately 17 percent more than non-staged homes.
A measurable difference in time and money
In a study conducted by the Real Estate Staging Association in 2007, a group of vacant homes that had remained unsold for an average of 131 days were taken off the market, staged, and relisted. The newly staged properties sold, on average, in just 42 days, – which is approximately 68 percent less time on the market.
The study was repeated in 2011, in a more challenging market, and the numbers were even more dramatic. Vacant homes that were previously on the market for an average of 156 days as unstaged properties, when listed again as staged properties, sold after an average of 42 days—an average of 73 percent less time on the market.
Small investments, big potential returns
Staging is a powerful advantage when selling your home, but that’s not the only reason to do it. Staging uncovers problems that need to be addressed, repairs that need to be made, and upgrades that should be undertaken. For a relatively small investment of time and money, you can reap big returns. Staged properties are more inviting, and that inspires the kind of peace-of-mind that gets buyers to sign on the dotted line.
What’s more, the investment in staging can bring a higher price. According to the National Association of REALTORS, the average staging investment is between one percent and three percent of the home’s asking price, and typically generates a return of eight to ten percent.
In short, less time on the market and higher selling prices make the small cost of staging your home a wise investment.
Interested in learning more? Contact your real estate agent for information about the value of staging and referrals for professional home stagers.
For more information on Windermere Evergreen please contact us here.
Home Staging tips
A few weeks ago we shared some insights into why home staging is an important part of the selling process. Below you will find some of our tips for staging and photographing your home for sale.
DIY Home Staging Tips:
With a little time, effort and imagination, you can stage your home to showcase its best features, sell it faster and get top dollar.
Clean up, pare down, and toss out: By simply getting rid of excess furniture and clutter, you can make any room look larger and more inviting.
Make it professional, not personal: Remove family photos, mementos and other personal items from the space. This not only eliminates clutter, it helps potential homebuyers envision their lives in the space.
Repurpose rooms: Do you have a “junk” room? You can transform a liability into an asset by turning an underused space into a reading nook, a craft room, a yoga studio or a home gym. Just clean it up, add a coat of paint, some furniture and the right accessories.
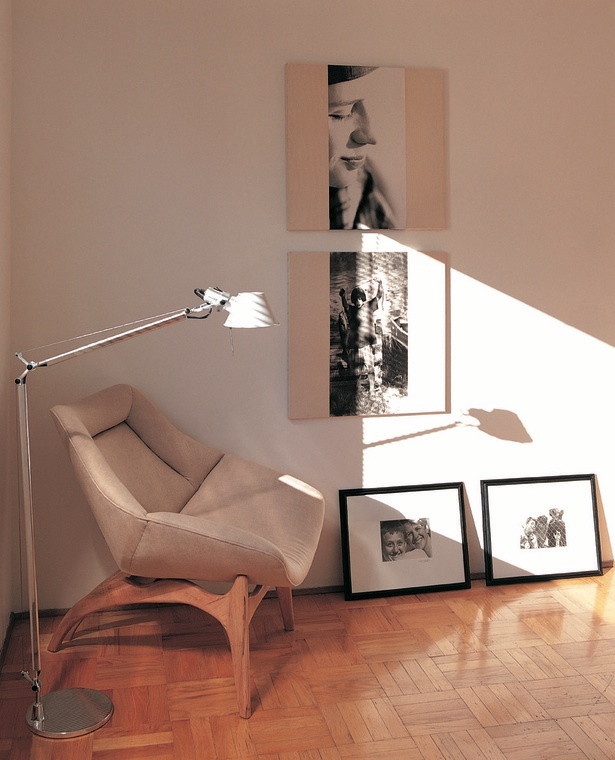
Lighten up: Light, airy rooms look bigger and more welcoming. You can create a pleasing effect by using the right wattage bulbs and multiple light sources. The right window treatments can also have a big impact. Choose fabrics that are light and gauzy, rather than dark and heavy.
Try a little color: Paint is the cheapest, easiest way to update your home. Stick with warm, natural hues, but try darker colors for accent walls and to highlight special features. You can give old furniture new life with a coat of shiny black paint—and freshen up the front door with a bold, cheerful color.
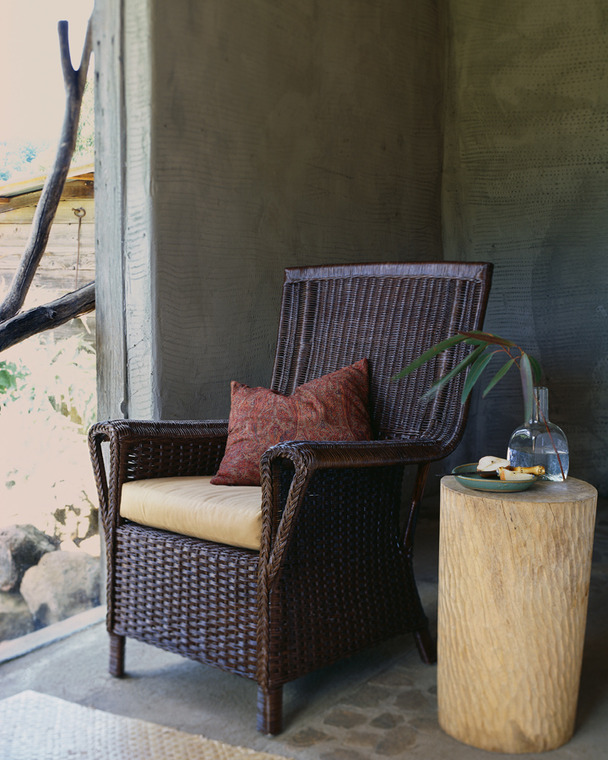
Add some decorative touches: Art, accessories, plants and flowers breathe life into a home. Make rooms more inviting with accessories that are carefully grouped, especially in threes. Pay attention to scale, texture and color. Bring the outdoors in with plants and flowers.
Picture-Perfect Staging:
When it comes to looking for a home most people start on the internet. The photos in your property listing can make a powerful first impression. According to a recent Wall Street Journal article, professional photos can increase home views up to 61%. Make sure your home is “ready for its close-up” by following these simple guidelines before the photographer shows up.
For exterior photography:
· Make sure no cars are parked in front of your house or in your driveway.
· Sidewalks and streets should be cropped out
· There should be up-close and angled shots, as well as long shorts that emphasize space.
· Clear away or trim vegetation blocking the front door or path to the door.
· Make sure lawns are mowed, hedges clipped, etc.
· Remove evidence of pets.
· Put away children’s toys.
· If you are selling a condo or townhome, such amenities as tennis courts, a gym, a garden patio or clubhouse should be photographed.
For interior photography:
· Make sure your house is spotless, windows are clean and rooms are decluttered.
· Repair all visible damage, e.g., bad water stains, gouges, chipped paing.
· Drapes and blinds should be open and lights on.
· Remove trash cans, close toilet seats.
· Use floral arrangements in kitchens and dining rooms.
· Make sure that interesting details and attractive features—e.g., wood floors, a carved mantel, marble countertops and ornamental tile backslashes, etc. – are photographed.
For more information on Windermere Evergreen please contact us here.
Why You Should Stay Put and Improve the Home You Have
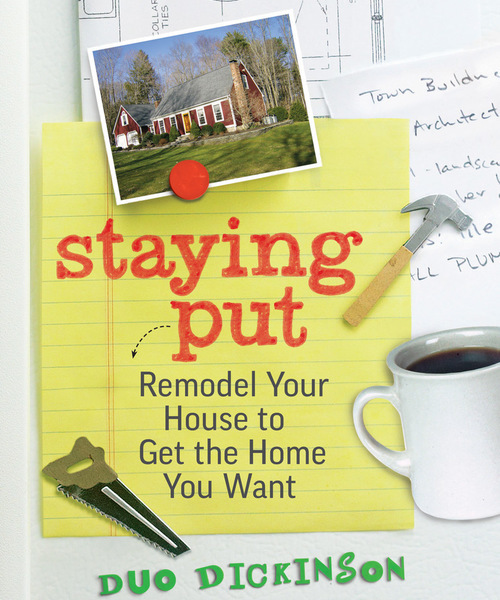

Here’s an architecture book for our times, when some homeowners are under water on mortgages, and the cycle of trading up has either stopped or slowed way, way down. In “Staying Put,” architect and writer Duo Dickinson has assembled a terrific and practical guide to help us make real improvements to our homes. Dickinson, an advocate of well-designed and affordable homes for all, has specialized in residential design for more than three decades.
This is not your typical architect’s book about design. There’s no obscure language nor design-for-design’s-sake ideas. It is a practical, down-to-earth guide that walks anyone through the rational process of how to remodel your house to get the home you want, from how to think about your house and overcoming hurdles to a list of “Duo’s Do’s and Don’ts” for the homeowner. Along the way, there’s plenty of nice before-and-after photos to help explain the points. Do read the book. You’ll be glad you did.
Staying Put 1: The Taunton Press Inc, original photo on Houzz
The cover says it all. The ubiquitous photo of a gorgeous, award-winning home that’s beyond most of us is replaced with images of a saw, cup of morning joe and a to-do list.
Are you staying put yourself? Read on for 8 of Dickinson’s suggestions.
Consider the compass points. The tips and illustrated examples are wonderfully straightforward. For example, we see a house that gets overheated, the siding degrades and the front door bakes in the sun because it all faces south.
Dickinson’s common-sense advice: Rework the front of the house with a new wide porch that shades the front door and some smaller, yet well-sized windows to create a lot more curb appeal while reducing maintenance and energy consumption. It’s a triple win: more beauty and comfort with less cost.
Avoid gutters. Statements such as “gutters and leaders are devoutly to be avoided” may sound like heresy to many, but certainly are the truth. Proving his point, Dickinson illustrates how a properly-built roof overhang can shed all the water it must without the complications, such as ice dams, caused by gutters.
Embrace small moves. Dickinson provides a wealth of simple solutions illustrated with before-and-after photos. He shows how to use small moves for big dividends, such as taking out a wall between a kitchen and a hallway to make room for more kitchen storage.
Enhance curb appeal. The book offers solutions to common problems with a particular style, such as how to improve and enhance an entrance into a split-level home.
Open up to the outside. Dickinson provides some excellent examples of how we can use modern windows and doors to strengthen the connection between inside and outside. Our homes, says Dickinson, no longer need be “later-day caves.”
Find your home. Learning more about the style of the house you have will help you avoid obstacles in remodeling and recognize the best opportunities for improving your particular home.
Open up the inside. Snippets of advice sprinkled throughout the book are like refreshing raindrops that clear the cobwebs away. One such snippet: “If you walk through a room to get to a room, something is wrong.” You know — it’s when that new great room gets added onto a modest house, and the result is some kind of dyslexic creature that’s really two houses rather than one.
So rather than even building an addition, Dickinson suggests you make the most of what you already have. In this example, widening the opening between rooms strengthens this room’s connection with the rest of the home, increasing its utility and spaciousness.
Work with what you’ve got (before): Keeping the kitchen size the same while vaulting the ceiling dramatically increases the overall spaciousness of the room, as you’ll see in the next photo.
Work with what you’ve got (after): Walls, doors, appliances and even the skylight and kitchen sink were all left where they were. This all avoided costly plumbing, electrical and mechanical work and rework.
Working with what you’ve got (plans): Dickinson has included before-and-after floor plans for many of the examples. These plans help provide that much more context, allowing the reader to better understand what they may be able to do with the home they already have.
By Bud Dietrich AIA, Houzz
For more information on Windermere Evergreen please contact us here.
6 Clever Ways to Disguise Trash Bins
 You probably don’t give much thought to your garbage cans, other than remembering to put them out on the right day. But we all have to store our trash and recycling bins somewhere, and doing so can be a challenge on a smaller property, especially if you don’t want them to be an eyesore. If you’re struggling to find a stylish way to store your bins, check out these smart and inspiring ideas. Now, is it black or green bin day this week?
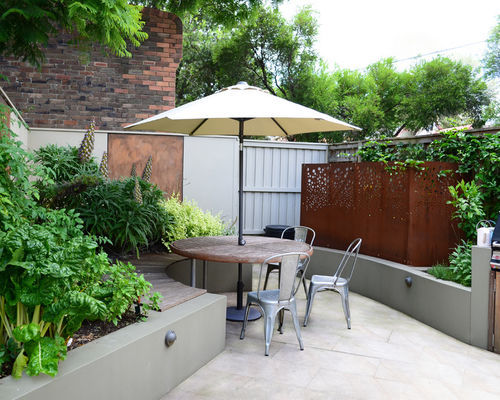
Garbage Bins 1: Outhouse Design, original photo on Houzz
Choose a screen. The curved screen in the corner of this courtyard is an attractive feature in its own right, thanks to the decorative cutwork pattern, and offers an elegant way to hide ugly plastic bins from view.
By using a screen like this, you can section off as much of the garden as you need — to store bikes or garden equipment as well as bins. To blend in the structure even further, you could grow climbers up and over the screen or along the wall behind.
Related: Outdoor Chairs to Entertain in the Garden
Create a brick shelter. Built in red brick to match the house, and tiled with slate, this practical storage area blends with the property’s exterior and actually enhances the space with its character and interest. The look is mirrored in the raised bed at the front of the drive for a coordinated finish.
A custom compartment on the left neatly houses the bin, while two smaller storage compartments on the right make room for stacking recycling boxes.
Make it part of the garden. The aim of this front garden design was to create a wildlife haven, and rather than see the bins as an unsightly obstacle to be hidden away, the owners decided to make them integral to the design.
They created a sturdy wooden structure with a living roof that works as an extension of the garden and is planted with wildlife-friendly flowers and foliage.
Related: Create a Wildlife Haven With a New Bird Bath
Design it into an outbuilding. In a larger space, an open-sided outbuilding like this one is ideal for storing and hiding bins. It’s painted a heritage shade and is partly screened in front with evergreen topiary to create a visually appealing feature — a great way to smarten up a drab drive.
This idea would complement a traditional or cottage exterior, but if your style is more contemporary than country, you could choose a sleeker style, or paint it a darker shade to tie in with the exterior of your home.
Tuck it into a border. Can you spot the trash bins on this drive? They’re neatly tucked away in the wooden box to the left of this image, and the impact of the structure has been much reduced by positioning it in a decorative floral border and planting low standard trees right alongside it.
The structure also has a green roof planted with succulents to further disguise the box and make it as visually appealing as possible.
Build a clever storage wall. If space is limited, why not make your recycling containers work extra hard by turning their storage area into a boundary wall, as these smart homeowners have. This neat wooden shelter screens the bins from the road while creating a clean, contemporary-style wall.
Related: More Designer Tips to Boost Curb Appeal
By Victoria Harrison, Houzz
For more information on Windermere Evergreen please contact us here.
6 Ways to Personalize a White Kitchen

White-on-white kitchens have been a classic look for many years. Why does this trend endure? For starters, white connotes cleanliness, makes small spaces appear larger, and brightens rooms that are naturally dark.
Although many all-white kitchens are just lovely, some can appear a bit stark or cold. To help clients warm up their white, I recommend a variety of strategies, such as mixing metals and adding contrasting paint, fabric or wood. Read on for inspiration for personalizing your white kitchen so that it stands out from the crowd.
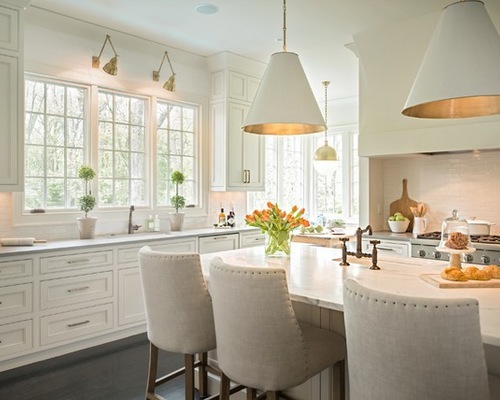
White Kitchen 1: Allard Ward Architects, original photo on Houzz
1. Warm metal accents. Copper, bronze, brass and polished nickel are just a few of the metals that can warm up an all-white kitchen. The gold sconces above the window and the white pendant lights, with their subtle hint of gold, add warmth and a touch of luxury to this all-white kitchen.
2. Color and metal. Moving beyond metallics alone, a single contrasting color when combined with metals can create drama in a white kitchen. In this photo, a modern white kitchen intermingles black pendants and countertops with gold seating. This combination contributes to the room’s sleek contemporary look.
3. Wallpaper. I love wallpaper, especially in kitchens. Wallpaper can introduce color, movement and dimension to a white kitchen. When applied to a lone wall, wallpaper can create a dynamic focal point, as shown in this photo. The bright white cabinets and crisp white walls are softened by the shades of blue in the fish swimming on the side wall. This kitchen’s under-the-sea motif is enhanced by the blue tile on the back wall and the sea urchin-shaped pendant lights.
4. Colorful island. Wood-stained islands often appear in white kitchens because of the richness and contrast they bring. This kitchen shows a creative alternative, pairing a chartreuse island with a chartreuse Roman shade. Together they lend a whimsical, personalized feel. To give your white kitchen a personal touch, consider painting your island your favorite color.
5. Tile rug. Layering in a rug is a great way to introduce color and texture to an all-white kitchen, but some clients worry that a rug could be an added source of dirt as well as a possible tripping hazard.
This clever kitchen resolves both issues with a tile rug instead of a fabric one.
6. Backsplash. A tile backsplash also can bring color and texture to your white kitchen. But who says a backsplash must be tile? This kitchen has a counter-level window in lieu of a tile splash. The window faces a luscious succulent garden, thus creating a green vista for an otherwise monochromatic kitchen.
By Barbra Bright, Houzz
For more information on Windermere Evergreen, please contact us here.
Energize Your Home This Winter With Bright Hues

Bright hues are eye catching, confident and cheering — so if winter’s got you feeling less than energized, why not tap into the power of bright colors to lift your spirits and your decor? Read on for 10 reasons to give bright, zesty hues a try in your home this winter.
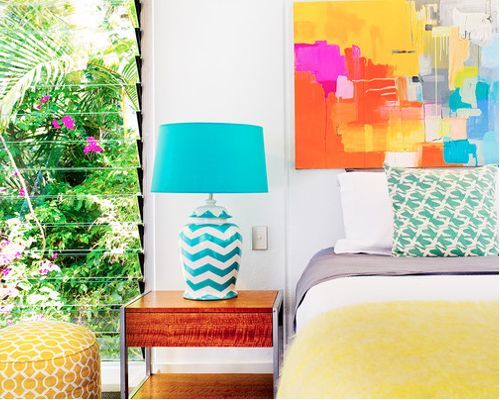
1. Bright hues help with the whole rising and shining thing. Zingy brights are like caffeine for your space. If you’ve been dragging on these dark winter mornings, perhaps a colorful bedroom makeover would help things along. Artwork, pillows and a throw can be easily swapped out now, and again when you feel like a change.
2. Bright hues are playful. Lighten the mood at home with fun, colorful pieces, like the oversize geometric artwork and bright blue vintage rug shown in this space. Colors this bold are packed with personality and perfect in spaces where you host parties or play with your kids.
3. Bright hues are a winter palette cleanser. Been feeling oversaturated by red, green and woodsy decor? Acid brights can act as a refreshing palette cleanser. Clear away the holiday decor and start fresh with a clean, crisp pairing of white and brights.
4. Bright hues are mood boosters. Bright, bold colors are undeniably cheerful. Even if you typically shy away from bright hues, consider making an exception in the winter. The infusion of color can be a great pick-me-up!
5. Bright hues are gutsy. Claim your space and make a statement with a big decorating move, like bold wallpaper or a bright, graphic rug. Bright hues exude confidence — perfect when you are looking to make a fresh start in your life.
6. Bright hues offer contrast to the gray outdoors. Dismal weather got you down? Cheer up your foyer with sunshine yellow. Spaces with large windows can also become a bit of a downer when the skies are cloudy — refresh a living room or kitchen with sunshiny hues to counteract the gloom.
7. Bright hues bring a dash of romance. From the shiny red of London buses to the bright turquoise of a zippy Italian scooter, the colors of a place are often one of the most memorable parts of traveling. Bring back a bit of the romance of your favorite destinations with a collection of colorful travel photos on the wall. Or pick up colors from your most cherished places in smaller doses — like bright buttons on a dapper gray armchair.
8. Bright hues can help you feel more productive. Give your home workspace a jolt to keep yourself sharp and focused. Try a brightly hued desk chair or filing cabinet, or arrange your bookshelves in rainbow order. Even a vase of bright blooms and a new pen cup on the desk can do the trick!
Related: Outfit Your Workspace With Stylish Office Furniture
9. Bright hues wake up winter white. If your winter decorating scheme tends towards pure wintry whites and subtle glints of metallic hues, consider punching things up with a bright accent or two. In the space shown here, a cluster of pillows and a glamorous chandelier dripping in turquoise beads transforms a plain landing into a jaw-dropping one.
10. Bright hues give you a taste of spring when you need it most. Why wait for the first daffodils, when you can have a wonderfully bright yellow door right now? Stop trudging through winter waiting for spring, and treat yourself to springy colors today.
By Laura Gaskill, Houzz
For more information on Windermere Evergreen please contact us here.
Stage Your Home to Impress Holiday Guests

 A few tricks used by professional home stagers can make your home holiday-guest-ready, even if you’re preparing for a visit from your in-laws, not potential buyers.
While friends and family might be more forgiving than a home-shopper would be, you’ll still want to create a clean and uncluttered atmosphere for making holiday memories. A major difference is, for friends and family, you don’t need to depersonalize. Tastefully placed photographs and kids’ hand-made masterpieces can help make a house a home, after all.
But you do want to make your place look and smell clean, and you might even want to evoke a sense of holiday magic and warmth. Michele Graham, a Long & Foster regional administrator and accredited home stager who works with agents in the greater Philadelphia area, offered these tips:
Cleanliness first. Make bathrooms sparkle and shine, since these are rooms every guest will probably see. Add fresh cut greens on top of the window treatments, and set out festive holiday hand towels or napkins. Keep small caddies of cleaning supplies in the bathroom and kitchen, or at least on each level of the home, to make clean-ups faster. In the kitchen, run a piece of fresh lemon through the garbage disposal and wipe off the splash guard, which can collect grime.
Clip an automobile air freshener to your shower curtain in a hidden spot to keep the bathrooms smelling good. You can use dryer sheets to do a quick dust job or polish up chrome faucets. Baby oil will make stainless steel appliances shine.
Add sparkle. Put something shiny in every room, whether it’s mirrors, mercury glass, silver or gold candlesticks, picture frames, or a string of white lights. The light will bounce off eye-catching shiny and metallic surfaces.
Bring in some green. Liven up your mantle or table with evergreen branches, holly boughs with berries, dogwood, and other décor provided by nature. You might find the perfect accents right in your own backyard.
Layer and add depth. A few silver and gold accessories add formality, while plaids and burlap are more casual. Embrace the palette of the season, with its gray sky, snow and evergreens. Even after the holidays, you can use white and silver accents around the house. You can add a pop of color using throw blankets and pillows.
Festive curb appeal. Greet your guests upon their arrival with window boxes filled with fresh-cut greens or even fake ones. Holly branches, pine cones and shiny round Christmas ornaments catch the eye.
Graham said you don’t have to spend a lot of money to get your home ready for the holidays. Most of the items she recommends can be found at dollar stores and thrift shops.
And one of the best ways to brighten your space is free. “Keep your window treatments open to let in as much natural light as possible,” Graham said. “It will add a wonderful glow to accent your décor.”
For more information on Windermere Evergreen please contact us here.
Preparing Your Home for the Winter

 During the winter, it is tempting to curl up and hibernate in bed for the next few months. However, you shouldn’t put off these important home maintenance duties.
Clean and check the gutters: While you are on the roof hanging holiday lights, make sure your gutters are clear of leaves, secured to the house, and in good condition. If you do find problem spots, seal, secure, and make note to fix these in the spring. You want to divert water away from your home.
Insulate external water sources: In cold climates pipes can freeze, which can then lead to cracked pipes and flooding. Bring hoses and sprinklers inside for the winter and use insulation to wrap external faucets. Insulating interior pipes can help prevent disaster. If you don’t have insulation, you can keep a faucet dripping during particularly cold days, so water is flowing through the pipes.
Check your water heater: One way to save money during the winter months is to wrap your water heater, so it doesn’t have to use as much energy to keep the water hot in a tank. You should check on your heater to make sure it isn’t leaking and in good repair regularly.
Interior insulation: Keep the heat in and the cold out with increased insulation in your attic and basement. This is an investment, and best done before the winter hits, but can make a big difference in how warm your house feels and how high your heating bill goes.
Check for cracks and leaks: Do you feel a draft? Check the sealing on your windows and doors. You can add weather stripping and silicon to seal these leaks. Foundations can leak as your home settles, so you should also check your basement for water coming through the walls, pipes, and older windows. You will want to seal these appropriately to minimize damage from flooding or mold.
Weatherize your windows: Your windows can be a great source of heat leakage depending on their age and condition. If you have older windows, you can use a clear film to help insulate them during the winter. If you don’t want to film the windows you can install extra thick drapes or curtains to help keep the interior of your home warm.
Check your heating system: What is one thing gas fireplaces, wood burning stoves, and central air heating systems all have in common? They all need to be cleaned and maintained. Check and clean your indoor heating system thoroughly. If you use an old-fashioned wood stove, make sure there are no leaks and that all soot buildup or nests are removed. If a furnace is what you have remember to change the filters as recommended or clean out your reusable filters.
Check your chimney with care: Nothing is as cozy as sitting by the fireplace during the winter, but use with care! Have your chimney checked by a professional to ensure that it’s in good condition and clear of critters or nests. You can also use a creosote log at the start of the season to help break down any old residue.
Invest in home security: The holidays are prime times for burglars looking to score some extra gifts so make sure your home is safe and secure at all times. Check your locks to make sure these are secure and consider a home security system with visible cameras to act as a deterrent. Keep evidence of big gifts hidden from view too. And make sure you discreetly get rid of any large boxes that might alert a prowler that you have new big-ticket items in your home.
Deck the halls and be merry: Decorate your home and prepare for guests. If you have a Christmas tree, keep it from drying out (and creating a fire hazard) by watering regularly. Keep decorative candles and menorahs away from children and flammable materials. You may want to consider battery powered candles, these can be a safe alternative to traditional candles.
Wishing you and yours a happy and safe holiday! For more information on Windermere Evergreen please contact us here.
Home Staging Tips

 DIY Home Staging Tips:
With a little time, effort and imagination, you can stage your home to showcase its best features, sell it faster and get top dollar.
Clean up, pare down, and toss out: By simply getting rid of excess furniture and clutter, you can make any room look larger and more inviting.
Make it professional, not personal: Remove family photos, mementos and other personal items from the space. This not only eliminates clutter, it helps potential homebuyers envision their lives in the space.
Repurpose rooms: Do you have a “junk” room? You can transform a liability into an asset by turning an underused space into a reading nook, a craft room, a yoga studio or a home gym. Just clean it up, add a coat of paint, some furniture and the right accessories.
Lighten up: Light, airy rooms look bigger and more welcoming. You can create a pleasing effect by using the right wattage bulbs and multiple light sources. The right window treatments can also have a big impact. Choose fabrics that are light and gauzy, rather than dark and heavy.
Try a little color: Paint is the cheapest, easiest way to update your home. Stick with warm, natural hues, but try darker colors for accent walls and to highlight special features. You can give old furniture new life with a coat of shiny black paint—and freshen up the front door with a bold, cheerful color.
Add some decorative touches: Art, accessories, plants and flowers breathe life into a home. Make rooms more inviting with accessories that are carefully grouped, especially in threes. Pay attention to scale, texture and color. Bring the outdoors in with plants and flowers.
Picture-Perfect Staging:
When it comes to looking for a home most people start on the internet. The photos in your property listing can make a powerful first impression. According to a recent Wall Street Journal article, professional photos can increase home views up to 61%. Make sure your home is “ready for its close-up” by following these simple guidelines before the photographer shows up.
For exterior photography:
· Make sure no cars are parked in front of your house or in your driveway.
· Sidewalks and streets should be cropped out
· There should be up-close and angled shots, as well as long shorts that emphasize space.
· Clear away or trim vegetation blocking the front door or path to the door.
· Make sure lawns are mowed, hedges clipped, etc.
· Remove evidence of pets.
· Put away children’s toys.
· If you are selling a condo or townhome, such amenities as tennis courts, a gym, a garden patio or clubhouse should be photographed.
For interior photography:
· Make sure your house is spotless, windows are clean and rooms are decluttered.
· Repair all visible damage, e.g., bad water stains, gouges, chipped paing.
· Drapes and blinds should be open and lights on.
· Remove trash cans, close toilet seats.
· Use floral arrangements in kitchens and dining rooms.
· Make sure that interesting details and attractive features—e.g., wood floors, a carved mantel, marble countertops and ornamental tile backslashes, etc. – are photographed.
For more information on Windermere Evergreen please contact us here.
How long should they last? The life span of your household components

 Nothing in life lasts forever – and the same can be said for your home. From the roof to the furnace, every component of your home has a life span, so it’s a good idea to know approximately how many years of service you can expect from them. This information can help when buying or selling your home, budgeting for improvements, and deciding between repairing or replacing when problems arise.
According to a National Association of Home Builders (NAHB) study, the average life expectancy of some home components has decreased over the past few decades. (This might explain why you’re on your third washing machine while Grandma still has the same indestructible model you remember from childhood.) But the good news is the life span of many other items has actually increased in recent years.
Here’s a look at the average life spans of some common home components (courtesy of NAHB).
Appliances. Of all home components, appliances have the widest variation in life spans. These are averages for all brands and models, and may represent the point which replacing is more cost-effective than repairing. Among major appliances, gas ranges have the longest life expectancy, at about 15 years. Electric ranges, standard-size refrigerators, and clothes dryers last about 13 years, while garbage disposals grind away for about 10 years. Dishwashers, microwave ovens, and mini-refrigerators can all be expected to last about nine years. For furnaces, expect a life span of about 15 years for electric, 18 for gas, and 20 for oil-burning models. Central air-conditioning systems generally beat the heat for 10 to 15 years.
Kitchen & Bath. Countertops of wood, tile, and natural stone will last a lifetime, while cultured marble will last about 20 years. The life span of laminate countertops depends greatly on use and can be 20 years or longer. Kitchen faucets generally last about 15 years. An enamel-coated steel sink will last five to 10 years; stainless will last at least 30 years; and slate, granite, soapstone, and copper should endure 100 years or longer. Toilets, on average, can serve at least 50 years (parts such as the flush assembly and seat will likely need replacing), and bathroom faucets tend to last about 20 years.
Flooring. Natural flooring materials provide longevity as well as beauty: Wood, marble, slate, and granite should all last 100 years or longer, and tile, 74 to 100 years. Laminate products will survive 15 to 25 years, linoleum about 25 years, and vinyl should endure for about 50 years. Carpet will last eight to 10 years on average, depending on use and maintenance.
Siding, Roofing, Windows. Brick siding normally lasts 100 years or longer, aluminum siding about 80 years, and stucco about 25 years. The life span of wood siding varies dramatically – anywhere from 10 to 100 years – depending on the climate and level of maintenance. For roofs, slate or tile will last about 50 years, wood shingles can endure 25 to 30 years, metal will last about 25 years, and asphalts got you covered for about 20 years. Unclad wood windows will last 30 years or longer, aluminum will last 15 to 20 years, and vinyl windows should keep their seals for 15 to 20 years.
Of course, none of these averages matter if you have a roof that was improperly installed or a dishwasher that was a lemon right off the assembly line. In these cases, early replacement may be the best choice. Conversely, many household components will last longer than you need them to, as we often replace fully functional items for cosmetic reasons, out of a desire for more modern features, or as a part of a quest to be more energy efficient.
Are extended warranties warranted?
Extended warranties, also known as service contracts or service agreements, are sold for all types of household items, from appliances to electronics. They cover service calls and repairs for a specified time beyond the manufacturer’s standard warranty. Essentially, warranty providers (manufacturers, retailers, and outside companies) are betting that a product will be problem-free in the first years of operation, while the consumer who purchases a warranty is betting against reliability.
Warranty providers make a lot of money on extended warranties, and Consumers Union, which publishes Consumer Reports, advises against purchasing them. You will have to consider whether the cost is worth it to you; for some, it brings a much needed peace of mind when making such a large purchase. Also, consider if it the cost outweighs the value of the item; in some cases it may be less expensive to just replace a broken appliance than pay for insurance or a warranty.
For more information on Windermere Evergreen please contact us here.
