
 Facebook
 X
X
 Pinterest
 Copy Link
A little goes a long way: a top ten list for making the most of your home improvement

 This weekend I spent the greater part of Saturday taking care of the ongoing household to do list and the transformation made a huge impact. There certainly is more to do, as is the nature of home improvement, but having a finite list of things to accomplish and making time to enjoy them made all the hard work worth it! Here is my top ten list of how to make the most of your time when tackling home-improvement projects.
1. Imagine your perfect place. Your home should reflect your personality, the way you spend your time, and fit your needs. If you want a place to entertain, to relax and meditate, to create art, nurture your children, or display your collections, you will want to consider your priorities. Once you have explored the possibilities the next step is to prioritize your to-do list in order to make the most impact.
2. Make a list. Some home project lists could go on and on (and on), so it’s a good idea to write out a list and discuss the details with the members of your household so you know where to start and who is responsible for what.
3. Prioritize. Once you know what needs to be done it’s time to prioritize the list. If there is something timely (like getting gutters before the fall) keep that in mind when prioritizing, but also think about those projects that will bring you the most joy in daily life.
4. Do one project that really makes a difference. I recently finished sprucing up the living and dining rooms with new curtains and new furniture for storage and display. These are the rooms I spend the most time in at home, so the difference is palpable to how I view my home. Now we are ready for a big dinner party which is one of the most important things in our household. From this experience, I realized that small changes and some cleanup can make a huge difference.
5. Keep it reasonable. Make sure your list is reasonable. The goal isn’t to get everything done in one weekend, which typically isn’t feasible anyway. Rather, you want the time you invest in your home to be enjoyable and give you the sense of satisfaction (and motivation to do more).
6. Gather your tools. Nothing will derail a project like not having the right tools. Once you know what you are going to accomplish make sure all your supplies are ready. You’ll be far more efficient if you hit the hardware store, fabric store, gas station, etc. prior to getting started.
7. Work together. Some projects are two-people projects. If you share your household, enlist other members to share the work. Some projects need two people to lift, spot, hand tools, push, pull, etc. If you live alone, have a work party by inviting a friend over to help. You can return the favor if they ever need help with a household project.
8. Enjoy the process. Blast music, take breaks, and step back to reflect on your household improvement. If you need to dedicate a weekend to doing your chores, you may as well still enjoy it!
9. Get the list done. If you’ve taken the time to make your list reasonable you shouldn’t have any trouble completing it. Doing so will reaffirm your sense of accomplishment, so when you look at what was done, you won’t be thinking about what you have to do next.
10. Bask in your success. Focus on the improvement, enjoy your space, and most importantly, use it! If you made your bedroom a sanctuary, light a candle and relax with a good book. If you reconfigured your kitchen for more efficient use, have your own Iron Chef moment and cook a huge meal. Just remember, all your planning and hard work should be enjoyed.
What are your tips for making the most out of your home?
For more information on Windermere Evergreen, please contact us here.
Make the Most of the Home You Have


If you have been in your home for a while you may be restless for change. The great part about having a home of your own is you can make improvements and give your home a chance to evolve over time. You just need to help your home live up to its potential! Here is a top ten list of improvements that will help you make the most of your home.
- Find your home’s purpose. Each home is as unique as its owners, so in order to fully utilize your home, consider how you view your home’s purpose. Some people like to entertain, others find it a calm space in the frenzy of daily life; some nurture their families and others nurture their creativity. Your home’s purpose can be any combination of these and more, but it helps to consider the function of your space in order to ultimately find its purpose.
- Assemble a list. A list always helps me figure out where to start or prioritize what is the most important project. Think about what you want to change in your home, inspirations, and preferences. .
- Make an “inspiration board”. An “inspiration board” is a great way to visualize your home’s decor. You can create a board online with a tool like Pinterest to organize ideas you love or you can do it the old fashioned way with a board, magazine cutouts, color swatches, and fabric samples. Doing this will allow you to see all the elements you like in one place so that you can then tie it all together into a room you love.
-
- Create a collection. If you have items that you like to collect, think about how to transform that collection into something you can display. If you don’t already have a collection of loved objects think about what this collection would be for you. You can center a room design around your travel souvenirs, old camera collection, figurines, unique plates, or familial objects. Adding to this collection over time can be a great way to keep your spaces new while maintaining a personal feel to your decor.
- Choose a new palate. Shake up your sensibilities and think of a color that will compliment your room while making a statement. It’s easy to fall into the white/beige standby to keep our rooms neutral, but sometimes a color that provides a contrast to your décor will make the room pop.
- Re purpose an old piece of furniture. Instead of replacing your furniture give it a facelift. You can have a sofa or chairs reupholstered or make use of a slip cover. Also, Painting and staining can add new life to your wood pieces.
- Rearrange. Moving furniture around is another easy way to reinvent your space. Try placing your sofa on an angle to open up your entertaining room or move your lamps to improve lighting. You can also think about moving a piece of furniture into a room to give it new life, like using a unique dresser for a credenza or a chair as a side table.
- Make a room of your own. Find some space in your home that is uniquely yours, whether this is the corner of the guest room or an office of your own. It can be very rewarding to have a space that you can organize to fit your personal needs without the worries of others intruding
- Find an inspirational object. Have you ever fallen in love with an object that inspired you to want to completely redo a room to accommodate it? Designing a room around an inspiring object can be a great way to create a space that truly embodies your design sensibility.
- Find design motivation. Home design evolves over time and can be sustained by finding items that inspire you. Read magazines and books that inspire your interests in architecture, design, art, etc. Or find stores and flea markets that sell pieces that influence your aesthetic. Or bring a camera with you when you’re doing your favorite activities and bring back memories or inspirations. Most of all have fun!
What inspires your home design?
For more information on Windermere Evergreen, please contact us here.
5 Creative Ways to Dress Up a Ceiling
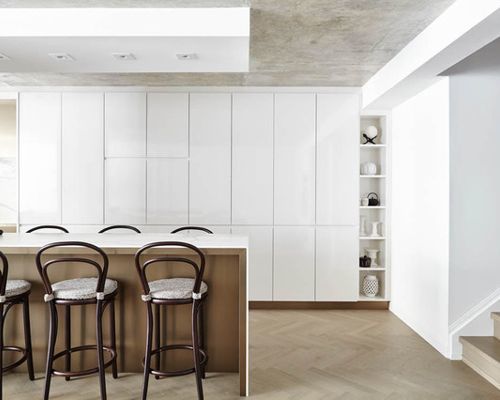

A crisp white ceiling is a classic look, but it’s not the only option for making a room look polished. Here are a few other design considerations to bring some personality to your ceiling.
The sky is the limit when it comes to the amount of creativity and beautiful layering you can put into creating a decorative statement on the ceiling. But before we discuss the many stylish or unusual treatments to consider, let’s start with a classic finish you’ve probably seen before.
Ceiling 1: Toronto Interior Design Group | Yanic Simard, original photo on Houzz
Exposed Concrete
In my own design projects, I find many clients are excited to remove a popcorn ceiling treatment, and this is usually my preference as well. The results can be subtle, yet striking.
In some cases, the results can be dramatic. Removing a popcorn ceiling, and the entire drywall layer above, can often reveal architectural finishes, such as a cool concrete surface.
An exposed concrete ceiling gives a room a bit of industrial, architectural flair, adding drama and texture in a modern way. Of course, not every home has a concrete ceiling to reveal, so it’s important to speak with your designer or contractor before making any plans.
It’s also important to note that stripping a ceiling back to the concrete will leave no space for recessed ceiling lights. For this reason I usually include an area of dropped ceiling to allow potlights, define a gathering space or focal point and visually break up the look a bit.

Ceiling 2: Victoria Gerts, original photo on Houzz
Flat Drywall
From my experience, the most popular contemporary ceiling style is the simple flat drywall ceiling. If a room includes other sound-absorbing materials like rugs, curtains or a fabric headboard, you can skip the acoustic ceiling treatment without worrying about echoes.
As I mentioned before, it is not always easy to achieve a perfectly crisp drywall ceiling, but skilled tradespeople can install either a new drywall ceiling or scrape the texture paint from an existing ceiling to reveal a much more sleek, modern surface.
Trimming a ceiling with crown molding painted to match the ceiling hue is a great alternative way to hide subtle imperfections in the slope of the ceiling and achieve a bright, airy, classic look.

Ceiling 3: Jade N Timmerman Interiors, original photo on Houzz
Paint
A drywall ceiling doesn’t only come in one shade, so while we’re discussing this finish, let’s touch on some differing paint choices.
White. A white or just-off-white ceiling is popular because it’s a great way to make any room feel open and airy and let light bounce from any windows or light fixtures back into the room.
For a contemporary or modern home, plain white can work great, but for a more traditional home or a space with definite warm tones (like this room with a lot of welcoming beige), choose a subtle off-white that complements the tone of the walls.
For a fun, trendy take, cheat the ceiling line a bit by starting the ceiling paint 12 to 24 inches down the wall (or only painting the walls up to that point, whichever way you think of it). The result is a breezy modern effect without using any bold hues or new materials.
Gray. Using a darker hue on the ceiling than on the walls visually brings the ceiling down, which can make a room feel more intimate.
Using a neutral gray shade (or one with a hint of cool blue) achieves this effect without drawing too much attention, so the room still feels serene and sophisticated.
This makes gray a great choice for bedrooms, dens and nurseries, bringing a peaceful, cozy atmosphere.
Accent colors. For a room with a unique personality, adding an accent color to the ceiling infuses a lot of drama in an unexpected spot.
I won’t lie: As a DIY task, painting the ceiling is not nearly as easy as painting a wall, and even for professionals it usually requires the room be fully emptied first. So, it’s best to be absolutely sure that you love a hue before applying it to the “fifth wall.” The upside is that the ceiling is often a relatively small surface area, meaning that splash of color is a more controlled dose than painting the walls.
While a painted ceiling is immediately noticeable in a room with stark white walls, when a room has a lot of interesting and eclectic finishes on other surfaces, a rich hue can actually blend in better than a white ceiling. It’s a daring look for sure, but for those who love a lot of personality in their home, a colorful ceiling can be a very livable choice.
For the best of both worlds, a navy, deep teal or royal blue shade will feel dramatic but still appear neutral enough to not overwhelm you.
Matching ceilings and walls. Painting the ceiling to match the walls may sound overwhelming, but sometimes it can actually be the more subtle choice. When the ceiling and the walls (or even just a few walls) are the same hue, the lack of contrast makes the ceiling less of a dramatic feature and more of a singular background color. Of course, this applies best to softer hues like gentle pink, watery blue or heritage butter yellow.

Ceiling 4: Toronto Interior Design Group | Yanic Simard, original photo on Houzz
I personally match the ceiling to the walls quite often when using light neutral shades. While it may appear white on your screen, the walls, ceiling and molding in this project are all Benjamin Moore’s Classic Gray, a subtle, warm gray shade. In an older home, using an all-over hue is a great way to deemphasize imperfections such as sloped ceilings that don’t meet walls in a perfectly straight line.
Two-tone paint. Using a dark or dramatic paint color on the ceiling doesn’t have to be an all-or-nothing decision. Like the opposite of an area rug, painting just part of a ceiling can help define a particular zone. Lining up the edge or edges with another element in the room will help it make visual sense.
Paint Finishes
Semigloss. The higher the degree of gloss in a paint, the more visual depth it will have and the lighter the perceived color will be. So, when choosing a darker shade especially, selecting a semigloss or more subtle satin finish can make a color seem less aggressive and more multidimensional and help keep the paint from absorbing all of the light in the room.
Matte. Matte and eggshell finishes represent the less-glossy end of the spectrum, and thus reflect less light. This will make a color seem more pure and vivid, and a bit darker. For those who don’t want to shy away from a rich statement, a matte finish gives a crisp contemporary look.
Gloss. Ultra-high-gloss paint is not easy to apply to a ceiling because it has a slower drying time and thus lots of opportunity to drip or become uneven. But it’s not impossible for expert professionals, and the results can be stunning, especially when paired with sparkling ceiling fixtures and beautiful natural light.
Alternately, a “stretched ceiling” uses a layer of high-tech material suspended just below the true ceiling to create a gloss effect (or other finishes) that paint alone cannot achieve.

Ceiling 5: Legacy Custom Homes Inc, original photo on Houzz
Paneling
Wood planks are most often seen on the floor, but they look just as beautiful above.
While wood-paneled ceilings are often associated with cottages and farmhouses, they can work with a variety of styles of home. Panelling works well for transitional homes, especially in controlled doses like the small strip seen here, bringing texture and richness to the ceiling that a solid color can’t match.
Generally, thinner strips of wood, and species with more knots, will appear more cottage-inspired, while wider planks or sheets, often with a less-grainy finish, will carry a more modern appearance.
Both types work well in kitchens with airy white or off-white cabinetry, taking a classic “white kitchen” and giving it added warmth and a natural appeal.

Ceiling 6: Buchanan Construction, original photo on Houzz
Pressed Tin
While these panels are not necessarily made from tin, the pressed-tin look endures as a charming option for traditional kitchens, or contemporary or transitional kitchens that want to add some classic flair.
These panels can be visually quite dominant with their glam or antiqued finishes and busy patterning, so they work well in rooms with otherwise simple palettes, or as a small accent over an island or seating group.
To keep the look fresh and bright, try using classic tin panels with stainless steel appliances, so the primary metal tone repeats and the room feels cohesive.
For more information on Windermere Real Estate and our agents, please contact us here.
Is a “home exchange” vacation right for you?

 It is finally summer; time for barbecues, summer camp, and family vacations. In recent years we’ve heard of people shortening their vacations, staying closer to home, or going nowhere at all for “staycations”. Another way to save money, while still getting away, is to leverage your own home for a home exchange.
A home exchange—often called “house-swapping”—is a money-smart vacation idea that’s been around for a long time. With virtually everyone feeling the economic squeeze, some exchanges are more popular than ever before.
Why a home exchange? Since accommodations are usually the priciest part of a vacation, a home exchange saves money, allowing travelers to take longer vacations and perhaps splurge a bit on dining, tours, or shopping. Larger families appreciate how homes meet their needs for space, meals, and a good night’s sleep. And, home-swappers often say they enjoy “living like the locals,” especially when traveling internationally.
How it works. The basic idea of a home exchange is that two families agree to live in each other’s home (usually at the same time) at no cost—it’s considered an even trade. Exchangers find one another via home exchange website that provides detailed listings of available homes. Exchanges take place within the United States or internationally, and the length of stay is whatever the parties agree upon. Exchangers typically do not meet in person but get acquainted via phone calls and emails before the exchange happens. Details, including pets, the use of a car, and cleaning are all agreed upon ahead of time, usually in a written contract provided by the website.
What makes a house desirable? You might be surprised! As a general rule, home exchangers are looking for location, location, location. They want to explore attractions in your area, attend an event, or visit family. A beachfront house in California is highly desirable, as is a condo in an exciting city—and even a home in the suburbs will appeal to the right travelers. Because swappers are primarily looking for a convenient jumping-off point for their adventures, your home’s age, floor plan, and furnishings don’t matter too much, as long as it’s clean, comfortable, and accommodating.
Vacation homes are ideal. Whether it’s a rustic cottage on a secluded fishing lake or a condo at a popular ski area, a second home is ideal for exchanges. Logistically, you don’t have to vacate your primary residence, and you have more flexibility as to when the swap can happen. For this reason, many retirees—who often own second homes and enjoy freer schedules—find home exchanges especially appealing.
First steps. If you’re intrigued, start by exploring a few websites; you can view a lot of information for free. Home exchange websites typically charge an annual membership fee of $50 to $100 to list your home. If you decide to join a service, you’ll provide several photos and a detailed description of your home. You’ll also post your desired destination(s) and travel dates, and you’ll be able to peruse the homes that meet your criteria. It’s common to trade information with several homeowners before finding just the right match, and the process may take several months.
Focus on the basics. Once you’ve agreed to an exchange and are preparing your home for guests, think about what makes a hotel room enjoyable. A clean, clutter-free home is universally appealing, and comfortable mattresses and attractive bedding are a must. Your kitchen should be well organized, and internet access is a big plus. Your guests know they’re staying in someone’s home, so don’t worry about scuffed baseboards and well-worn furniture. Likewise, don’t expect five-star accommodations when you step into your host’s home.
Is a home exchange right for you? If the very thought of others living in your home and sleeping in your bed—or you in theirs—makes your palms go clammy, an exchange is probably not for you. But many travelers are hooked!
What are your summer vacation tips?
For more information on Windermere Evergreen, please contact us here.
Damage Control: Preparing for Winter Storms
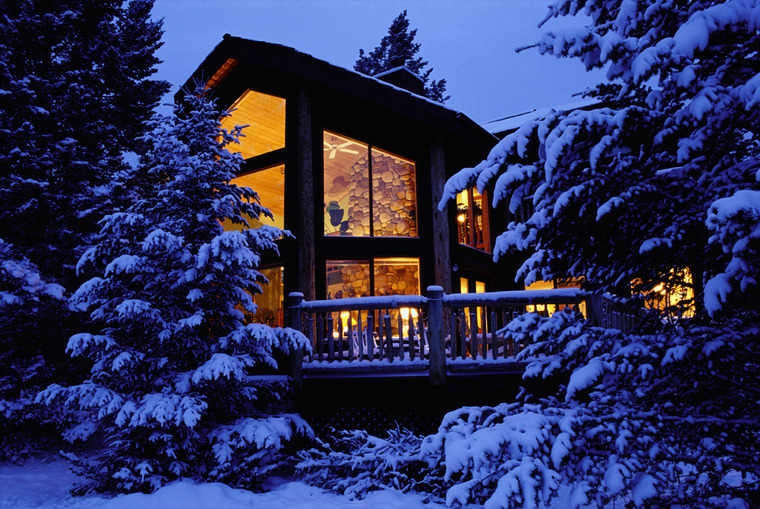
 Last week we shared tips for preventive home maintenance to help you and your home fare better through the winter months. This week we want to take this topic a bit further by focusing on disaster preparedness. No one wants to think about disasters, but being organized can help bring you and your family a peace of mind. Here are some tips for preparing for events, such as major winter storms, natural disasters, and evacuations. In the coming weeks, we will have more on how to stock an emergency kit and manage property damage.
Power Outages
Power outages are relatively common during large weather-related events; however, losing power for a few days can be highly inconvenient – and even dangerous. If you aren’t in immediate danger, you will want to make sure you are prepared with some basic necessities to survive the cold, darkness, and boredom that can accompany days without electronic stimulants.
· Keep a supply of flashlights and batteries on hand. These items easily find their way to the back of drawers, or misplaced in rooms. Make sure they are easy to find in absolute darkness. Keep flashlights in your bed side table and use a magnet to secure a flashlight to your fridge. Keep plenty of batteries on hand; in the case of an emergency, batteries can be very difficult to find.
· Don’t rely on candles. Candles are dangerous if you have pets or small children, and they can also cause a fire if not properly attended.
· Have a crank or battery powered AM/FM radio available so you can keep up on the news.
· Use your cell phone sparingly or use a charger with an alternative energy source to make sure your phone is fully changed during an emergency situation.
· When preparing for the winter season, make sure you stock up on food that is easy to eat without the help of a microwave or stove.
· Keep your refrigerator cold. The more often you open the fridge, the more quickly the temperature will rise and your food will spoil. Here is a useful guide for how long food will last after an outage.
· If you have small children, keep a stock of activities to entertain them without the aid of electricity.
· You may be able to use a BBQ if the weather is permitting or if you have a covered patio. It is very important to remember to never bring your BBQ inside for food consumption or heat. Using a BBQ or generator inside can lead to carbon monoxide poisoning.
Natural Disasters
In the instance of a natural disaster, such as a tsunami or earth quake, turn off your water heater and gas tanks. Gas leaks can be very dangerous, so if you smell gas or hear a blowing or hissing noise, you will want to leave the premises immediately and call your gas provider. If you are concerned for your family’s safety in your home, follow an evacuation plan (see “Evacuations” below).
If you are preparing for a major wind storm or hurricane/tornado, you may actually have some forewarning. In that instance, here are some helpful tips:
· Secure furniture to walls. If you live in earthquake prone territories (or have small children), securing tall bookshelves to your wall is a must. This will reduce damage and decrease the odds that someone will get injured.
· Bring outdoor items inside, including your patio furniture, pots, barbeques, etc. These items could get lost or cause greater damage to your property.
· In high wind situations, use storm shutters or board up your windows to prevent trees or other objects from causing damage.
· Fill your bathtub with clean water. In the event that water is shut off, this will be valuable for flushing the toilet and personal hygiene.
· If you have a fireplace or a wood burning stove, stock up on firewood to ensure your home stays warm.
Evacuations
During a weather-related emergency, your first priority is usually to stay in the safety of your own home. But sometimes this is not possible. With the help of your family, it’s a good idea to make an evacuation plan. Here are some possible issues to consider:
· Come up with a plan. If something should happen, it is best that everyone knows what the drill is ahead of time. Have a plan about where the family meets, a backup place to stay, and if you have family pets, how they will be evacuated, as well.
· A designated place to meet if your family cannot evacuate together.
· Designate a spot in your house and store all important documentation together, so someone can grab copies of birth certificates, home inventory, insurance documents, etc.
· Create a list of other important items you would like to take in case of an emergency, such as family heirlooms, a toy, a laptop, etc. Each person should know what those special items are, and be able to grab them quickly.
· And don’t forget to practice your plan together as a family.
For more information on Winderemere Evergreen, please contact us here.
Baby Boomers Have Homebuilders Rethinking Home Design

 The baby boomer generation, which is currently estimated to be aged between 48 and 67 years old, comprises almost one-third of the nation’s population. The demand that this lucrative segment of the population has on housing is causing homebuilders to rethink how they design homes. In fact, the National Association of Home Builders (NAHB) has a 50+ Housing Council which focuses entirely on the housing needs of aging baby boomers. A study commissioned by the NAHB suggests that baby boomers and older homebuyers want a maintenance-free lifestyle that frees them up to travel, socialize, and pursue other activities. Perhaps this is why real estate professionals report an increase in the number of baby boomers who are interested in condominiums and townhomes. There is also growing popularity for luxury units because they appeal to empty-nester baby boomers who no longer want the maintenance of a single family home, but don’t want to scale back on certain features and amenities either.
Fear of Commitment? Choosing the Right Colors for Your Home

 One of the most frequent questions interior designers hear is how to choose colors for a home. We all love color, but some people are afraid of using color in their home. Many find they fear committing to a certain color scheme or making a mistake after it is all done. Here are some ideas to help to get you started.
To try to determine just what colors to use in your home, look in your closet! You’ll see the basic wardrobe classics in there: black, brown, navy, beige/khaki. Those colors are neutrals and very applicable in your home color scheme. Now, check out the colors hanging there, too. Unless you are a serious fashionista, a certain color or two will emerge as a standard in your color preference repertoire. Even prints will feature similar colors. These colors are a great place to start to help you decide what colors to use in your home. If you love wearing certain colors and feel good wearing them, you will enjoy seeing them throughout your décor.
Lest you feel the need to paint an entire room tomato red (or whatever color you find that you prefer), just paint the walls a nice warm taupe or other neutral that you like and use the tomato red as an accent color with some of your accessories such as throw pillows, lamp bases, art on the walls or throw rugs. You can even practice with some inexpensive items you might find at a tag sale or discount store before you commit with higher priced items. Give it a try and don’t be afraid to keep working at it. For more information on Windermere Evergreen, please contact us here.
Oh My Aching Back: Cabinet Heights to the Rescue

 When approaching a kitchen or bath remodel or new construction, you can make things a lot more comfortable by getting creative with the heights of your base cabinets.
Standard heights traditionally have been 36” tall (including the thickness of the countertop material) for kitchen base cabinets, and 29” – 30” tall for bathrooms. These heights are good overall, but are surely not set in stone and can make life a lot more comfortable with some tweaking.
Consider the users’ heights when deciding on cabinet heights. If everyone in the household is tall, consider having the main area of the kitchen raised an inch or so. Chopping will be much more comfortable that way, and it will help avoid arm and back fatigue. If household members are various heights, consider having one area raised higher and another area at the standard height. If you have someone who requires lower heights, such as a wheelchair user, consult a design professional to assist with their particular needs.
In the bathroom areas, consider the primary users when determining the best heights. The master bath would likely serve adults, so having the base vanities at a taller 34” height will help to avoid stress on the users’ backs when utilizing the sink for face washing and tooth brushing. If a child uses the area, keep a small step stool handy for those times. A main hall bath outside the children’s rooms could have the standard height. If the children are a bit older (and taller) and you intend to remain in the home longer than a few years, consider the taller height there too for when the children are taller, as they do grow quickly!
Just a few adjustments can make for happy backs, and aren’t difficult at all to achieve if you plan ahead. For more information on Windermere Evergreen, please contact us here.
Follow the Direction in Which the House Is Growing

 When you first move into your new home, it is likely you will have a list of items you must change right away, to fit your design and practical needs. As far as your landscaping goes, I recommend that you maintain what you have for at least one full year—the entire growing cycle of everything in your lot. This way you may avoid chopper/whacker/digger remorse: “Oh, I wish I’d known that was a flowering syringa (lilac) and not just a weedy-stick-y looking thing.” Additionally, if you begin planting right away, you won’t really know your micro-areas and could well be pulling dead, stick-like plants, shrubs, trees which you only recently purchased. It takes a bit of self-control to avoid that initial “clean-up” and planting frenzy, but you may thank yourself eternally if you can hold off.
During that first year of restraint, watch the pattern of the sun across your lot/land, learn the irrigation system or lack thereof, note shady, sunny, dry, wet, windy, catbox, and understory areas. Note the neighbors’ yards, and see what works and doesn’t, and what you like and don’t. If you are so inclined, keep a gardener’s notebook with your observations.. Decide what you want your lot to be, and what fits into your lifestyle. Whether you are a retired, full-time master gardener, or an organic gardener, or you “just wanna bbq and kick-back”, there are landscapes to fit your ideal. Developing a plan for all of your “yard-rooms”, as 20th century British gardener Gertrude Jekyll named the various areas of the yard, is a comprehensive approach. Where do the kids play? Where are the garbage/recycle bins stashed?
Think about traffic patterns—where do you want paths, seating areas, and garden beds. Also consider “hardscape”: walls, fences, garden structures, screening from neighbors, and parking areas.
A well-planned landscape enhances the value of your home and lets you extend the walls of your home from lot line to lot line.
For more information on Windermere Evergreen, please contact us here.
Here’s Your Spring Maintenance Checklist

 Now that spring has sprung, let’s clear the cobwebs and get your home ready! Here is our quick guide to spring home maintenance:
Inspection top to bottom: Now that the weather is temperate you will want to check on how your home weathered the winter. Check the roof for leaks, the gutters for damage, and the siding for cracks. You will also want to inspect your basement or foundation for any shifts. Make repairs now to prevent further damage.
Clean out the gutters: April showers bring May flowers… so clear out the gutters to keep rain from pooling on your roof or near your foundation.
Pest control: Spring is mating season for eight legged critters, so sweep out cobwebs, clear debris, and check the nooks and crannies. If you live in an area prone to dangerous species like brown recluse or black widows, you may want to contact your local pest control, but otherwise household spiders do help eliminate other bugs.
Check your basement and attic for signs of other infestations. For more information on pest control go here: http://www.windermere.com/blogs/windermere/categories/living/posts/when-things-go-bump-in-the-night
HVAC system: If you have an air conditioner now is the time to check to make sure it is ready before summer gets here and everyone else is clamoring for maintenance. Now is a good time to check your home air filters and replace or upgrade to keep allergens at bay.
Clear the clutter: Do a sweep around the house and get rid of junk that you don’t use! Take a little time each week to tackle a room. Closets, playrooms, and basements can be especially daunting, but getting rid of old stuff and refreshing your space will go a long way!
Deep clean: On a nice day open the windows, dust, wipe, scrub, and clean. You will get a nice work out and your home will look and feel so fresh after a winter of being cooped up.
Update your décor: Add a splash of color to your home with small embellishments. Add a colorful vase, a lighter throw for your sofa, pretty pastel pillows, or spring-time candles, to upgrade your living space.
Take it outdoors: Let your throw rugs, curtains, and other tapestries air our outside. Shake off the dust, spot clean what you can and let everything bask in the sun for an afternoon.
Don’t forget the back yard: It may not be time to start up the grill, yet, but you can get started on your outdoor entertaining checklist. Check your lawn, and if you have some spare spots start filling in with seed. Check your outdoor plants, prune, plant bulbs, start to replenish soil for your garden, and mow, so you are ready to start when the season allows.
Speaking of the grill – if you have a gas grill you will want to pull this out and perform a maintenance check. Clean everything up and check to make sure all the gas lines are clear, as these can get clogged after sitting idle all winter. Make sure the grill is clear of spiders too, as they can build webs in the tubes, causing damage to your grill. You can start to bring out your garden furniture too, or clean it up if you left it covered outside all winter. Because before you know it, it’ll be barbecue season!
For more information on Windermere Evergreen, please contact us here.
