
 Facebook
 X
X
 Pinterest
 Copy Link
Five Essentials for Your Home Office
 Most people dream of working from home, but ask anyone who does it on a regular basis, and they’ll tell you how hard it can be to stay productive when you work where you live. The most disciplined telecommuters will tell you that you need a structured routine and organization to rise and grind and get into work mode.
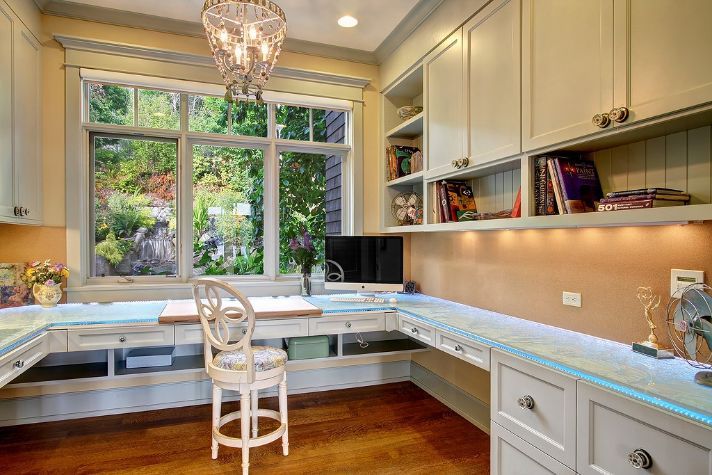
Having a designated work space is quite possibly the most important piece to the WFH pie. Even if you live in a small space, you need to find a balance between home and office. People who work from home often have a difficult time separating work hours from their non-work hours because it’s so easy to keep at it late into the night. But maintaining a balance and shutting down the computer is important for overall wellbeing. What are some other must-haves for a successful home office? Here are the top five:
- Natural Light – Study upon study tells us that natural light is needed to boost productivity and mood. Make sure to set your desk up as close to a window as you can. If being near a window isn’t an option, a natural light lamp is the next best thing. It helps balance your body clock and leaves you feelings rested and refreshed.
- To-Do List or Planner – Start each day off by making a to-do list outlining what you need to get done before the end of the work day. Make sure to set a realistic time frame in which all of that should be completed, so you can check each one off the list and feel immense accomplishment once you’ve completed them all.
- Storage – If you have a big enough space, put in a large bookshelf where you can organize everything (think storage boxes). It reduces clutter and looks stylish. Using your walls and cabinetry is the most efficient use of space.
- Calendar – Many people tend to rely on digital calendars these days because of their convenience. When all of your devices sync together and pop up with reminders, you never have to worry about missing an appointment. However, many people find that it helps to keep a paper calendar handy too so you can easily view your whole month at a glance.
- Space for Inspiration – It doesn’t matter what field you work in, having a source of inspiration in your work space is essential. Whether it’s a photo of your family, your dream car, or that vacation you’ve been dying to take, having that inspiration right in front of you provides a constant reminder of why you do what you do.
For more information on Windermere Evergreen, please contact us here.
Outdoor Living Trends
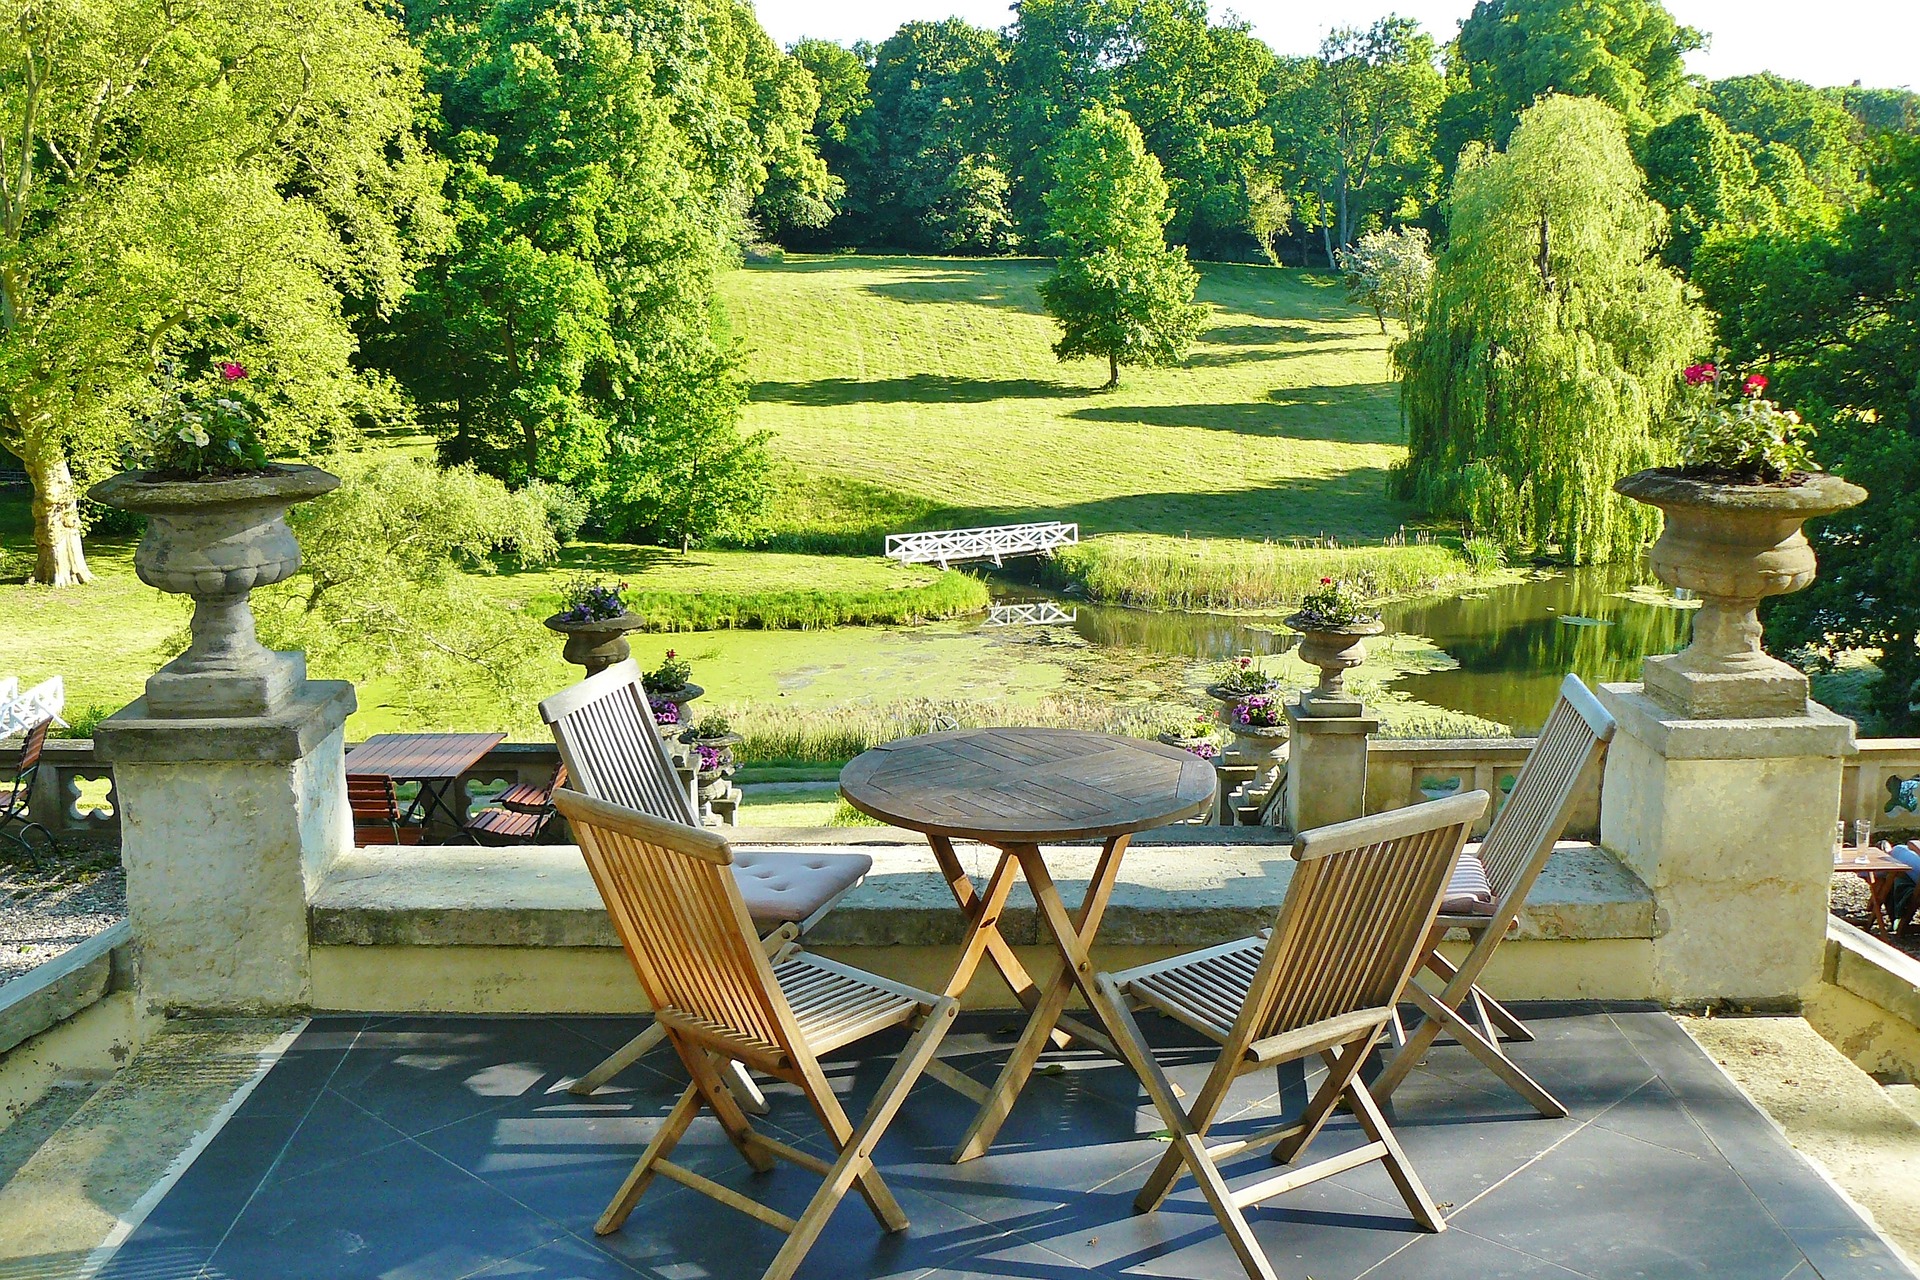
 Summer is just around the corner and there is no better way to prepare than indulging in some exciting backyard inspiration. Your outdoor living space can be more than just a place to spend time with family and friends; it can be your sanctuary as well. This year is the time to turn your backyard into your own personal vacation spot.
If you don’t have a tub already, consider adding a sunken hot tub into your backyard with a deck of natural stone, tall grasses, and outdoor curtains for privacy. Include pillar candles and some twinkling lights for ambiance.
If you entertain a lot, a kitchen is the ideal outdoor space for summer entertaining. Bring out your inner Bobby Flay with a cooking station that includes a high-end grill, refrigerator, wine chiller, and elegant washbasin. Round this all out with a concrete counter, bluestone tile floor, and stainless steel.
Nothing says summer like outdoor movies and your own personal drive-in. All you need is a projector to watch your favorite movie, some dangling lights in the trees, blankets, and pillows. You could also watch it from a hanging bench or my personal favorite, a floating bed.
Gardening can go beyond being a relaxing pastime; consider growing your favorite foods and join the “farm to table” movement. In 2012, people spent $1.2 billion more dollars on food gardening than they did flower gardening. An easy way to incorporate this is to use blueberries as foundation plants or other fruits, such as raspberries. If you already have flowers planted, tuck a pepper plant or basil in between your flowers.
A reading nook outdoors is the perfect way to get lost in your favorite book or magazine. You can convert a small shed into a private reading spot, an arbor with a bench surrounded by clematis, or a relaxing hammock. These hideaway spots are what turn your home into a staycation resort.
Is your ideal summer situated by a campfire? Build a fire pit and enjoy s’mores in the comfort of your backyard. Use an old wine barrel, bricks, stones, or a concrete bowl. A lowered fire pit is great if you want to use sand for a beachy atmosphere. On a warm summer night a campfire sets just the right mood for outdoor fun.
Having a water feature in your backyard instantly creates a Zen space. They can deflect unwanted attention by drowning out unwelcome sounds. Add a fountain, pondless waterfall, or small stream to complete the vibe. If you want a smaller commitment, a shallow recirculating foundation will also do the trick. All you need is a simple foundation and recirculating pump.
To enhance your space with little to no cost, add dangling vines or twinkling lights as a finishing touch to create your backyard haven. Time is something there never seems to be enough of, but these low-maintenance enhancements will enable you to spend that time in your very own outdoor living space.
For more outdoor living ideas, follow our Pinterest board.
For more information on Windermere Evergreen, please contact us here.
Indoor Air Quality Basics
 Most of us tend to think of air pollution as something that occurs outdoors where car exhaust and factory fumes proliferate, but there’s such a thing as indoor air pollution, too. Since the 1950s, the number of synthetic chemicals used in products for the home has increased drastically, while at the same time, homes have become much tighter and better insulated. As a result, the EPA estimates that indoor pollutants today are anywhere from five to 70 times higher than pollutants in outside air.
Luckily, there are many ways to reduce indoor air pollution. We all know that buying organic and natural home materials and cleaning supplies can improve the air quality in our homes, but there are several other measures you can take as well.
How pollutants get into our homes
Potentially toxic ingredients are found in many materials throughout the home, and they leach out into the air as Volatile Organic Compounds, or VOCs. If you open a can of paint, you can probably smell those VOCs. The “new car smell” is another example of this. The smell seems to dissipate after a while, but VOCs can actually “off-gas” for a long time, even after a noticeable smell is gone.
We all know to use paint and glue in a well-ventilated room, but there are many other materials that don’t come with that warning. For instance, there are chemicals, such as formaldehyde, in the resin used to make most cabinets and plywood particle board. It’s also in wall paneling and closet shelves, and in certain wood finishes used on cabinets and furniture. The problems aren’t just with wood, either. Fabrics—everything from draperies to upholstery, bedding, and carpets—are a potent source of VOCs.
The good news about VOCs is that they do dissipate with time. For that reason, the highest levels of VOCs are usually found in new homes or remodels. If you are concerned about VOCs, there are several products you can buy that are either low- or no-VOC. You can also have your home professionally tested.
How to reduce VOCs in your home
Make smart choices in building materials.
- For floors, use tile or solid wood—hardwood, bamboo, or cork – instead of composites.
- Instead of using pressed particle board or indoor plywood, choose solid wood or outdoor-quality plywood that uses a less toxic form of formaldehyde.
- Choose low-VOC or VOC-free paints and finishes.
Purify the air that’s there.
- Make sure your rooms have adequate ventilation, and air out newly renovated or refurnished areas for at least a week, if possible.
- Clean ductwork and furnace filters regularly.
- Install air cleaners if needed.
- Use only environmentally responsible cleaning chemicals.
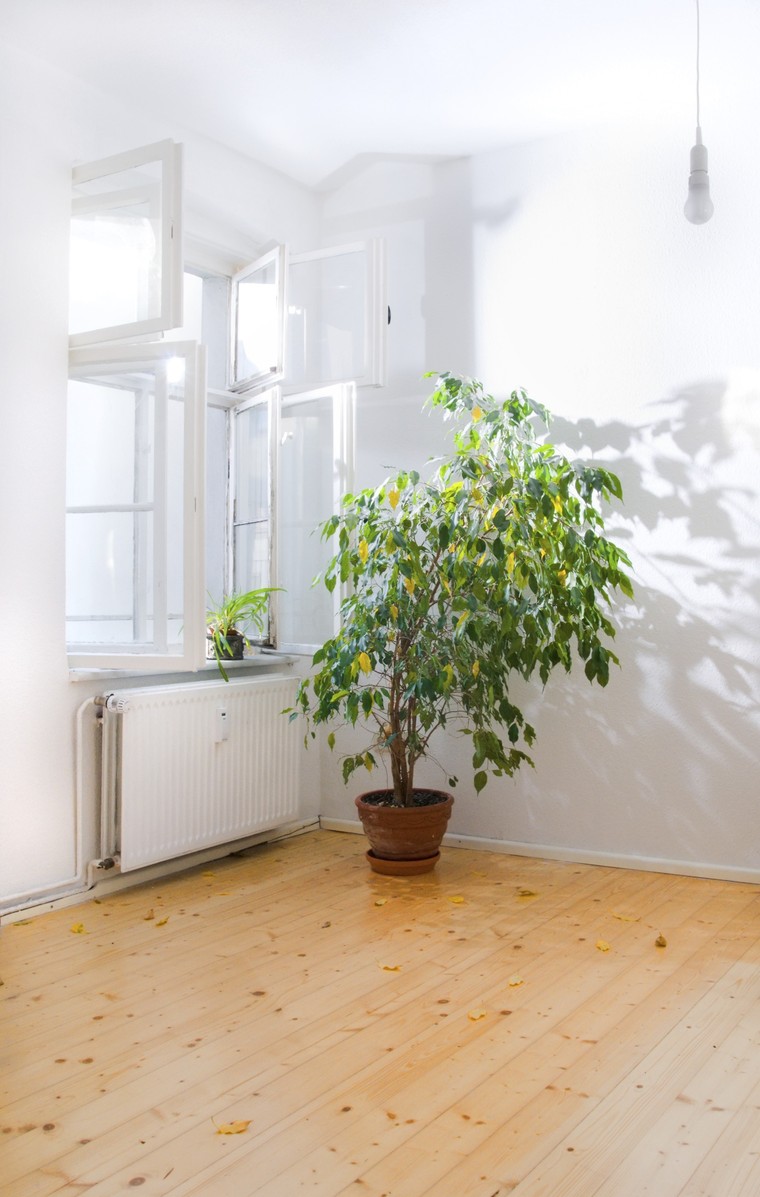
- Plants can help clean the air: good nonpoisonous options include bamboo palm, lady palm, parlor palm, and moth orchids.
- Air out freshly dry-cleaned clothes or choose a “green” cleaner.
Fight the carpet demons.
- Choose “Green Label” carpeting or a natural fiber such as wool or sisal.
- Use nails instead of glue to secure carpet.
- Install carpet LAST after completing painting, wall coverings and other high-VOC processes.
- Air out newly carpeted areas before using.
- Use a HEPA vacuum or a central vac system that vents outdoors.
Prevent Mold.
- Clean up water leaks fast.
- Use dehumidifiers, if necessary, to keep humidity below 60 percent.
- Don’t carpet rooms that stay damp.
- Insulate pipes, crawl spaces, and windows to eliminate condensation.
- Kill mold before it gets a grip with one-half cup of bleach per gallon of water.
We hope this information is helpful. If you would like to learn more about VOCs and indoor air quality, please visit: http://www.epa.gov/iaq/
For more information on Windermere Evergreen please contact us here.
6 Alternative Flooring Solutions to Refresh Your Home

Feeling ho-hum about classic hardwood floors? Here are six alternative floor solutions that can give any room in your house a fresh sense of personality, whether you’re starting from scratch or looking for an inexpensive DIY update.
1. Rubber. Often associated with commercial interiors, industrial rubber flooring can also be a sleek and smart solution for homes. Rubber is comfortable to stand on, easy to clean and durable enough to take on plenty of mess and abuse — great for an entry, a mudroom or a laundry room. From a style perspective, it gives a room a hint of an industrial edge, but in warm muted tones that still create an inviting air.
In a kitchen, a rubber floor is a chef’s dream, as it cushions the feet while the cook is standing to reduce fatigue. Plus, the textural surface reduces slipping hazards from spills and is very child-friendly. DHV Architects, original photo on Houzz
Want a rubber floor with a less industrial vibe? Choose sheets or tiles of rubber with a flat surface dyed to various hues that draw from the tones in stone tile. You wouldn’t guess this floor is rubber by looking at it, but your feet would be able to tell.
Cost: Rubber flooring can be extremely inexpensive but, in general, quality materials start at $12 per square foot. Anything below that would probably be of a quality that wouldn’t look appropriate inside a home.
2. Bamboo. Bamboo flooring is similar to wood flooring in many ways, but it imparts a Zen flair that can add a sense of peace to a room. And it is typically more moisture-resistant and hard-wearing than wood.
It should be noted that not every bamboo product is equally environmentally conscious. For one thing, shipping products from overseas can quickly make up for any carbon-footprint cost saved during production. However, if you are looking for a durable natural floor that’s sustainably grown, bamboo is a great option to consider.
It’s also worth noting that bamboo flooring can come in quite a variety of styles. A higher-contrast grain and stain can create an exotic look, for an effect that is playful and energetic rather than soft and tranquil.
If you love the look of walnut or zebrawood, bamboo can recreate that vibe with a stronger surface, and without cutting down any rare trees.
Keep in mind that the stains and adhesives involved in bamboo flooring can off-gas with an unpleasant odor, so those who are sensitive to chemicals may want to avoid the space immediately following an installation, or look at traditional hardwoods instead.
Cost: Bamboo is generally comparable in price to hardwoods, running about $2 to $8 per square foot.
3. Parquet. Everything old is new again, and while some homeowners (and many renters) are wishing away their parquet floors, others are installing them anew. These patterned wood floors add a sense of life and richness to a home, bringing visual interest and a sense of dynamic energy that typical straight-laid planks can’t match.
Installing wood in a parquet pattern also gives a lot more character to inexpensive local woods that might not have an exciting grain. For a patient DIYer, a parquet floor gives a high-fashion look with a much lower price tag than some other choices.
To give a classic block parquet layout a modern twist, use an oversized pattern in squares 12 inches or bigger. And, yes, a warm honey or orange tinted stain is back as well, especially mixed with classic modern furnishings in deep rich tones like chocolate, ruddy tan or espresso or crisp, airy whites.
Cost: Installation fees may be a bit higher than for straight-laid flooring, but the material cost can be as low as a few dollars per square foot.
See These Styles at Your Local Showroom
4. Painted. Think painted wood floors are only for cottages? As with walls, painting a floor can create as many different moods and effects as there are colors of paint. And if you choose a paint in a durable finish, it will hold up just as well as your wall paint does.
For a contemporary interior, consider a painted floor in a simple, natural hue like a muted beige or an off-white, and mix it with anything from antiques to midcentury classics or hip, trendy pieces.
You can kick up the style of a painted floor another notch by creating patterned effects that echo stone inlays, without that thousands-of-dollars investment. With a little painter’s tape and patience, this can be another great DIY approach to getting high style at home without ripping out your existing wood.
For those who do prefer a relaxed cottage air, a muted color adds a lot of charm, much like an accent wall, only underfoot. Try pale blue for a semi-neutral that will work with neutrals or other colors without clashing.
Cost: Paint and a top coat will cost a few dollars per square foot, and can be applied to existing flooring (with some good sanding and prep) or to inexpensive wood planks for a new installation.
5. Concrete. Concrete floors may sound like the domain of cold, minimalist works of architecture, but they can actually come in many forms to suit various tastes and personalities. Like wood, concrete can be stained (or tinted), allowing the material to feel quite warm and human in a way that beautifully suits transitional or traditional spaces.
Why choose concrete? Well, you can imagine that if the material can handle the wear and tear in an auto factory or warehouse, it can easily handle pets, children and sharp heels.
For an added seal and a gloss effect, concrete is sometimes finished with a coat of resin. This gallery-like look typically comes with a gallery price tag, but for those who enjoy a modern atmosphere with a perfect polish, this look is definitely photoshoot-ready.
It should be noted that concrete does not retain heat well, and thus can be chilly without a heated floor system, but extremely cozy with one installed.
Cost: With heated floors and a sleek finish, the cost can definitely add up. Your budget could range from $2 to $20 per square foot and beyond.
6. Cork. Cork flooring, like bamboo, can be developed very sustainably, making many cork products a smart choice for those hoping to reduce their environmental impact.
In the case of cork, the finish is very important to determining how water-resistant the product will be. However, cork has natural springiness that makes it feel extra comfortable (a little like rubber) and makes it resistant to dents and dings. Plus, it has a unique visual texture that’s a little like wood’s but with a twist, for a very livable sense of flair.
Cork works beautifully for sleek modern spaces or contemporary ones, as it has a natural softness that gives it a friendly vibe. If you’re considering using carpet in some rooms and wood in others, consider cork for the entire home, and get the best of both worlds along with a sense of harmony.
Cost: Cork ranges from $3 to $8 per square foot, but keep in mind that some products may require an additional sealant to hold up to moisture and possible stains.
By Yanic Simard, Houzz
For more information on Windermere Evergreen please contact us here.
Why You Should Stay Put and Improve the Home You Have
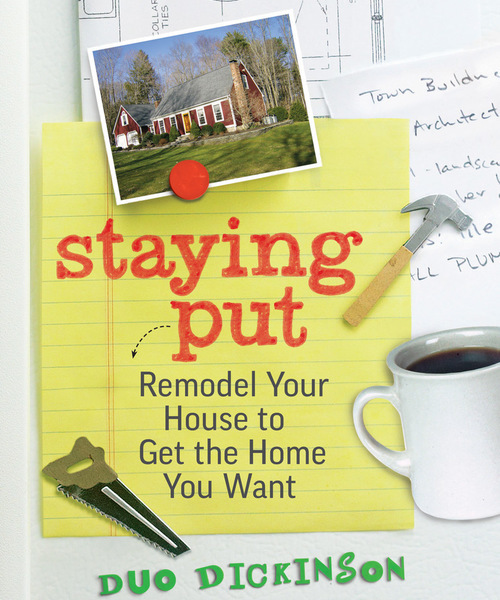

Here’s an architecture book for our times, when some homeowners are under water on mortgages, and the cycle of trading up has either stopped or slowed way, way down. In “Staying Put,” architect and writer Duo Dickinson has assembled a terrific and practical guide to help us make real improvements to our homes. Dickinson, an advocate of well-designed and affordable homes for all, has specialized in residential design for more than three decades.
This is not your typical architect’s book about design. There’s no obscure language nor design-for-design’s-sake ideas. It is a practical, down-to-earth guide that walks anyone through the rational process of how to remodel your house to get the home you want, from how to think about your house and overcoming hurdles to a list of “Duo’s Do’s and Don’ts” for the homeowner. Along the way, there’s plenty of nice before-and-after photos to help explain the points. Do read the book. You’ll be glad you did.
Staying Put 1: The Taunton Press Inc, original photo on Houzz
The cover says it all. The ubiquitous photo of a gorgeous, award-winning home that’s beyond most of us is replaced with images of a saw, cup of morning joe and a to-do list.
Are you staying put yourself? Read on for 8 of Dickinson’s suggestions.
Consider the compass points. The tips and illustrated examples are wonderfully straightforward. For example, we see a house that gets overheated, the siding degrades and the front door bakes in the sun because it all faces south.
Dickinson’s common-sense advice: Rework the front of the house with a new wide porch that shades the front door and some smaller, yet well-sized windows to create a lot more curb appeal while reducing maintenance and energy consumption. It’s a triple win: more beauty and comfort with less cost.
Avoid gutters. Statements such as “gutters and leaders are devoutly to be avoided” may sound like heresy to many, but certainly are the truth. Proving his point, Dickinson illustrates how a properly-built roof overhang can shed all the water it must without the complications, such as ice dams, caused by gutters.
Embrace small moves. Dickinson provides a wealth of simple solutions illustrated with before-and-after photos. He shows how to use small moves for big dividends, such as taking out a wall between a kitchen and a hallway to make room for more kitchen storage.
Enhance curb appeal. The book offers solutions to common problems with a particular style, such as how to improve and enhance an entrance into a split-level home.
Open up to the outside. Dickinson provides some excellent examples of how we can use modern windows and doors to strengthen the connection between inside and outside. Our homes, says Dickinson, no longer need be “later-day caves.”
Find your home. Learning more about the style of the house you have will help you avoid obstacles in remodeling and recognize the best opportunities for improving your particular home.
Open up the inside. Snippets of advice sprinkled throughout the book are like refreshing raindrops that clear the cobwebs away. One such snippet: “If you walk through a room to get to a room, something is wrong.” You know — it’s when that new great room gets added onto a modest house, and the result is some kind of dyslexic creature that’s really two houses rather than one.
So rather than even building an addition, Dickinson suggests you make the most of what you already have. In this example, widening the opening between rooms strengthens this room’s connection with the rest of the home, increasing its utility and spaciousness.
Work with what you’ve got (before): Keeping the kitchen size the same while vaulting the ceiling dramatically increases the overall spaciousness of the room, as you’ll see in the next photo.
Work with what you’ve got (after): Walls, doors, appliances and even the skylight and kitchen sink were all left where they were. This all avoided costly plumbing, electrical and mechanical work and rework.
Working with what you’ve got (plans): Dickinson has included before-and-after floor plans for many of the examples. These plans help provide that much more context, allowing the reader to better understand what they may be able to do with the home they already have.
By Bud Dietrich AIA, Houzz
For more information on Windermere Evergreen please contact us here.
6 Clever Ways to Disguise Trash Bins
 You probably don’t give much thought to your garbage cans, other than remembering to put them out on the right day. But we all have to store our trash and recycling bins somewhere, and doing so can be a challenge on a smaller property, especially if you don’t want them to be an eyesore. If you’re struggling to find a stylish way to store your bins, check out these smart and inspiring ideas. Now, is it black or green bin day this week?
Garbage Bins 1: Outhouse Design, original photo on Houzz
Choose a screen. The curved screen in the corner of this courtyard is an attractive feature in its own right, thanks to the decorative cutwork pattern, and offers an elegant way to hide ugly plastic bins from view.
By using a screen like this, you can section off as much of the garden as you need — to store bikes or garden equipment as well as bins. To blend in the structure even further, you could grow climbers up and over the screen or along the wall behind.
Related: Outdoor Chairs to Entertain in the Garden
Create a brick shelter. Built in red brick to match the house, and tiled with slate, this practical storage area blends with the property’s exterior and actually enhances the space with its character and interest. The look is mirrored in the raised bed at the front of the drive for a coordinated finish.
A custom compartment on the left neatly houses the bin, while two smaller storage compartments on the right make room for stacking recycling boxes.
Make it part of the garden. The aim of this front garden design was to create a wildlife haven, and rather than see the bins as an unsightly obstacle to be hidden away, the owners decided to make them integral to the design.
They created a sturdy wooden structure with a living roof that works as an extension of the garden and is planted with wildlife-friendly flowers and foliage.
Related: Create a Wildlife Haven With a New Bird Bath
Design it into an outbuilding. In a larger space, an open-sided outbuilding like this one is ideal for storing and hiding bins. It’s painted a heritage shade and is partly screened in front with evergreen topiary to create a visually appealing feature — a great way to smarten up a drab drive.
This idea would complement a traditional or cottage exterior, but if your style is more contemporary than country, you could choose a sleeker style, or paint it a darker shade to tie in with the exterior of your home.
Tuck it into a border. Can you spot the trash bins on this drive? They’re neatly tucked away in the wooden box to the left of this image, and the impact of the structure has been much reduced by positioning it in a decorative floral border and planting low standard trees right alongside it.
The structure also has a green roof planted with succulents to further disguise the box and make it as visually appealing as possible.
Build a clever storage wall. If space is limited, why not make your recycling containers work extra hard by turning their storage area into a boundary wall, as these smart homeowners have. This neat wooden shelter screens the bins from the road while creating a clean, contemporary-style wall.
Related: More Designer Tips to Boost Curb Appeal
By Victoria Harrison, Houzz
For more information on Windermere Evergreen please contact us here.
Energize Your Home This Winter With Bright Hues

Bright hues are eye catching, confident and cheering — so if winter’s got you feeling less than energized, why not tap into the power of bright colors to lift your spirits and your decor? Read on for 10 reasons to give bright, zesty hues a try in your home this winter.
1. Bright hues help with the whole rising and shining thing. Zingy brights are like caffeine for your space. If you’ve been dragging on these dark winter mornings, perhaps a colorful bedroom makeover would help things along. Artwork, pillows and a throw can be easily swapped out now, and again when you feel like a change.
2. Bright hues are playful. Lighten the mood at home with fun, colorful pieces, like the oversize geometric artwork and bright blue vintage rug shown in this space. Colors this bold are packed with personality and perfect in spaces where you host parties or play with your kids.
3. Bright hues are a winter palette cleanser. Been feeling oversaturated by red, green and woodsy decor? Acid brights can act as a refreshing palette cleanser. Clear away the holiday decor and start fresh with a clean, crisp pairing of white and brights.
4. Bright hues are mood boosters. Bright, bold colors are undeniably cheerful. Even if you typically shy away from bright hues, consider making an exception in the winter. The infusion of color can be a great pick-me-up!
5. Bright hues are gutsy. Claim your space and make a statement with a big decorating move, like bold wallpaper or a bright, graphic rug. Bright hues exude confidence — perfect when you are looking to make a fresh start in your life.
6. Bright hues offer contrast to the gray outdoors. Dismal weather got you down? Cheer up your foyer with sunshine yellow. Spaces with large windows can also become a bit of a downer when the skies are cloudy — refresh a living room or kitchen with sunshiny hues to counteract the gloom.
7. Bright hues bring a dash of romance. From the shiny red of London buses to the bright turquoise of a zippy Italian scooter, the colors of a place are often one of the most memorable parts of traveling. Bring back a bit of the romance of your favorite destinations with a collection of colorful travel photos on the wall. Or pick up colors from your most cherished places in smaller doses — like bright buttons on a dapper gray armchair.
8. Bright hues can help you feel more productive. Give your home workspace a jolt to keep yourself sharp and focused. Try a brightly hued desk chair or filing cabinet, or arrange your bookshelves in rainbow order. Even a vase of bright blooms and a new pen cup on the desk can do the trick!
Related: Outfit Your Workspace With Stylish Office Furniture
9. Bright hues wake up winter white. If your winter decorating scheme tends towards pure wintry whites and subtle glints of metallic hues, consider punching things up with a bright accent or two. In the space shown here, a cluster of pillows and a glamorous chandelier dripping in turquoise beads transforms a plain landing into a jaw-dropping one.
10. Bright hues give you a taste of spring when you need it most. Why wait for the first daffodils, when you can have a wonderfully bright yellow door right now? Stop trudging through winter waiting for spring, and treat yourself to springy colors today.
By Laura Gaskill, Houzz
For more information on Windermere Evergreen please contact us here.
