
 Facebook
 Twitter
 Pinterest
 Copy Link
Preparing Your Home for a Winter Wonderland

 As they say, winter is coming, and while it is tempting to curl up and hibernate in bed for the next few months, you shouldn’t put off these important home maintenance duties.
Clean and check the gutters: While you are on the roof hanging holiday lights, make sure your gutters are clear of leaves, secured to the house, and in good condition. If you do find problem spots, seal, secure, and make note to fix these in the spring. You want to divert water away from your home.
Insulate external water sources: In cold climates pipes can freeze, which can then lead to cracked pipes and flooding. Bring hoses and sprinklers inside for the winter and use insulation to wrap external faucets. Insulating interior pipes can help prevent disaster. If you don’t have insulation, you can keep a faucet dripping during particularly cold days so water is flowing through the pipes.
Check your water heater: One way to save money during the winter months is to wrap your water heater, so it doesn’t have to use as much energy to keep the water hot in a tank. You should check on your heater to make sure it isn’t leaking and in good repair regularly.
Interior insulation: Keep the heat in and the cold out with increased insulation in your attic and basement. This is an investment, and best done before the winter hits, but can make a big difference in how warm your house feels and how high your heating bill goes.
Check for cracks and leaks: Do you feel a draft? Check the sealing on your windows and doors. You can add weather stripping and silicon to seal these leaks. Foundations can leak as your home settles, so you should also check your basement for water coming through the walls, pipes, and older windows. You will want to seal these appropriately to minimize damage from flooding or mold.
Weatherize your windows: Your windows can be a great source of heat leakage depending on their age and condition. If you have older windows, you can use a clear film to help insulate them during the winter. If you don’t want to film the windows you can install extra thick drapes or curtains to help keep the interior of your home warm.
Check your heating system: What is one thing gas fireplaces, wood burning stoves, and central air heating systems all have in common? They all need to be cleaned and maintained. Check and clean your indoor heating system thoroughly. If you use an old fashioned wood stove, make sure there are no leaks and that all soot build up or nests are removed. If a furnace is what you have remember to change the filters as recommended or clean out your reusable filters.
Check your chimney with care: Nothing is as cozy as sitting by the fireplace during the winter, but use with care! Have your chimney checked by a professional to ensure that it’s in good condition and clear of critters or nests. You can also use a creosote log at the start of the season to help break down any old residue.
Invest in home security: The holidays are prime times for burglars looking to score some extra gifts so make sure your home is safe and secure at all times. Check your locks to make sure these are secure and consider a home security system with visible cameras to act as a deterrent. Keep evidence of big gifts hidden from view too. And make sure you discreetly get rid of any large boxes that might alert a prowler that you have new big-ticket items in your home.
Deck the halls and be merry: Decorate your home and prepare for guests. If you have a Christmas tree, keep it from drying out (and creating a fire hazard) by watering regularly. Keep decorative candles and menorahs away from children and flammable materials. You may want to consider battery powered candles, these can be a safe alternative to traditional candles.
For more information on Windermere Evergreen please contact us here.
Affordable Tips To Up Your Home’s Curb Appeal

 You’ll never have a second chance at a first impression, so let’s make it count! When it comes to upping your home’s curb appeal, there are plenty of small changes you can make that have a big impact. And best of all, you don’t need to call in the pros or spend a fortune to get beautiful results. Below are some helpful and affordable tips.
A Well-Maintained Yard
Mowing: The first step to a well-manicured lawn is to mow it regularly. The experts recommending mowing high because mowing it too short can damage the grass and allow weeds to set root.
Weeds: To prevent weeds like crabgrass use a pre-emergent herbicide in early spring. These herbicides manage the weeds by stopping the seeds from sprouting in your lawn. Broadleaf weeds like dandelions can be stopped by applying granular weed control products.
Feeding: Lawns consume mostly nitrogen, so look for mixes of fast and slow release fertilizers; they will feed your lawn over time while keeping it lush and green.
Watering: Nighttime watering can result in long spans of moisture on the blades, potentially exposing your grass to disease. Consider watering your lawn in the morning – the sun helps dry out the blades throughout the day.
Flowers: You can quickly and affordably dress up your yard with colorful pre-made flower pots and containers. When placing your flower pots and containers remember that asymmetrical arrangements and staggering plants will provided the liveliest setting.
Dress up the Front Door and Porch
Paint: A fresh coat of paint in a pop color can give your home a well-deserved facelift. If you are hesitant to add a bright color to your front door, check out our article Energize Your Home This Winter With Bright Hues.
Replace Old Hardware: Clean off any dirty spots around the door knob, and use a metal polish on the fixtures. Change out house numbers for an updated feel, put up a wall-mounted mailbox, or add an overhead light fixture. Keep in mind that well thought through elements, instead of mix-and-match pieces, will add the most curb appeal.
Create Perfect Symmetry: Symmetry is one of the simplest design techniques to master and is the most pleasing to the eye. Maintain symmetry by flanking your front door with two sidelights (just make sure that your hardware matches); find two urn planters or a unique visual detail to put on either side of your door.
For more information on Windermere Evergreen, please contact us here.
Colorado Real Estate Market Update


ECONOMIC OVERVIEW
Colorado added 45,300 non-agricultural jobs over the past 12 months, a growth rate of 1.7%. Although that is a respectable number, employment growth has been trending lower in 2017 as the state reaches full employment. Within the metropolitan market areas included in this report, there was annual employment growth in all areas other than Grand Junction, where employment was modestly lower. There was solid growth in Greeley and Fort Collins, where annual job growth was measured at 4% and 2.7%, respectively.
In November, the unemployment rate in the state was a remarkably low 2.9%, down from 3% a year ago. The lowest reported unemployment rates were seen in Fort Collins and Boulder, where only 2.5% of the labor force was actively looking for work. The highest unemployment rate (3.7%) was in Grand Junction.
The state economy has been performing very well, which is why the wage growth over the past year has averaged a very solid 3.3%. I expect the labor market to remain tight and this will lead to wages rising at above-average rates through 2018.
HOME SALES ACTIVITY
- In the fourth quarter of 2017, there were 14,534 home sales—a drop of 2.0% compared to a year ago.
- Sales again rose the fastest in Boulder County, which saw sales grow 17.9% versus the third quarter of 2016. There were also reasonable increases in Weld and Larimer Counties. Sales fell in all other counties contained within this report because there is such a shortage of available homes for sale.
- As I discussed in my third quarter report, sales slowed due to the lack of homes for sale. The average number of homes for sale in the markets in this report is down by 8.2% from the fourth quarter of 2016.
- The takeaway is that sales growth has moderated due to the lack of homes for sale.
HOME PRICES
- With continued competition for the limited number of available homes, prices continued their upward trend. Average prices were up 9.8% year-over-year to a regional average of $431,403, which was slightly higher than the third quarter of 2017.
- There was slower appreciation in home values in Boulder County, but the trend is still positive.
- Appreciation was strongest in Weld County, which saw prices rise 14.3%. There were also solid gains in almost all other counties considered in this report.
- The ongoing imbalance between supply and demand persists, which means we can expect home prices to continue appreciating at above-average rates for the foreseeable future.
DAYS ON MARKET
- The average number of days it took to sell a home rose by two days when compared to the fourth quarter of 2016.
- Homes in all but three counties contained in this report took less than a month to sell. Adams County continues to stand out, where it took an average of just 21 days for homes to sell.
- It took an average of 29 days to sell a home last quarter. This is up nine days over the third quarter of 2017.
- Housing demand remains strong in Colorado and this will continue with well-positioned, well-priced homes continuing to sell very quickly.
CONCLUSIONS
This speedometer reflects the state of the region’s housing market using housing inventory, price gains, home sales, interest rates, and larger economic factors.
For the fourth quarter of 2017, I have chosen to leave the needle where it was in the previous quarter. Listings remain scarce, but this did not deter buyers who are still active in the market. As much as I want to see more balance between supply and demand, I believe the market will remain supply-constrained as we move toward the spring, which will continue to heavily favor sellers.
Matthew Gardner is the Chief Economist for Windermere Real Estate, specializing in residential market analysis, commercial/industrial market analysis, financial analysis, and land use and regional economics. He is the former Principal of Gardner Economics, and has more than 30 years of professional experience both in the U.S. and U.K.
For more information on Windermere Evergreen please contact us here.
Commercial Owner/ Investment Opportunity
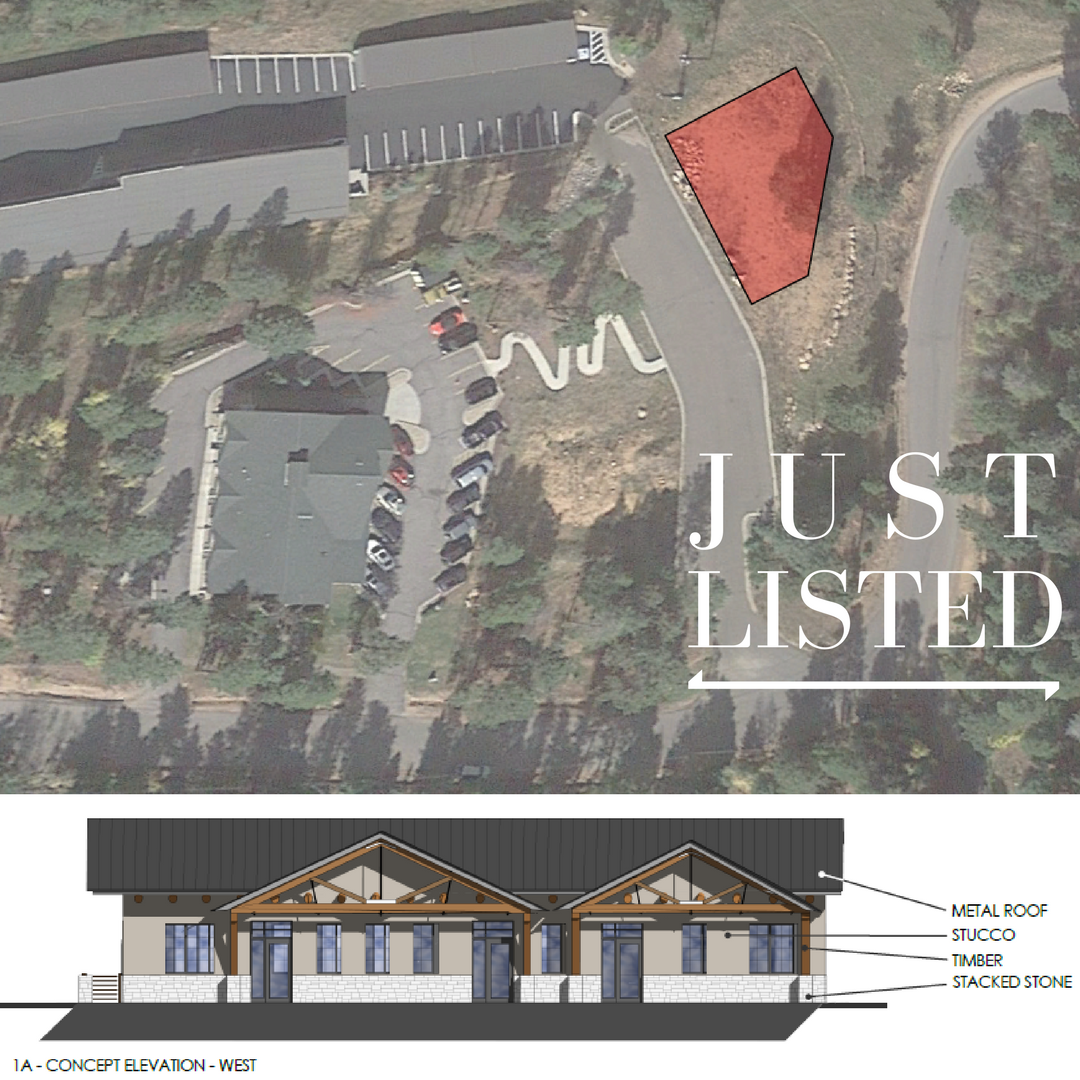

Site approved for an Office Building with 9545 square feet of office space and
2115 square feet of common space. This commercial property represents a
unique owner/investment opportunity for a variety of business, professional or
service uses. Subject property is centrally located behind Staples Shopping
Center in Conifer with easy access to and from Highway 285. Highway 285 is
the primary route from the C-470 and the Greater Denver area to the mountain
areas serving residential, commuter and tourist traffic. Current land use along
Highway 285 serves as a commercial corridor for the surrounding communities
For more information, please visit the listings website.
You may also call Holly Roberts at (410)698-2617.
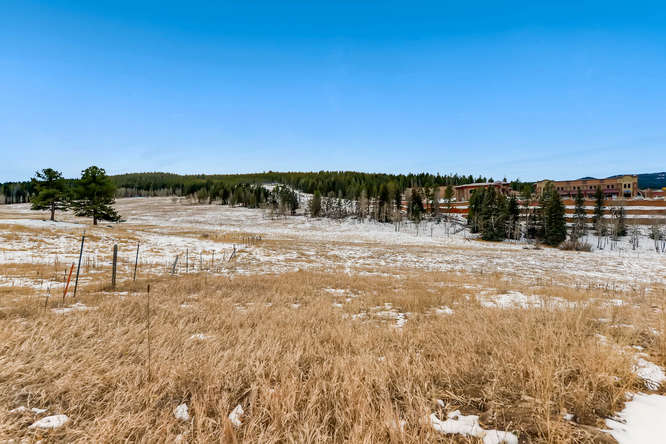
Conifer Proposed Town Home Project
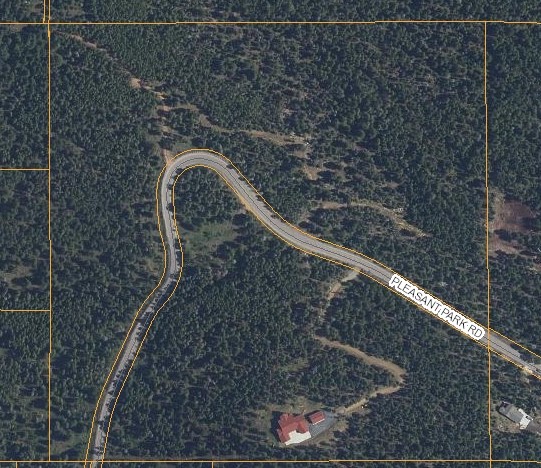
Featuring 22.82 Acres
Centrally located in Conifer, Colorado on the main 285 corridor which is the
primary route to and from C-470, Denver and local communities. This
unique 22.82 acre project has been approved for 75 Town Homes and has
all approvals and infrastructure requirements in place including water and
sewer. Located just behind the busy Flagship Safeway Shopping Center
with all of its amenities. There is unparalleled NW Mountain views and this
property is located across 285 from top rated Colorado Elementary and
High-schools. Don’t miss out on this highly sought after 22.82 Acre
opportunity!
For more information please visit, the listing website.
You may also call Holly Roberts at (410)698-2617

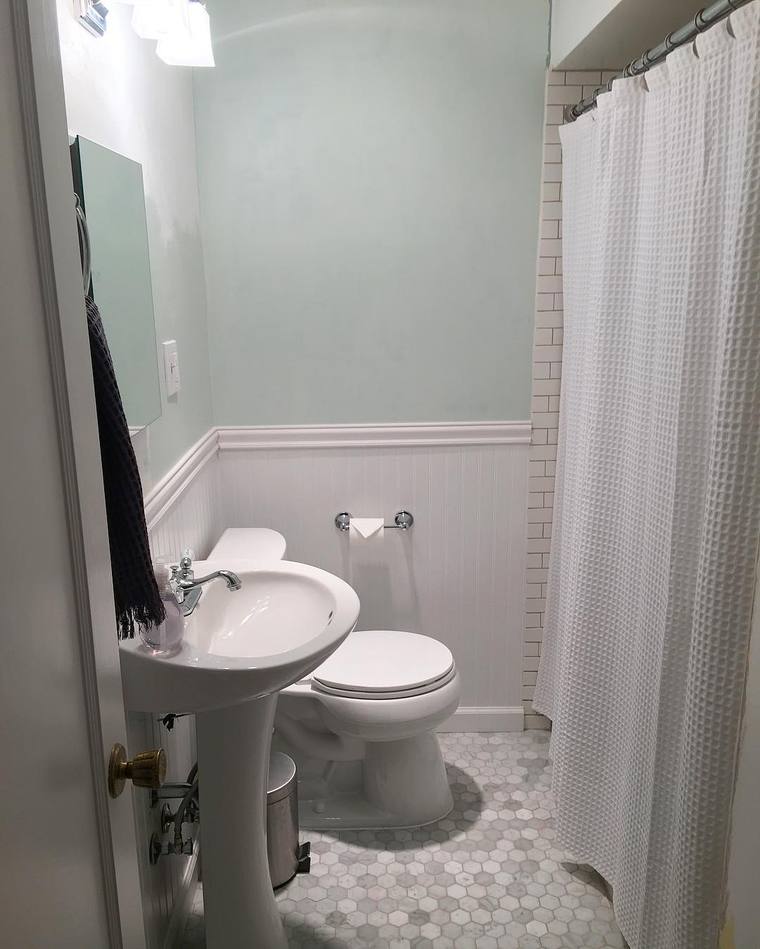
DIY: Giving Our Fireplace a Facelift


A story of a DIY project… While we were willing to do some major updates to the bathroom, plumbing and electrical, we decided to pick a few areas of our 1940s fixer to do some smaller, mostly cosmetic updates. One of these projects included giving the fireplace a little facelift to bring it into this century.
When the house was built, we believe the fireplace was a simple plaster build-out. At some point, the original owners of the home laid on these tan tiles in a decorative pattern around the fireplace. They may have added the wooden mantel piece, as well. And in the 70s, perhaps they added the black and bronze fireplace cover. Not completely sure as this home was an estate sale (which means the owner either passed away or moved into an assisted living community — and in this case, we know the owner passed away in her 90s in another home).
We were told that there is gas available on the street so at some point, we’ve love to add a gas insert for a gas fireplace and stove. Rumor has it, Seattle may outlaw burning real wood in fireplaces within the next couple of years. But that gas fireplace update will take more time, money and permits. So for now, we paint.
After the contractors left, we noticed some brown/yellow stains on the plaster facing. My wife, our resident painter, tried to paint over the stains. Even after two or three coats, the marks were still pretty apparent. We waited until we could have our young daughter, out of the house before trying to prime the fireplace with industrial strength primer. The guy at the hardware store even suggested buying a “throw-away” paintbrush for a few bucks because to get this primer off of a normal brush would take more industrial strength cleaner. Two coats of that primer stuff and voila! Stains hidden.
After the primer dried, she painted the tiles (sorry previous owners!) and fireplace face a bright white which instantly modernized the whole room. We contemplated painting the black half circle that’s part of the fireplace cover but decided against it, mostly because we had already put our paint supplies away and #tired.
The fireplace has some areas that need some grout repair and one of the tiles is cracked (and has been for God-knows how long) but this was a nice, easy win. When you’re doing home renovations, not much feels easy so three cheers for a white fireplace that only required three trips to the hardware store.
For more information on Windermere Evergreen and our team, please contact us here.
Seven Phases of Home Renovations

The 7 Phases of Home Renovations:
Phase 1: Get super pumped about an idea. Pin, pin, pin on Pinterest until you’re bursting with excitement. Tell everyone about your amazing project.
Phase 2: Collect materials. Realize things cost a lot. Begin project fueled by coffee, nervous anticipation and adrenaline.
Phase 3: Get halfway through the project. It doesn’t look exactly like your Pinterest board but it’s still cool. Realize you haven’t showered or shaved in +/- 3 days. But it’s all good because you’re 50% there!
Phase 4: There’s visible progress but it’s not totally done. It looks done on the Instagram photo though! But in reality, the project is about 85% complete and it bugs you every time you see that one grout line that needs a little attention or that one corner that needs a little touch up paint. It’s okay though, you’ll get to it this weekend.
Phase 5: Weeks have gone by. The blisters on your hands have healed. You stop noticing the grout line that needs filling or the wall that needs paint. You’re busy enjoying the house and admiring your clean fingernails.
Phase 6: Write a blog about how you’re still not done with that one bathroom you started two months ago.
Phase 7: Complete project, details included. Toast to celebrate. Post more photos to Instagram. Start dreaming of a new project. Pin, pin, pin…
Some people may say the hardest part of a renovation is starting the project. We say it’s that last pesky 5%. We’ll get it done . . . eventually.
For more information on Windermere Evergreen and our team, please contact us here.
Find your Real Estate Agent


You have many tough choices to make as you start looking for the home of your dreams and prepare to make one of the largest financial decisions of your life. Finding the right agent to represent you shouldn’t add to your worries. I’ve met a few real estate agents over the years and here are 5 tips to help you find a great one.
-
- Ask your friends and neighbors. Most consumers find their agents’ through referrals from those close to them. You’ll get real world references (good and bad) from the people you trust.
- Search your online networks. Search for real estate agents within your professional network on LinkedIn.com. LinkedIn can show you the agents who are 2nd and 3rd degree connections within your network. LinkedIn will even show you the agent’s resume and recommendations, mutual connections and offer to introduce you.
- Search local listings. Spend some time looking at homes similar to the one you wish to purchase or plan to sell on your favorite real estate website. Which agents are posting the best photos and doing the best to represent homes through their marketing efforts? Which agents are the most active in the area?
- Search Yelp. Yelp.com started as a place where people could write reviews and rate restaurants and bars. Today, Yelp has become the one-stop site for reviews of local businesses and professionals. Take a look at the highest rated agents in your area and read what your neighbors have to say about their service.
- When in doubt, Google it. When you’ve narrowed your search down to a list of possible agents start typing their names into Google. Google is a quick and easy way to see how active an agent is in the online world. If your agent has a common name include location or company search terms as well. You’ll be able to see any blogging or community activities they are involved in. You will also be able to see how active they are on real estate sites like Zillow and Trulia. Working with an agent who is active online benefits you because they are more likely to have larger networks and a greater reach with marketing efforts.
For more information on Windermere Evergreen and our team please contact us here.
Top five words of advice for a seller today


As a seller today you are faced with a challenge when it comes to selling your home for a fair price and getting it done in a reasonable amount of time. Even though inventory is lower than it was five months ago, we are still looking at about 9 months of inventory in many areas. This large amount of inventory indicates there is a lot of competition out there to attract the right buyer.
We all know there are more than five steps involved when it comes to selling your home. We asked a few of our Windermere agents what advice they would give a seller today if selling your home came down to just five key things.
Top five by Liz Talley Windermere Ballard
-
- Declutter.
-
- Refresh the garden.
-
- Clear the entry and front porch.
-
- Minimalize & depersonalize.
-
- Price it a wee bit under the competition so that it pulls in buyers.
As always, market presence, professional photos, etc. all make an enormous difference but these five steps are the key right now.
Top five by Jamie Johnson Windermere Camano Island
-
- Price. Listen to your real estate expert and don’t try to “start high.”
-
- Clean and stage. You are competing with other great deals out there. Yours needs to stand out and shine.
-
- Follow a marketing plan. Drop your price 3% every 30 days.
-
- Ask yourself – what is your goal? Most sellers have a dream of making a lot of money off the sale of their home. If your goal is to purchase another home, you will make up for your “loss” there. It’s all relative.
-
- Hire a local expert. Interview at least three agents. Do your research. A good agent will do all that for you.
If you are looking for a great Real Estate agent please contact us here.
Considering becoming a landlord? How to evaluate whether to rent or sell your property

 Over the last few years, we have seen an increase in homeowners choosing to become landlords rather than placing their homes on the market. In deciding whether or not becoming a Landlord is right for you, there are a number of factors to consider, but primarily they fall into the following three categories: Financial Analysis, Risk and Goals.
The financial analysis is probably the easiest of the three to assess. You will need to assess if you can afford to rent your house. If you consider the likely rental rate, vacancy rate, maintenance, advertising and management costs, you can arrive at a budget. It is important both to be reasonably correct in your assumptions and to have enough reserves to cover cash-flow needs if you’re wrong. The vacancy rate will be determined by the price at which you market the property. Price too high and you’re either vacant or accepting applicants that, for some reason, couldn’t compete for more competitively priced homes. Price too low and you don’t achieve the revenue you should. If you want to try for the higher end of an expected range, understand that the cost may be a vacant month. It is difficult to make up for a vacant month.
Consider the other costs renting out your property could accrue. If you have a landscaped or large yard, you will likely need to hire a yard crew to manage the grounds. Other costs could increase when you rent your home, such as homeowner’s insurance and taxes on your property. Also, depending on tenant turn-over, you may need to paint and deal with maintenance issues more regularly. Renting your home is a decision you need to make with all the financial information in front of you. You can find more information about the hidden costs of renting here.
If your analysis points to some negative cash-flow, that doesn’t necessarily mean that renting is the wrong option. That answer needs to be weighed against the pros and cons of alternatives (i.e., selling at the price that would actually sell), and some economic guesswork about what the future holds in terms of appreciation, inflation, etc. to arrive at an expectation of how long the cash drain would exist.
Risk is a bit harder to assess. Broadly though, it’s crucial to understand that if you decide to lease out a home, you are going into business, and every business venture has risks. The more you know, the better you can mitigate those risks. One of the most obvious ways of mitigating the risk is to hire a management company. By hiring professionals, you decrease your risk and time spent managing the property (and tenants) yourself. However, this increases the cost. So, as you reduce your risk of litigation, you increase your risk of negative cash-flow, and vice versa… it’s a balancing act, and the risk cannot be eliminated; just managed and minimized.
In considering Goals, what do you hope to achieve by renting your property? Are you planning on moving back into your home after a period of time? Will your property investment be a part of your long-term financial planning? Are you relocating or just hoping to wait to sell? These are all great reasons to consider renting your home.
Keep in mind that renting your family home can be emotional. Many homeowners LOVE the unique feel of their homes. It is where their children were raised, and they care more about preserving that feel than maximizing revenue. That’s OK, but it needs to be acknowledged and considered when establishing a correct price and preparing a cash flow analysis. Some owners are so attached to their homes that it may be better for them to “tear off the band-aid quickly” and sell. The alternative of slowly watching over the years as the property becomes an investment instead of a home to them may prove to be more painful than any financial benefit can offset.
In the process of considering your financial situation, the risks associated with becoming a landlord, and the goals you hope to achieve with the rental of your property, – ask yourself these questions. Before reaching a conclusion, it’s also a good idea to familiarize yourself with the landlord-tenant-law specific to your state (and in some cases, separate relevant ordinances in the city and/or county that your property lies within) and to do some market research (i.e. tour other available similar rentals to see if your financial assumptions are in line with the reality of the competition across the street). If you are overwhelmed by this process, or will be living out of the region, seek counsel with a property management professional. Gaining experience the hard way can be costly.
For more information on Windermere Evergreen please contact us here.
