
 Facebook
 Twitter
 Pinterest
 Copy Link
Summer Entertaining Guide
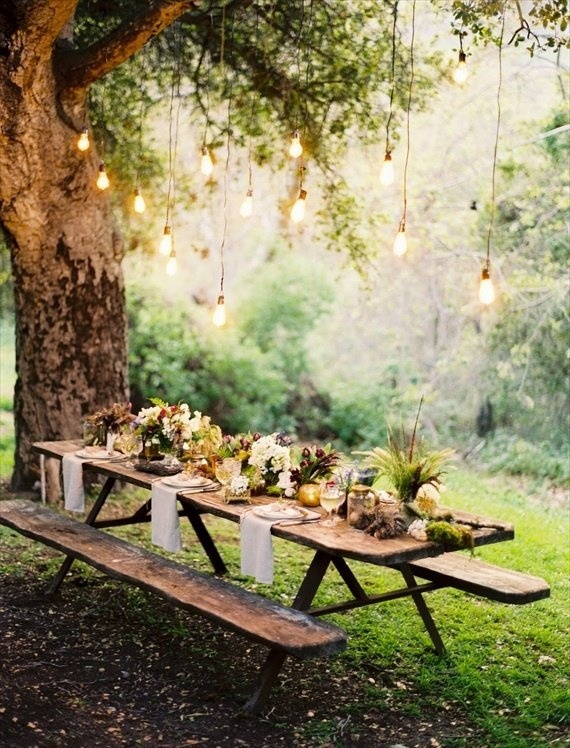
Summer will be here before we know it, and the season is ripe with opportunities for parties, barbecues, and outdoor entertaining with friends and family. To set the stage for fun gatherings, we have collected some ideas for outdoor decorating, fun party themes, and more on the “Summer Entertaining” Pinterest board. What are your tips for throwing a fantastic summer soiree?
Outdoor improvement
Add some finishing touches to your outdoor spaces to create a fun atmosphere and a touch of your personal style.

Party ideas
You don’t need an excuse for a party! Elevate your gatherings to a whole new level with these fun party ideas.

Get your game on
From Bocce to Horse Shoes, there are plenty of games for guests of all ages.

Summer safety
Keep your friends and family safe outdoors with this quick tip.

How to feed a crowd
Don’t forget to search for delicious recipes, quick BBQ tips, kid-friendly foods, and summery cocktails.

You can find more fun home decoration and entertaining ideas on the Windermere Pinterest Board.
For more information on Windermere Evergreen, please contact us here.
5 Creative Ways to Dress Up a Ceiling
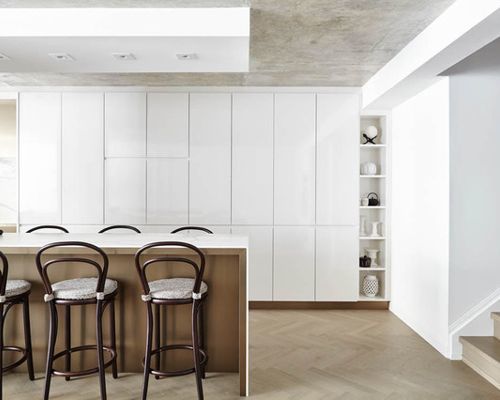

A crisp white ceiling is a classic look, but it’s not the only option for making a room look polished. Here are a few other design considerations to bring some personality to your ceiling.
The sky is the limit when it comes to the amount of creativity and beautiful layering you can put into creating a decorative statement on the ceiling. But before we discuss the many stylish or unusual treatments to consider, let’s start with a classic finish you’ve probably seen before.
Ceiling 1: Toronto Interior Design Group | Yanic Simard, original photo on Houzz
Exposed Concrete
In my own design projects, I find many clients are excited to remove a popcorn ceiling treatment, and this is usually my preference as well. The results can be subtle, yet striking.
In some cases, the results can be dramatic. Removing a popcorn ceiling, and the entire drywall layer above, can often reveal architectural finishes, such as a cool concrete surface.
An exposed concrete ceiling gives a room a bit of industrial, architectural flair, adding drama and texture in a modern way. Of course, not every home has a concrete ceiling to reveal, so it’s important to speak with your designer or contractor before making any plans.
It’s also important to note that stripping a ceiling back to the concrete will leave no space for recessed ceiling lights. For this reason I usually include an area of dropped ceiling to allow potlights, define a gathering space or focal point and visually break up the look a bit.

Ceiling 2: Victoria Gerts, original photo on Houzz
Flat Drywall
From my experience, the most popular contemporary ceiling style is the simple flat drywall ceiling. If a room includes other sound-absorbing materials like rugs, curtains or a fabric headboard, you can skip the acoustic ceiling treatment without worrying about echoes.
As I mentioned before, it is not always easy to achieve a perfectly crisp drywall ceiling, but skilled tradespeople can install either a new drywall ceiling or scrape the texture paint from an existing ceiling to reveal a much more sleek, modern surface.
Trimming a ceiling with crown molding painted to match the ceiling hue is a great alternative way to hide subtle imperfections in the slope of the ceiling and achieve a bright, airy, classic look.

Ceiling 3: Jade N Timmerman Interiors, original photo on Houzz
Paint
A drywall ceiling doesn’t only come in one shade, so while we’re discussing this finish, let’s touch on some differing paint choices.
White. A white or just-off-white ceiling is popular because it’s a great way to make any room feel open and airy and let light bounce from any windows or light fixtures back into the room.
For a contemporary or modern home, plain white can work great, but for a more traditional home or a space with definite warm tones (like this room with a lot of welcoming beige), choose a subtle off-white that complements the tone of the walls.
For a fun, trendy take, cheat the ceiling line a bit by starting the ceiling paint 12 to 24 inches down the wall (or only painting the walls up to that point, whichever way you think of it). The result is a breezy modern effect without using any bold hues or new materials.
Gray. Using a darker hue on the ceiling than on the walls visually brings the ceiling down, which can make a room feel more intimate.
Using a neutral gray shade (or one with a hint of cool blue) achieves this effect without drawing too much attention, so the room still feels serene and sophisticated.
This makes gray a great choice for bedrooms, dens and nurseries, bringing a peaceful, cozy atmosphere.
Accent colors. For a room with a unique personality, adding an accent color to the ceiling infuses a lot of drama in an unexpected spot.
I won’t lie: As a DIY task, painting the ceiling is not nearly as easy as painting a wall, and even for professionals it usually requires the room be fully emptied first. So, it’s best to be absolutely sure that you love a hue before applying it to the “fifth wall.” The upside is that the ceiling is often a relatively small surface area, meaning that splash of color is a more controlled dose than painting the walls.
While a painted ceiling is immediately noticeable in a room with stark white walls, when a room has a lot of interesting and eclectic finishes on other surfaces, a rich hue can actually blend in better than a white ceiling. It’s a daring look for sure, but for those who love a lot of personality in their home, a colorful ceiling can be a very livable choice.
For the best of both worlds, a navy, deep teal or royal blue shade will feel dramatic but still appear neutral enough to not overwhelm you.
Matching ceilings and walls. Painting the ceiling to match the walls may sound overwhelming, but sometimes it can actually be the more subtle choice. When the ceiling and the walls (or even just a few walls) are the same hue, the lack of contrast makes the ceiling less of a dramatic feature and more of a singular background color. Of course, this applies best to softer hues like gentle pink, watery blue or heritage butter yellow.

Ceiling 4: Toronto Interior Design Group | Yanic Simard, original photo on Houzz
I personally match the ceiling to the walls quite often when using light neutral shades. While it may appear white on your screen, the walls, ceiling and molding in this project are all Benjamin Moore’s Classic Gray, a subtle, warm gray shade. In an older home, using an all-over hue is a great way to deemphasize imperfections such as sloped ceilings that don’t meet walls in a perfectly straight line.
Two-tone paint. Using a dark or dramatic paint color on the ceiling doesn’t have to be an all-or-nothing decision. Like the opposite of an area rug, painting just part of a ceiling can help define a particular zone. Lining up the edge or edges with another element in the room will help it make visual sense.
Paint Finishes
Semigloss. The higher the degree of gloss in a paint, the more visual depth it will have and the lighter the perceived color will be. So, when choosing a darker shade especially, selecting a semigloss or more subtle satin finish can make a color seem less aggressive and more multidimensional and help keep the paint from absorbing all of the light in the room.
Matte. Matte and eggshell finishes represent the less-glossy end of the spectrum, and thus reflect less light. This will make a color seem more pure and vivid, and a bit darker. For those who don’t want to shy away from a rich statement, a matte finish gives a crisp contemporary look.
Gloss. Ultra-high-gloss paint is not easy to apply to a ceiling because it has a slower drying time and thus lots of opportunity to drip or become uneven. But it’s not impossible for expert professionals, and the results can be stunning, especially when paired with sparkling ceiling fixtures and beautiful natural light.
Alternately, a “stretched ceiling” uses a layer of high-tech material suspended just below the true ceiling to create a gloss effect (or other finishes) that paint alone cannot achieve.

Ceiling 5: Legacy Custom Homes Inc, original photo on Houzz
Paneling
Wood planks are most often seen on the floor, but they look just as beautiful above.
While wood-paneled ceilings are often associated with cottages and farmhouses, they can work with a variety of styles of home. Panelling works well for transitional homes, especially in controlled doses like the small strip seen here, bringing texture and richness to the ceiling that a solid color can’t match.
Generally, thinner strips of wood, and species with more knots, will appear more cottage-inspired, while wider planks or sheets, often with a less-grainy finish, will carry a more modern appearance.
Both types work well in kitchens with airy white or off-white cabinetry, taking a classic “white kitchen” and giving it added warmth and a natural appeal.

Ceiling 6: Buchanan Construction, original photo on Houzz
Pressed Tin
While these panels are not necessarily made from tin, the pressed-tin look endures as a charming option for traditional kitchens, or contemporary or transitional kitchens that want to add some classic flair.
These panels can be visually quite dominant with their glam or antiqued finishes and busy patterning, so they work well in rooms with otherwise simple palettes, or as a small accent over an island or seating group.
To keep the look fresh and bright, try using classic tin panels with stainless steel appliances, so the primary metal tone repeats and the room feels cohesive.
For more information on Windermere Real Estate and our agents, please contact us here.
Outdoor Living Inspiration


Can you believe that it’s already the middle of February? Summer is just around the corner and there is no better way to prepare than indulging in some exciting backyard inspiration. This year, turn your backyard or patio into the ultimate hangout. We’re talkin’ friends-never-want-to-leave kind of spot. Here are some ways to make that happen:
Sunken Hot Tub
We know what you’re thinking; hot tubs are so 80s. Not anymore! Consider adding a sunken hot tub to your backyard with a deck of natural stone, tall grasses, and outdoor curtains for privacy. Include pillar candles and some twinkling lights for added ambiance.
Outdoor Kitchen
If you entertain a lot, an outdoor kitchen is the ideal space for summer entertaining. Bring out your inner Tom Douglas with a cooking station that includes a high-end grill, refrigerator, wine chiller, and elegant washbasin. Round this all out with a concrete counter, bluestone tile floor, and stainless steel.
Outdoor Theater
Nothing says summer like outdoor movies, so why not create your own personal drive-in? All you need is a projector to watch your favorite movies, some dangling lights in the trees, blankets, and pillows. You could also watch it from a hanging bench or a floating bed. Get über creative and buy an inflatable flat screen for your pool area and turn it into a full-fledged theater, inflatable lounge chairs and all. This way you’ll never have to choose between movies and precious pool time.
Tiki Bar
Before you say no, say yes. Tiki Bars are entirely underrated; we think they’re the quintessential piece to any stay-cation. If you’re going for a tropical retreat feel, this is the place to start. Just don’t forget the hanging lanterns, bamboo, and ice-cold margaritas.
Fire Pit
Is your ideal summer situated by a campfire? Then add a fire pit and enjoy s’mores in the comfort of your own backyard. It’s easy to make your own. Use an old wine barrel, bricks, stones, or a concrete bowl. A lowered fire pit is great if you want to use sand for a beachy atmosphere. On a chilly summer night a campfire sets just the right mood for outdoor fun.
To enhance your space with little to no cost, add dangling vines or twinkling lights. And a splash of color here and there immediately changes the vibe. Choose one or all of the ideas above and start planning your debut party!
For more outdoor living ideas, follow our Pinterest board. For more information about Windermere Evergreen, please contact us here.
Is a “home exchange” vacation right for you?
 It is finally summer; time for barbecues, summer camp, and family vacations. In recent years we’ve heard of people shortening their vacations, staying closer to home, or going nowhere at all for “staycations”. Another way to save money, while still getting away, is to leverage your own home for a home exchange.
A home exchange—often called “house-swapping”—is a money-smart vacation idea that’s been around for a long time. With virtually everyone feeling the economic squeeze, some exchanges are more popular than ever before.
Why a home exchange? Since accommodations are usually the priciest part of a vacation, a home exchange saves money, allowing travelers to take longer vacations and perhaps splurge a bit on dining, tours, or shopping. Larger families appreciate how homes meet their needs for space, meals, and a good night’s sleep. And, home-swappers often say they enjoy “living like the locals,” especially when traveling internationally.
How it works. The basic idea of a home exchange is that two families agree to live in each other’s home (usually at the same time) at no cost—it’s considered an even trade. Exchangers find one another via home exchange website that provides detailed listings of available homes. Exchanges take place within the United States or internationally, and the length of stay is whatever the parties agree upon. Exchangers typically do not meet in person but get acquainted via phone calls and emails before the exchange happens. Details, including pets, the use of a car, and cleaning are all agreed upon ahead of time, usually in a written contract provided by the website.
What makes a house desirable? You might be surprised! As a general rule, home exchangers are looking for location, location, location. They want to explore attractions in your area, attend an event, or visit family. A beachfront house in California is highly desirable, as is a condo in an exciting city—and even a home in the suburbs will appeal to the right travelers. Because swappers are primarily looking for a convenient jumping-off point for their adventures, your home’s age, floor plan, and furnishings don’t matter too much, as long as it’s clean, comfortable, and accommodating.
Vacation homes are ideal. Whether it’s a rustic cottage on a secluded fishing lake or a condo at a popular ski area, a second home is ideal for exchanges. Logistically, you don’t have to vacate your primary residence, and you have more flexibility as to when the swap can happen. For this reason, many retirees—who often own second homes and enjoy freer schedules—find home exchanges especially appealing.
First steps. If you’re intrigued, start by exploring a few websites; you can view a lot of information for free. Home exchange websites typically charge an annual membership fee of $50 to $100 to list your home. If you decide to join a service, you’ll provide several photos and a detailed description of your home. You’ll also post your desired destination(s) and travel dates, and you’ll be able to peruse the homes that meet your criteria. It’s common to trade information with several homeowners before finding just the right match, and the process may take several months.
Focus on the basics. Once you’ve agreed to an exchange and are preparing your home for guests, think about what makes a hotel room enjoyable. A clean, clutter-free home is universally appealing, and comfortable mattresses and attractive bedding are a must. Your kitchen should be well organized, and internet access is a big plus. Your guests know they’re staying in someone’s home, so don’t worry about scuffed baseboards and well-worn furniture. Likewise, don’t expect five-star accommodations when you step into your host’s home.
Is a home exchange right for you? If the very thought of others living in your home and sleeping in your bed—or you in theirs—makes your palms go clammy, an exchange is probably not for you. But many travelers are hooked!
What are your summer vacation tips?
For more information on Windermere Evergreen, please contact us here.
Fear of Commitment? Choosing the Right Colors for Your Home

 One of the most frequent questions interior designers hear is how to choose colors for a home. We all love color, but some people are afraid of using color in their home. Many find they fear committing to a certain color scheme or making a mistake after it is all done. Here are some ideas to help to get you started.
To try to determine just what colors to use in your home, look in your closet! You’ll see the basic wardrobe classics in there: black, brown, navy, beige/khaki. Those colors are neutrals and very applicable in your home color scheme. Now, check out the colors hanging there, too. Unless you are a serious fashionista, a certain color or two will emerge as a standard in your color preference repertoire. Even prints will feature similar colors. These colors are a great place to start to help you decide what colors to use in your home. If you love wearing certain colors and feel good wearing them, you will enjoy seeing them throughout your décor.
Lest you feel the need to paint an entire room tomato red (or whatever color you find that you prefer), just paint the walls a nice warm taupe or other neutral that you like and use the tomato red as an accent color with some of your accessories such as throw pillows, lamp bases, art on the walls or throw rugs. You can even practice with some inexpensive items you might find at a tag sale or discount store before you commit with higher priced items. Give it a try and don’t be afraid to keep working at it. For more information on Windermere Evergreen, please contact us here.
Oh My Aching Back: Cabinet Heights to the Rescue

 When approaching a kitchen or bath remodel or new construction, you can make things a lot more comfortable by getting creative with the heights of your base cabinets.
Standard heights traditionally have been 36” tall (including the thickness of the countertop material) for kitchen base cabinets, and 29” – 30” tall for bathrooms. These heights are good overall, but are surely not set in stone and can make life a lot more comfortable with some tweaking.
Consider the users’ heights when deciding on cabinet heights. If everyone in the household is tall, consider having the main area of the kitchen raised an inch or so. Chopping will be much more comfortable that way, and it will help avoid arm and back fatigue. If household members are various heights, consider having one area raised higher and another area at the standard height. If you have someone who requires lower heights, such as a wheelchair user, consult a design professional to assist with their particular needs.
In the bathroom areas, consider the primary users when determining the best heights. The master bath would likely serve adults, so having the base vanities at a taller 34” height will help to avoid stress on the users’ backs when utilizing the sink for face washing and tooth brushing. If a child uses the area, keep a small step stool handy for those times. A main hall bath outside the children’s rooms could have the standard height. If the children are a bit older (and taller) and you intend to remain in the home longer than a few years, consider the taller height there too for when the children are taller, as they do grow quickly!
Just a few adjustments can make for happy backs, and aren’t difficult at all to achieve if you plan ahead. For more information on Windermere Evergreen, please contact us here.
Follow the Direction in Which the House Is Growing

 When you first move into your new home, it is likely you will have a list of items you must change right away, to fit your design and practical needs. As far as your landscaping goes, I recommend that you maintain what you have for at least one full year—the entire growing cycle of everything in your lot. This way you may avoid chopper/whacker/digger remorse: “Oh, I wish I’d known that was a flowering syringa (lilac) and not just a weedy-stick-y looking thing.” Additionally, if you begin planting right away, you won’t really know your micro-areas and could well be pulling dead, stick-like plants, shrubs, trees which you only recently purchased. It takes a bit of self-control to avoid that initial “clean-up” and planting frenzy, but you may thank yourself eternally if you can hold off.
During that first year of restraint, watch the pattern of the sun across your lot/land, learn the irrigation system or lack thereof, note shady, sunny, dry, wet, windy, catbox, and understory areas. Note the neighbors’ yards, and see what works and doesn’t, and what you like and don’t. If you are so inclined, keep a gardener’s notebook with your observations.. Decide what you want your lot to be, and what fits into your lifestyle. Whether you are a retired, full-time master gardener, or an organic gardener, or you “just wanna bbq and kick-back”, there are landscapes to fit your ideal. Developing a plan for all of your “yard-rooms”, as 20th century British gardener Gertrude Jekyll named the various areas of the yard, is a comprehensive approach. Where do the kids play? Where are the garbage/recycle bins stashed?
Think about traffic patterns—where do you want paths, seating areas, and garden beds. Also consider “hardscape”: walls, fences, garden structures, screening from neighbors, and parking areas.
A well-planned landscape enhances the value of your home and lets you extend the walls of your home from lot line to lot line.
For more information on Windermere Evergreen, please contact us here.
Here’s Your Spring Maintenance Checklist

 Now that spring has sprung, let’s clear the cobwebs and get your home ready! Here is our quick guide to spring home maintenance:
Inspection top to bottom: Now that the weather is temperate you will want to check on how your home weathered the winter. Check the roof for leaks, the gutters for damage, and the siding for cracks. You will also want to inspect your basement or foundation for any shifts. Make repairs now to prevent further damage.
Clean out the gutters: April showers bring May flowers… so clear out the gutters to keep rain from pooling on your roof or near your foundation.
Pest control: Spring is mating season for eight legged critters, so sweep out cobwebs, clear debris, and check the nooks and crannies. If you live in an area prone to dangerous species like brown recluse or black widows, you may want to contact your local pest control, but otherwise household spiders do help eliminate other bugs.
Check your basement and attic for signs of other infestations. For more information on pest control go here: http://www.windermere.com/blogs/windermere/categories/living/posts/when-things-go-bump-in-the-night
HVAC system: If you have an air conditioner now is the time to check to make sure it is ready before summer gets here and everyone else is clamoring for maintenance. Now is a good time to check your home air filters and replace or upgrade to keep allergens at bay.
Clear the clutter: Do a sweep around the house and get rid of junk that you don’t use! Take a little time each week to tackle a room. Closets, playrooms, and basements can be especially daunting, but getting rid of old stuff and refreshing your space will go a long way!
Deep clean: On a nice day open the windows, dust, wipe, scrub, and clean. You will get a nice work out and your home will look and feel so fresh after a winter of being cooped up.
Update your décor: Add a splash of color to your home with small embellishments. Add a colorful vase, a lighter throw for your sofa, pretty pastel pillows, or spring-time candles, to upgrade your living space.
Take it outdoors: Let your throw rugs, curtains, and other tapestries air our outside. Shake off the dust, spot clean what you can and let everything bask in the sun for an afternoon.
Don’t forget the back yard: It may not be time to start up the grill, yet, but you can get started on your outdoor entertaining checklist. Check your lawn, and if you have some spare spots start filling in with seed. Check your outdoor plants, prune, plant bulbs, start to replenish soil for your garden, and mow, so you are ready to start when the season allows.
Speaking of the grill – if you have a gas grill you will want to pull this out and perform a maintenance check. Clean everything up and check to make sure all the gas lines are clear, as these can get clogged after sitting idle all winter. Make sure the grill is clear of spiders too, as they can build webs in the tubes, causing damage to your grill. You can start to bring out your garden furniture too, or clean it up if you left it covered outside all winter. Because before you know it, it’ll be barbecue season!
For more information on Windermere Evergreen, please contact us here.
How to Style Your Bookshelf


Whether you have a library full of books or only hold onto a few favorites, a bookshelf is one of those furniture pieces most homes are guaranteed to have, and yet, few have them are properly “styled”. We have some easy DIY tips that will transform your shelves, while still allowing your books to stay center stage.
Start with a blank canvas. Take everything off your shelves before you decide to start putting your books back on.
Mix it up. Don’t have all of the books vertical or horizontal (but never stack anything on top of vertical stacks). Layer them on top of each other in different ways on all of the various shelves. Bigger books on bottom of stacks, smaller ones on top. Place your most attractive books at eye level.
Accessorize. Add items in between, in front, and on top of books. This can mean collectibles, candles, small plants, pictures, you name it. You can use a variety of shapes and sizes, but try to keep all non-book items to the same theme/color.
Leave Space. Adding just a little bit of space between items gives space for the eye to breathe and helps your book and collectibles to stand out.
Little details. Don’t follow the same pattern on each shelf otherwise it could end up looking too stiff. Try to zig-zag your way down (or up).
Add color. If you’re ready for a full-fledged redo, paint the back of the bookshelves to add dimension and character before styling. If you don’t want to permanently color your bookcases, try fabric or wallpaper. For example, if you have glossy accessories, choose a metallic wallpaper to turn your bookshelf into a shimmering showpiece.
Have too many books or don’t feel like accessorizing? No problem. Color code your books ROYGBIV style to make a bold and fun statement in your room.
For more information on Windermere Evergreen, please contact us here.
How to Decorate a Rental


Abiding by rental rules is important, but so is style and making a house feel more like a home. Thus, we’ve put together a little list for you to help personalize your home, while still insuring you get your security deposit back by the end of it.
Storage – Let’s be honest, rentals often lack sufficient storage place, and since custom cabinetry isn’t usually an option for renters, investing in some added storage is key. Add some simple shelves, bookshelves, baskets, or under the bed storage.
Blinds – Vertical blinds may be the ultimate decorating sin. No one likes feeling as if they’re living in a motel room. We suggest you either take them down or hide them under curtains. Just don’t throw them out or you may not get your security deposit back!
Accessorize – Pillows, throws, candles, books, light fixtures… the only way to get a truly genuine space. This is by far the easiest and a MUST.
Wall Art – Those pesky holes might keep you from hanging art or photos on your walls, but when it comes down to it, they’ll only take a few minutes to patch up when it comes time to move out. This doesn’t mean you have to hang an entire art gallery, but hanging one statement piece and placing the rest of the photos on a mantel or shelf should do the trick.
Rugs – Last but not least, rugs: the peanut butter to your rental jelly. If there are scratched hardwood floors or stained carpets, you can cover those up easily with a throw rug. Not only that, a rug is a great investment piece that will add your personal flavor to any space. And they absorb noise and make a room feel comfy.
For more information on Windermere Evergreen, please contact us here.
